
Symmetra In-depth Strategy Guide
( FP's Overwatch Strategy Guide )
 Story
Story
Symmetra is an architect from India who has the unique ability to bend
light energy to construct the world around her. She used this
ability to construct cities made of hard-light technology for her
nation's displaced population. Being the best at what she does,
she was taken in by the Vishkar's architect academy to further enhance
her light bending abilities which she now uses as her weapons for
Overwatch.
Play Style
Unlike other support heroes in Overwatch, Symmetra doesn't heal her
teammates but rather uses her light bending abilities to construct
weapons and shields to protect her allies. Symmetra typically
places Sentry Turret defenses in various rooms or areas to hold back her
offensive opponents while staying back with her team while firing photon
orbs at her enemies. Symmetra's Photon Orbs can strike through
anything in its path, including shields, which works great against
Reinhardt and Winston's shields. In short range she has a short photon beam
that gets stronger the longer it is connected to an enemy. Her
photon beam isn't overly powerful but it helps Symmetra rev up her
ultimate. Symmetra's ultimate Teleporter is a game changing
ability that allows you and your team to teleport back to the fight
faster after dying. Getting your team back to the fight faster
after death means much less downtime and can easily turn the tide of the
battle in your favor.
Weaknesses
Symmetra's weakness is her lack of mobility to escape from enemies and
to seek health packs. Unlike other support heroes she does not
heal her teammates, even though she can give each of her allies a 25 hitpoint shield. Because of this, having another healer support on
the team makes sense. Symmetra's short range beam makes her not so
effective in close range and she will have to watch out for all the
offensive heroes in Overwatch.
Name: Satya Vaswan
Difficulty: Medium
Role: Support
Age: 28
Occupation: Architect
Base of Operation: Utopaea, India
Release Date: 10-27-2015
Base Hitpoints: 200 (100 of it is shield)

Main attacking weapon Symmetra's weapon emits a short-range beam that homes in on a nearby enemy, dealing continuous damage that increases the longer it is connected.
Ammo: 100 |

Symmetra's Photon Projector's primary fire increases one level per second while it's connected to an enemy. The first level happens instantly upon firing (even if you don't have a target), it will take 2 seconds of firing on an enemy to reach the max level of 3. It will slowly revert back to level 1 if you lose contact with the beam for any amount of time or if you need to reload. When not targeting an enemy, it takes about 4 seconds for the Photon Projector to go from level 3 back to level 1. Because of this, it's important to keep up with your reloading so you can take advantage of the sustained level increasement of your photon beam. Each level up will also increase the visual width of the beam. The Projector Beam cannot penetrate through shields. The level indicator is shown on the gun itself:
Beam OFF:
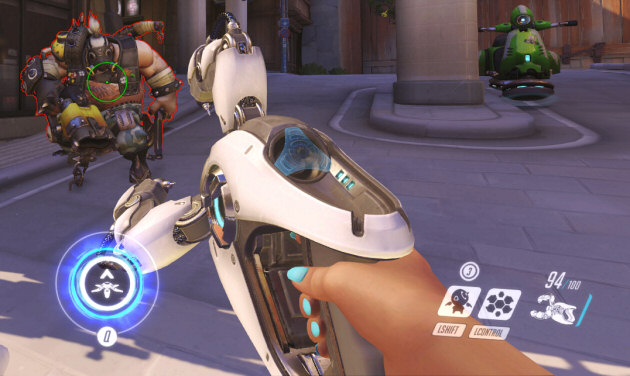
Level 1 Beam indicator:

Level 2 Beam indicator:
Level 3 Beam indicator:
Take advantage of the self aim
One advantage of the beam is that it's self aiming. As long as you have an
opponent within view (and range) the beam should connect to your target. This
means you should take advantage of this and make yourself a hard target to hit
by jumping and strafing madly around your enemy. Just remember to keep the
enemy within view so you take full advantage of the level increments for your
beam.
General use
Overall the photon beam can be very powerful when close to enemies, but
remember the range for it is not very
long and the damage output is a tad on the weaker side even with the level
increments. Even though the projector beam can be useful for gaining
ultimate charge and protecting yourself in close range, most of the time you
will be
staying in the backlines with your team while firing photon orbs..
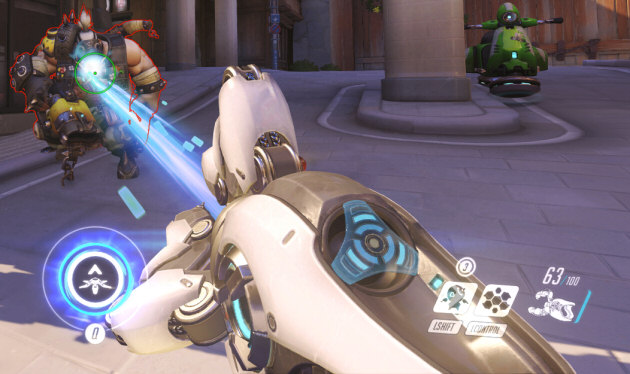
Main attacking weapon The projector can also release a charged energy ball that deals high damage. Ammo: 100Charged Ammo Usage: 20 Charged Damage: 25 - 125 Max Charge Time: 2 seconds Reload Time: 1 second Range: 7 meters Headshot?: no Additional Key: RM - NOTE: Pressing RM again will cancel a charged shot |
Photon Orbs is Symmetra's main means of dealing damage from a distance while gaining ultimate charge. Photon Orbs is the only thing in Overwatch (besides Reinhardt's Fire Strikes) that can pierce through and damage all targets in its path, including shields. Because of this, Symmetra is a great counter to enemies that use shields.
Non Charged Orbs Vs Fully Charged Orbs
Fully charged orb shots do about 33% more DPS overtime than quick non charged
shots. Charged up orbs are bigger and also have a larger hit area than
orbs not charged up that much. According to my
DPS chart,
half-way charged orbs do only slightly less DPS than fully charged orbs.
This means you should consider letting orbs go even before they get fully
charged more often. Non charged orbs proved to be very weak in DPS however.
 Charge
indicator
Charge
indicator
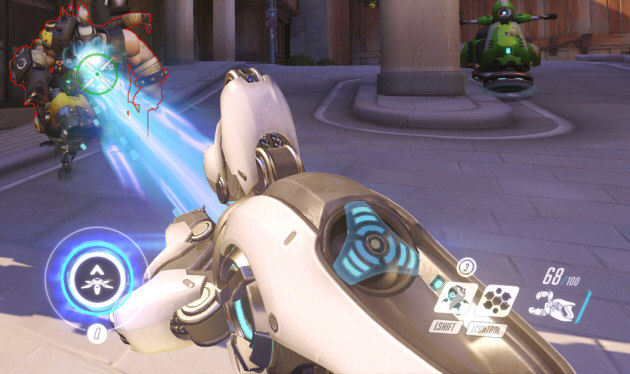
When
charging up a Photon Orb, it will reach its max charge before the game fires it
for you. This means that you can fire fully charged orbs more often than
if you were to wait for the game to fire them for you. The Orbs will reach
max charge when both of the circles in your crosshair meet with each other.
The animation on the right shows when it reaches full charge, but I made it so I
waited until the game fired for me:
Symmetra's Photon Orbs is a great counter to:
- Reinhardt's shield - Symmetra is a strong counter to Reinhardt for this very reason. Photon orbs will fly right through Reinhardt's shield and then damage all enemies behind it. Because Reinhardt also moves slow when he has his shield out, it will be difficult for him to dodge the photon orbs.
- Winston's Barriers - Photon orbs can penetrate right through Winston's Barriers and hit any enemies inside the barrier.
NOTE: Photon Orbs will still strike through Zarya's Particle Barriers, but the barrier will absorb the damage making Zarya's gun stronger. One fully charged Orb will give Zarya +50 power for her Particle Cannon.
The main issue with photon orbs is they travel so slow, which makes avoiding them rather easy and can give your position away to the enemy. So intentionally aiming them at most heroes can be hard to do, that's why you will most likely be spamming most of them in the general direction of the enemy. And that's another important thing to note, keep spamming them! Keep charging them up and firing one right after another while taking cover between shots.
Other Important uses for Photon Orbs:
- Bastion Sentry - Bastion Sentries are stationary and will have a difficult time dealing with Photon Orbs spammed his direction.
- Torbjorn's Turret - Dealing damage to Torbjorn's turret and perhaps Torbjorn behind it also.
- Roadhog - Roadhog's slow movement and large hitbox makes hitting him with photon orbs much easier than other heroes.
- D.va - Firing photon orbs in D.va's general direction will force her to stop firing her Fusion Cannons temporarily to strafe out of the way (since she moves very slow while firing).
- Widowmaker - Photon Orbs fired in Widowmaker's general direction can impair her vision making it harder for her to aim at enemies and potentially forcing her to move somewhere else, disabling her for a short awhile.
Ammo Usage
One last thing to mention is that you can charge up a full Photon Orb with
only 1 ammo left. With this in mind, you can make use of your Projector
Beam for awhile and then fire a fully charged Photon Orb when your ammo count is
very low.
Ability with cooldown Symmetra sets up a small turret that automatically fires speed-reducing blasts at the nearest enemy within range. Several turrets can be built on the battlefield at once. Cooldown: 1 per 10 seconds - Can hold up to 6 charges max.Max Number of Turrets: 6 Damage: 25 DPS (All 6 turrets will do 150 DPS) Range: 10 meters Hitpoints: 1 Headshot?: no Default Hotkey: Shift |

Sentry turrets allows Symmetra to setup death traps in various rooms, hallways, or other areas where the enemy may come across.
Sentry Turret Mechanics:
- Sentry turrets have an attack range of about 30 feet.
- Turrets can be placed on nearly any surface, including: floors, walls, ceilings and objects.
- Turrets will stack damage when multiple turrets are attacking the same target.
- Turrets will gain ultimate charge for Symmetra.
- Turrets will also slow targets and the more turrets are on one target the slower the target will move.
- Shields can block turret beams. This means Reinhardt and Winston's shields will block turret beams. Even though turrets will fire at them and deal damage to the shield, it will not charge up Symmetra's ultimate.
- If turrets are attacking Reinhardt's shield, it will not slow him down any further.
- Turrets will still attack targets that have Zarya's barrier on. The barriers will absorb the damage to make Zarya's weapon stronger and not slow down the hero with the barrier.
- Turrets cannot be put on Mei's Ice Walls.
- When a turret is attacking an enemy you can see that indication on screen. This can alert you where the enemy is at. This can provide important info about incoming attacks on other potential allies such as your Bastion Sentries and Widowmakers. You can then alert your team to go defend the incoming attackers. Remember that only you will be able to see these alerts (not your allies).
- When placing a Sentry turret down, Symmetra will move slow for a short period of time. You can jump first before putting down a turret to slightly reduce this slow movement.
- Although it's not very stable, you can attach multiple Sentry Turrets to a soccer ball (a prop that you can shoot around the map). This might have potential strategies?
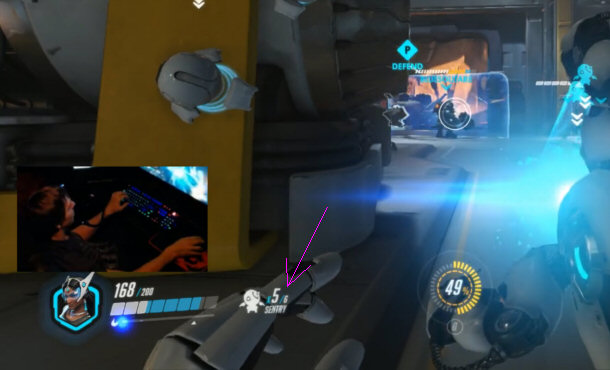
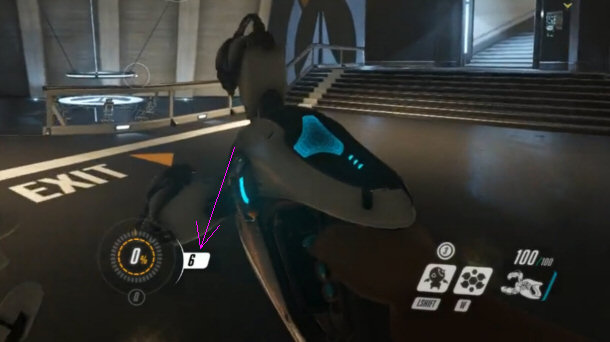
- You can only have 6 turrets out at a time and if you place another one down after having 6 out, it will replace the oldest one you put down. You can see how many current turrets you have out at any given time by the indicator next to your health bar:
Number of Sentry Turrets out:
Sentry Turret's can easily die to:
Turrets only have 1 HP a piece. This means that they can be
easily destroyed, especially by splash damage or from weapons that utilize a
self aim such as Winston's Tesla Cannon or Symmetra's projector beam.
Other things that can easily destroy Sentry Turrets are:
- D.va's Self Destruct ultimate. D.va can launch her Self-Destructing mech into a room or area with Sentry Turrets to wipe them all out.
- D.va's Fusion Cannons are also good at firing down Sentry Turrets.
- Junkrat's grenade spam can bounce right into rooms or hallways populated by Sentry Turrets to easily take them out with the splash damage.
- Zarya's explosive charged shots do splash damage and can take turrets out quite effectively.
- Pharah's rockets do splash damage and can easily take turrets out.
Strategies for using Sentry Turrets:
- Placing Sentry Turrets in side rooms or hallways to take out or severely damage offensive enemies such as Tracer, Genji, and Reaper. Sentry Turrets are a great counter to these specific heroes and the turrets will do a great job at keeping these heroes from flanking your teammates. This will also alert you of incoming attackers, allowing you to tell your allies where the enemy is at.
- Keep Sentry Turrets out of the enemy's vision as best as you can. I have seen a lot of new players place Sentry Turrets right out in the open where they can be easily fired at from a distance. You want to place turrets so they are hidden from your enemy as possible. This means placing them behind walls, rooms, choke points, or objects in the path the enemy has to travel. By doing this, the turrets will start attacking an enemy right when an enemy approaches them.
- You want to space out turrets within a room. Don't just put them all in one particular spot, instead spread them out in a room. By doing this, it will be much harder to take them all out quickly with splash damage or from simply firing at them. One spot I like to use is right above a door, as that tends to be the last place someone looks when entering a room.
- For use in basic combat. Remember that Sentry Turrets will slow enemies down, so placing them on the ground during battle can help give you some time to escape from an enemy by slowing them down a tad with your turrets.
- Another strategy is to space your turrets all over the map, such as using one in each room on the map. By doing this, you are protecting them further from splash damage and have the capability of potentially keeping them alive longer. Another important aspect of using this strategy is for scouting purposes. You will be able to have a better understanding of where your enemies are coming from as you will see when each of your turrets are attacking something, thus allowing you to alert your team on the whereabouts of the enemy. The drawback of this is the lack of powerful trap setups that one particular area provides.
- For protecting your Teleporter (ultimate), more on this later.

Ability with cooldown Generates a large energy barrier in front of Symmetra that blocks enemy fire as it travels forward. Cooldown: 10 secondShield Strength: 1000 HP Range: 20 meters Default Hotkey: E |

Photon Barrier generally has more uses on attack than it does on defense. This is because of how the ability works as it flies forward until the center core collides with an obstacle. Having the barrier fly forward can allow Symmetra's team to push forward easier and to protect fragile allies from damage.
Photon Barrier mechanics:
- The Photon Barrier will continue to move indefinitely until the center of it impacts into an object or wall, or if the barrier's hitpoints gets destroyed. The center of the Photon Barrier has a visual that indicates the impact zone.
- Photon Barrier will move through enemies/allies and the center impact zone has no effect if touched by enemies or allies.
- Photon Barrier's speed is about the same as the normal movement speed of most heroes.
Photon Barrier Strategies
- The best use for this ability is to help your team safely push forward towards the enemy, because of this Photon Barrier tends to be much more useful on attack than defense.
- Use it in front of a moving payload to block incoming shots.
- Launch the barrier toward snipers to prevent them from doing damage to your team.
- Protect you and your team from enemy ultimates, especially McCree's Deadeye, Pharah's Barrage, D'va's Self Destruct, and Roadhog's Whole Hog.
- You still need to be cautious of Bastion Sentries, as they can destroy the barrier within seconds.
- Launch the barrier towards Roadhog to prevent him from hooking you or one of your allies into him.
- Use the Photon Barrier with specific allies to help them get into flanking positions better. The Barrier is especially useful for getting allies into close range such as McCree, Mei and Zarya.
Symmetra's Ultimates
Symmetra is currently the only hero in Overwatch who has access to two different ultimates (either Teleporter or a Shield Generator).
|
ULTIMATE #1 |
Ultimate Ability Symmetra places a teleporter exit pad at her current location, and connects it to a teleporter entry pad at her team's starting point. Allies can travel through the entry pad to the exit pad instantly, enabling them to return to the fight swiftly after being defeated. Cast Time: 2 secondsHitpoints: 50 Health + 350 Shield (400 total HP) Total Number of Allies Can Be Teleported Per Teleporter: 6 Default Hotkey: Q |

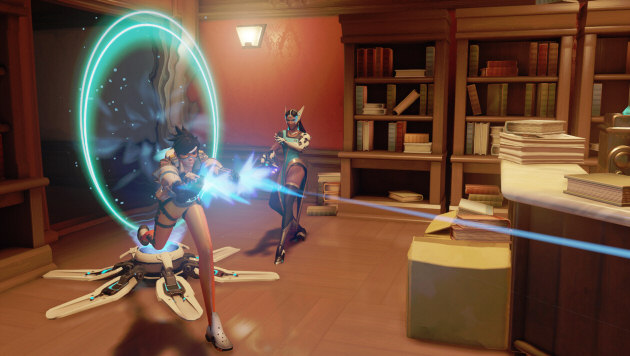
Symmetra's Teleporter is uniquely one of the most interesting ultimates in the game that can serve many strategic uses. Being able to teleport dead allies right back into battle can be game changing. Downtime from death dramatically decreases and can easily keep the battle going in your favor.
Teleporter mechanics:
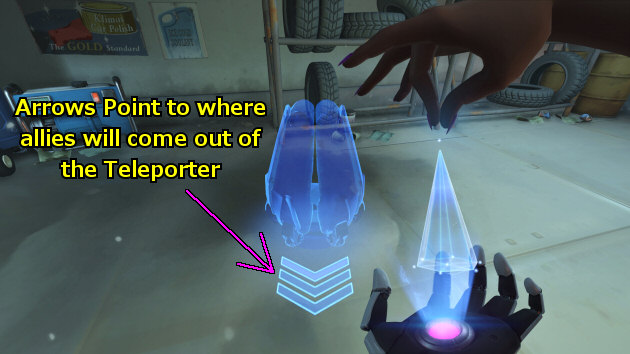
- When Symmetra puts a Teleporter down, the spot where she was standing to put it down will be the direction your allies will come out of it. Because of this, you can strategically stand in a certain way to make sure your allies will be facing a certain direction once they get teleported. Every time you put down a Teleporter, keep this in mind each time!
- When Teleporter is used, it will automatically place an entrance teleporter pad at the current spawn location for your team.
- The location for the entrance teleporter pad will always be in the same spot, unless there are two Symmetras on the team. Symmetra #1's Teleporter will always be in the default place and Symmetra #2's will be in a different spot.
- Teleporter only works one way, meaning you can only go through the entrance teleporter at your spawn location and arrive out in the battlefield. You cannot go back through the teleporter to your spawn location..
- Your team's teleporter is blue while your enemy's teleporter will be red. If you see red a teleporter, kill it immediately. You will be surprised at how many new players will simply pass them right up!
- You can only have one teleporter for each Symmetra that is on a team. For example, if your team has 3 Symmetras, you can have up to 3 teleporters total (one teleporter per Symmetra).
- Your Teleporter will last until either the enemy destroys, until all 6 charges have been used up, or a checkpoint has been met.
- Once a checkpoint has been met (either on Payload or Point Capture) Symmetra's Teleporter (either on Defend or Attack) will both disappear and get refunded or partially refunded depending on how many charges were used by the Teleporter Pad. For each charge of the Teleporter used, it will take away -17 of ultimate charge from 100. If no charges were used, it will get fully refunded.
- While having a Teleporter out, you will not gain ultimate charge. When your Teleporter is destroyed, refunded or all 6 charges used up is when you can start collecting new ultimate charge.
- Teleporters cannot be damaged by you or your team, only by the enemy.
- When activating the "Ultimate Status" communication, Symmetra reports the number of charges left on her teleporter to her allies.
- You can see if you have a teleporter out and how many charges are left by looking right next to your ultimate charge meter:
Teleport Charges Left:
How the enemy gets alerted
Right when an enemy Symmetra puts her Teleporter down, your team will be alerted
immediately. The alert is a sound announcement from the hero on your team
that was the closest one to her at the time she put her teleporter down.
Line of sight takes priority over who is actually closer as well.
The announcement will sound something like "The enemy has a teleporter.", or
"The enemy has got a teleporter, we have to find it."
Because of this automatic alert, it can be wise to run back to the fight in a cryptic way so that the enemy will have a harder time predicting where you placed your teleporter at.
Teleporter counters
The heroes that are good at hunting down and destroying teleporters are the
ones that are good at flanking and harassing. These heroes usually have movement abilities that
enable them to traverse deadly parts of a map to get anywhere they want to much
more safely than other heroes can. This list ranks all the heroes who are
the best at hunting down teleporters (from best to least):
NOTE: Keep in mind that where Symmetra places her Teleporter at will make some heroes better than others at hunting down her Teleporter, but this list shows an average overall best at hunting down Teleporters.
- Tracer - Her Blinks enable her to be super fast at getting almost anywhere safely. Although, her drawback is lack of vertical mobility, as she cannot Blink upwards or climb walls like Genji can.
- Reaper - He can use Shadow Step and Shadow Wraith to sneakily get virtually anywhere on a map.
- Genji - His parkour abilities are second to none thanks to his double jump, wall climb and Swift Strike, along with shielding attacks via Deflect. All this enables him to get virtually anywhere on the map quite easily. In some cases, Genji excels better at Tracer thanks to his superior vertical mobility.
- D.va - She can use Boosters and Defense Matrix to move around the map seamlessly to hunt down teleporters.
- Winston - His frequent Leaps and Barrier Projector (shield globes) enable him to traverse around the map while protecting himself in the process. Winston can fully heal to 1000 HP with his ultimate Primal Rage if he needs to.
- Lucio - His speed aura combined with Amp it Up enables him to quickly move around the map to hunt down teleporters. Lucio can also skate on walls, which provides many shortcuts on many maps.
- Pharah - With the ability to fly in the air, she can sometimes see Teleporters placed on the ground from afar and sometimes be able to shoot rockets at it from a distance. Pharah's Jet Packs in general allow her to have great mobility to get around seamlessly and her Concussive Blast enables her to knock enemies away from her.
- Soldier 76 - His Sprint ability allows him to quickly get to places quickly. Although if Soldier 76 gets overwhelmed by enemies there is not much he can do about it.
- Mei - Mei can use her Ice Wall to lift her up to places that can provide shortcuts to get around the map easier. She can use Ice Walls to block the enemy away from her and self heal via Cryo-freeze. Up close and Mei can 1vs1 many heroes with her freeze gun. All this enables her to be somewhat okay at hunting down teleporters.
- Junkrat - Junkrat can use his Mine jumps to maneuver around the map quickly and he can put down his traps to block enemies from chasing after him.
- Hanzo - Hanzo's wall climb is what makes him decent at hunting down teleporters, but there is not much else he can do besides good Scatter Arrow shots for offensive protection. Although Hanzo's Sonic Arrow could potentially spot you behind a wall when putting down a Teleporter. This can be tough to deal with because enemy Sonic Arrows have no indication that it was used on the battlefield.
- Widowmaker - She can use her Grappling Hook to traverse around the map to potentially hunt down a teleporter. Widowmaker can also use Venom Mines to hold back any enemies that might chase after her. But she is very vulnerable close up and can easily die if overwhelmed. Widowmaker's Infra-Sight allows all her allies to see every enemy behind walls. This means when you put up a Teleporter, the enemy will be able to see where you put it down at (as long as Infra-Sight is active at the time for their team). More info about this is down below!
- Roadhog - Roadhog is self sufficient with his 600 HP and self heal of +300 every few seconds. But his extremely poor mobility makes him not so good at hunting down teleporters, but he can succeed in some situations.
- Ana - Ana has very poor mobility. Her only advantage at going off on her own is the hopes of landing a Sleep Dart on an enemy while also using a Biotic Grenade to deal damage while providing some healing for her at the same time, but it will be extremely difficult for her to hunt down teleporters on her own. Although, Ana could Nano Boost one of her teammates to turn them into a good Teleporter hunter for a short while, as Nano Boost increases speed, damage reduction and damage output.
- Zarya - Zarya has very poor mobility, but she can use her Particle Barrier to provide some protection while moving around the map. Her 200 HP regenerating shield helps a bit too when on her own.
- Reinhardt - Reinhardt can use a Charge to quickly move across large parts of the map quickly and then use his shield to block attacks. But Reinhardt is very vulnerable without another ally to support him.
- McCree - McCree has very poor mobility (besides Combat Rolls), but he can use his Flashbangs and Fan Fire attacks to take down enemies in his path.
- Torbjorn - Torbjorn has poor mobility and his main means of keeping alive while moving around the map by himself is to continuously give himself Armor Packs and throw down level one turrets. If he is low on Scrap, he should not even bother hunting down a Teleporter. Torbjorn's Molten Core can also be used to keep him alive while hunting down a Teleporter.
- Symmetra - Symmetra has very poor mobility and her only means of survival while going off on her own is to put down Sentry Turrets to slow enemies coming after her while potentially taking on some enemies with her Projector Beam.
- Zenyatta - Zenyatta can 1vs1 enemies with his Discord Orb, but his poor mobility (besides his quiet footsteps) and low HP makes him a poor choice to hunt down Teleporters.
- Bastion - Bastion has a self heal of 25% a second which can help him survive while moving around the map, but his poor mobility and lack of damage mitagation makes him a poor choice to hunt down Teleporters.
- Mercy - Mercy is basically a sitting duck when she is on her own. Her only self defense is to use her blaster gun and to rely on her slow HP regeneration when not taking damage.
Be aware when Widowmaker uses Infra-Sight
When an enemy Widowmaker uses her ultimate
Infra-Sight,
her whole team will be able to see all their enemies behind walls. When
Widowmaker activates Infra-Sight, she will say in French: "No one can hide from
my sights". You should wait the 15 seconds until it is over to put down a
Teleporter so the enemy will be unable to spot you during that time.
Teleporter Use During Different Match Phases
Teleporter strength largely depends on the phase of the game and the map involved. This section will go over all the points in where teleporters will be the most useful and the least useful for both attackers and defenders.
For Defending:
Symmetra is very useful overall for the first part of a defender's game.
This is because the defenders generally have the longest run to get back to the
fight after dying. A teleporter is extremely useful at the beginning of a
defenders game because of this. With this in mind you should try your best
to charge up your teleporter and get it out ASAP.
Sentry Turrets also get a lot of use at the beginning of the defender's game. Since attackers have to push forward, they will easily be tempted to go into hallways and rooms to bypass major choke points. Symmetra can use the start of a game's defending time to set up Sentry Turrets in these specific spots. Sometimes (depending on the map), you may want to place your teleporter in the same room (or near it) that you put your Sentry Turrets at for protection.
As the game progresses into mid game, teleporters are still very useful, just not as useful as the start of the game, and this largely depends on the map and where your check points will spawn you at after death.
At the end of a defender's match, teleporters become almost useless since the travel time to get to the defending spot is really fast anyway. Teleporters only save maybe a couple seconds at the most to get to the final point or objective. Because of this, Symmetra becomes the least used hero at the end of a defender's match.
For Attacking:
On attack, the advantages and disadvantages are the opposite as the defenders.
This means Symmetra's teleporter is not so useful at the start of the game but
gets incredibly useful near the end of the match.
At the start of the game you will find that your photon orbs will be the most useful weapon you have. As you can use it to break up strong defenses such as Bastion Sentries and especially Reinhardts. Sentry Turrets can still be placed in rooms and hallways near your starting area to prevent offensive heroes from ambushing your team, but you will find as you progress that turrets can quickly become useless as you push forward, in which case you will have to keep putting new ones up.
At the start of the match, teleporters are not very useful since it will not save a whole lot on travel time after death. If you can, one good tactic is to place your teleporter behind your enemy somewhere. This way you can setup ambushes for certain allies. It's important if you actually do this to communicate with your team and let them know that the teleporter is behind the enemy. You still may want tanks and other defensive heroes to not take the portal. This is a case where strategic use of teleporters come into play. The drawback of this approach is that your teleporter has a greater chance of being discovered by your enemy, unless you can thoroughly protect it with sentry turrets or other means.
As the match continues into mid game, teleporters generally start becoming more useful and can make a big difference depending on the map and where your check points will spawn you at after death.
At the end of an Attackers match is where Symmetra will shine the most. This is where teleporters will make a huge difference in travel time after death for your team. Getting them back to the fight quickly at the end of a match is clearly very powerful here and can easily make winning the match much easier for your team. Not only this but a lot of defenders end up going with Bastion Sentries to setup strong defenses at the last point of a game. Symmetra's Photon Orbs tends to be a decent counter to this as well.
In Summary:
It's simple, Symmetra gets a lot of use at the beginning of a defender's match,
but becomes almost useless at the very end of the match. The opposite is
true for attackers, Symmetra is only mediocre at the start of the match but
becomes extremely useful at the very end of the match.
I am sure as the game progresses over time, more and more strategies will emerge with the use of Symmetra's teleporter and I will be sure to keep this section updated to include all the latest teleporter strategies.
|
ULTIMATE #2 |
Ultimate Ability #2 Symmetra deploys a wide-radius generator that provides increased shielding to her entire team. Cast Time: 2 secondsHitpoints: 50 Health + 350 Shield (400 total HP) Range: 50 meters Default Hotkey: Q (Need to press twice to select Shield Generator) |
Symmetra's alternate ultimate she can use instead of her Teleporter ultimate is a Shield Generator that will give all her allies a +75 HP shield within 50 meters regardless if they are in the line of sight of the generator or not.
When to use Shield Generator instead of Teleporter?
When playing Symmetra and your ultimate becomes available you will need to decide whether to use a Teleporter or Shield Generator. Certain factors come into play when knowing which ultimate works better under different circumstances. Here are some tips:
- The shield Generator typically will get more use during situations where using a Teleporter will not save much walking distance if allies die. For instance, at the beginning of an attackers match
-MORE INFO COMING SOON-
Symmetra's Strength and Weaknesses Vs Other Heroes

Bastion: As mentioned above, Symmetra's photon orbs is a decent counter to Bastion Sentries. Even though photon orbs fly slowly, it's no problem for damaging Bastion Sentries because they are stationary. Bastion can only counter this temporarily by relocating to a different position or healing up the damage. It will take about 3 orbs to kill a Bastion Sentry as long as he doesn't heal up the damage from it. Sometimes a Bastion Sentry will be on top of a moving Payload, in these cases it will be harder to aim photon orbs at him.
Another advantage that Symmetra has is her Teleporter is virtually safe from Bastions, giving her one less enemy to worry about hunting down her Teleporter.
If you see Bastion use his Tank Form ultimate you are better off just taking cover until it's over as Symmetra has nothing to defend against it.

Reinhardt: Photon Orbs will go right through Reinhardt's shield damaging it and then hitting anything behind the shield as well, including Reinhardt himself. Even though Photon Orbs fly slowly in the air, it's still hard to dodge them as Reinhardt due to his slow mobility while his shield is out. This can quite easily charge up your ultimate much faster when facing a Reinhardt. However, Reinhardt's shield does block Symmetra's Projector beam.
Since Symmetra is usually back with her team taking cover while lobbing Photon Orbs or putting up Sentry Turrets, she is usually in the clear of Reinhardt's deadly melee attacks and Earthshatter. However if you do happen to get close to Reinhardt you will most likely take a good punishment from him as there is not much you can do about it besides backing up away from him while firing Photon Orbs at him.
It is possible for Reinhardt to run into Symmetra's Sentry Turrets, but it's rare. Reinhardt's shield does block Sentry Turret beams from hitting him and his wide melee arc swings can easily take them out with little problems. Placing turrets higher up will make it harder for him to hit with his Rocket Hammer.
Symmetra's Teleporter is generally safe from Reinhardt since it's not a job for Reinhardt to go hunt down due to his lack of mobility and much needed use in the frontlines as a tank.

Genji: Genji is the type of hero that wonders around the map trying to pick off stray enemies. Because of this, Sentry Turrets can be especially lethal to Genji. You can put Sentry Turrets in rooms or hallways around the map to deal a lot of damage to a wondering Genji. Genji also has a harder time hitting the traps with his shurikens (as opposed to other heroes). However, Genji does have the option to use a Swift Strike to escape out of rooms with deadly turret nests if he needs to.
Symmetra's short range beam weapon works great against Genji since he cannot deflect it (with his Deflect ability). However he can deflect your deadly photon orbs.
Genji's roles and abilities enables him to do a decent job at finding and taking out Symmetra's Teleporter as long as he can make it past your turret nests.
Genji's ultimate Dragonblade happens to be very deadly against Symmetra as long as he can get close to you. Symmetra's poor mobility makes it hard to avoid Dragonblade swipes and it will be difficult to escape it.

Pharah: Pharah is a big threat to Symmetra. Sentry Turrets are practically useless against Pharah since she mostly flies in the air bypassing most rooms and hallways. Not to mention Pharah's rocket launcher is one of the easiest weapons to take out Sentry Turrets with since it does splash damage.
Symmetra's projector beam will rarely make contact with Pharah since she can just take off in the air quickly to avoid it. Photon Orbs are also very difficult to aim at flying objects.
Since Pharah flies in the air, oftentimes she can easily spot your Teleporter on the ground and then fire rockets down at it to easily take it out. With this in mind, try to build your Teleporter in a room hidden from Pharah's line of sight from the air.
Pharah's ultimate Barrage is also quite effective against Symmetra since she has poor mobility to dodge out of the way quick enough from it.

Junkrat: Junkrat has only a slight advantage over Symmetra. Symmetra rarely comes into close contact with any hero in Overwatch since she is busy putting up turrets, teleporters, or lobbing Photon Orbs. So you rarely need to worry about running into one of Junkrat's traps, even though it can happen. If you get close enough, his traps will further keep your short range projector beam away from him.
Junkrat's Frag Launcher spam works well against Symmetra's Sentry Turrets. All Junkrat has to do is lob grenades in rooms or hallways before walking into them and the splash damage from the nades will most likely take any Sentry Turrets out. Junkrat's Grenade spam can also be deadly against Symmetra herself as she is usually in the targetable range for it when firing photon orbs.
It's not usually Junkrat's job of hunting down teleporters, but he does have decent mobility (with his mine jumps) and can take some time out to go hunt one down if he needs to.

Reaper: Sentry Turrets will be your best weapon against Reaper. Since Reaper is an offensive hero that wonders around in rooms and hallways to flank his enemies, Sentry Turrets can slow him down or force him to use up a Wraith Form prematurely. Unfortunately, Reaper's shotguns are decent at shooting down turrets and he can always Shadow Step past rooms filled with turrets.
Since Reaper is an offensive hero with great mobility he is very efficient at hunting down teleporters.
Getting up close to Reaper is a deadly experience for Symmetra. Your poor mobility and damage output will make it very difficult to deal with Reaper's shotguns and if he uses his ultimate Death Blossom you might as well expect to die to it.

Winston: Winston is the best counter to Symmetra's Sentry Turrets. All Winston has to do is walk in the room filled with Sentry Turrets and hold down the trigger for his Telsa Cannon, it will automatically aim and kill each one quickly.
Symmetra on the other hand can fire her Photon Orbs inside of Winston's Barrier Projector, making his less useful against Symmetra.
Winston has the capability to leap right up close to Symmetra, throw down a barrier and then take you out quite easily as you have no escape mechanisms at your disposal. Winston is also decent at hunting down Symmetra's Teleporter thanks to his frequent Jump Pack leaps.

Zarya: Both heroes are not much of a threat to each other. Symmetra is usually far enough away to avoid Zarya's short range particle beam, although Symmetra is somewhat susceptible to Zarya's explosive charge shots from a distance.
Photon Orbs will still strike through Zarya's Particle Barriers, but the barrier will absorb the damage making Zarya's gun stronger. One fully charged Orb will give Zarya +40 power for her Particle Cannon. And since Photon Orbs fly so slowly, Zarya (or one of her allies) can purposely run into them while having a Particle Barrier on to absorb the damage to enhance her Particle Cannon. So keep this in mind!
If Zarya walks in a room full of Sentry Turrets, she can easily take them out with the AOE damage of her explosive charge shots, or even her short range beam while protecting herself with a Particle Barrier. Sentry Turrets will still attack targets that have Zarya's barrier on. The barriers will absorb the damage to make Zarya's weapon stronger and not slow down the hero with the barrier.
Symmetra's Teleporter is safe from Zarya due to the fact that Zarya has very poor mobility and is generally not a Teleporter hunter.
Symmetra is a sitting duck to Zarya's ultimate Graviton Surge, as there is nothing you can do to escape or protect yourself while trapped in the surge.

Roadhog: Since Symmetra typically stays in the backlines putting up Sentry Turrets or lobbing Photon Orbs, she is usually safe from Roadhog's Chain Hook. But if Roadhog does happen to Chain Hook you, then you will be a sitting duck as there is nothing you can do to escape or repel damage back at him. With this in mind, try to keep your distance from Roadhog and avoid being chained in at all costs.
Firing photon orbs at Roadhog is effective since he is such a large target that also moves slow, which makes avoiding them a tad difficult as Roadhog. This in turn will help charge up your teleporter ultimate.
Since Roadhog's short range Scrap Gun has a nice spread, it makes shooting down Sentry Turrets somewhat easy for him.
Due to Roadhog's poor mobility and role as a front line tank, he is not a Teleporter hunter and will rely on his offensive allies to deal with Symmetra's Teleporter.

Torbjorn: Since Torbjorn generally doesn't wander around like offensive heroes do, he usually doesn't run into Sentry Turrets often, but the plus side to this is that he also is not good at hunting down teleporters as he will have to rely on his offensive allies to deal with that.
Torbjorn's turret can pose a problem to you, but photon orbs do work okay against turrets and it will force Torbjorn to stay at his turret to keep repairing it allowing you to charge up your ultimate in the meantime.

McCree: Since Symmetra usually stays in the backlines putting up turrets or firing photon orbs while usually taking cover behind tanks, she is relatively safe from McCree's revolver shots. McCree can easily kill you up close with his Flashbang and fan fire combo, which can be difficult to avoid due to Symmetra's poor mobility, but the use of Photon Barrier can potentially save you from his Flashbang and fan fire combo.
Sentry Turrets can give McCree a hard time since his revolver will require more aiming precision than most other heroes. However, McCree can use Combat Rolls to potentially avoid your Sentry Turrets.
McCree is the worst offensive hero at hunting down Teleporters due to his poor mobility to get around maps easily.
McCree's ultimate Deadeye can be shielded via Photon Barrier and that is Symmetra's best hope in dealing with it. Once you fire Photon Barrier towards a McCree using Deadeye, try to remove yourself from McCree's line of sight to further protect yourself from Deadeye.

Soldier 76: Hopefully you will be able to take cover from Soldier 76's Pulse Rifle by hiding behind a tank such as Reinhardt or Winston. Sentry Turrets can be effective against Soldier 76, however his Pulse Rifle does work well at shooting them down and he can use a Biotic Field to regain his health back.
It usually isn't Soldier 76's job to hunt down Symmetra's Teleporters, however his sprint ability can enable him to quickly scout the map for one if he needs too.
Soldier 76's ultimate Tactical Visor is deadly against Symmetra due to her poor mobility to take cover from it and her low HP of 200.

Hanzo: Hanzo is a sniper that can kill you from longer distances, so you need to make sure to take cover from him by staying behind tanks or peeking around corners quickly to fire photon orbs. Although you need to be careful because Hanzo can use a Sonic Arrow to reveal his enemies behind walls, which can make peeking within view to fire photon orbs a risky endeavor for Symmetra.
If Symmetra gets close to Hanzo her Photon Projector Beam can be very effective against him, as it will auto aim at him and it can be hard for Hanzo to get bow shots on you during this time.
Sentry Turrets are a big threat to Hanzo because they can be hard for him to shoot down with his bow and his lack of fast movement abilities will make it harder for him to avoid them. However, Hanzo can fire a Scatter Arrow in rooms filled with turrets with the chance of knocking some of them out.
Keep in mind that your Sentry Turrets and Teleporters are immune to Hanzo's ultimate Dragonstrike.
Hanzo is usually not a Teleporter hunter as that is a job for offensive heroes with superior mobility, so that is another advantage for Symmetra. Although Hanzo's Sonic Arrow could potentially spot you behind a wall when putting down a Teleporter. This can be tough to deal with because enemy Sonic Arrows have no indication that it was used on the battlefield.

Widowmaker: Widowmaker is another deadly sniper to watch out for. Dealing with her is similar to dealing with Hanzo, as you will need to be careful when peeking around corners to fire photon orbs. Try to make it random where you appear to fire them and you should be better off. However you really need to watch out when Widowmaker uses her ultimate Infra-Sight, which will allow her whole team to see behind walls. That's when it becomes especially dangerous to peek around corners to fire photon orbs. Hopefully you will be able to take cover from a tank such as Reinhardt.
Other than that, not much else happens between the two heroes. Widowmaker rarely encounters Symmetra's Sentry Turrets or Teleporters since she is too busy sniping and grappling away from all that. And Symmetra will rarely run into a Venom Mine, unless Symmetra is on attack and Widowmaker puts a Venom Mine in a room where Symmetra may put up her turrets later.
Like I said above on the Teleporter section, Widowmaker can counter Symmetra's Teleporter by detecting you with Infra-Sight right when you place a Teleporter down, you can read more about this at Widowmaker's Infra-Sight section.

Lucio: Both Symmetra and Lucio generally keep a distance from each other while spamming each other with projectiles. However, Lucio's fast movement makes it really easy for him to dodge your photon orbs.
If you get close to Lucio, you can do some decent damage with your short-range photon beam. However, Lucio can counter that by using Soundwave to knock you away from him.
Sentry Turrets are not too much of a problem for Lucio, he can quickly turn on his heal aura with an Amp It Up while taking out the turrets with sonic projectiles. As a last resort, he can use his ultimate Sound Barrier to save himself from any turrets.
Lucio is generally not a Teleporter hunter, but he can go hunt down a Teleporter if he needs to with his speed aura combined with an Amp It Up. It can be risky for him though, especially if Sound Barrier is not available to him.

Ana: It can be easy to use your Projector Beam up close to Symmetra as long as she does not land her Sleep Dart on you. Just try to make yourself a hard target to hit and you might be okay. Ana can also use her Biotic Grenade on you up close which will do damage to you and prevent healing done on you at the same time, while also healing up Ana.
One thing to note about Symmetra's Photon Shield is that shield regeneration acts differently than health regeneration/healing. This means that Shield HP will still be able to regenerate while under the influence of Ana's Biotic Grenade's healing prevention.
Due to Ana's nature as a backline support sniper, she usually doesn't have to deal with Symmetra's Sentry Turrets. However if Ana starts getting attacked by Symmetra's Sentry Turrets, it can be difficult for Ana to aim her Biotic Rifle at them, but she can use her Biotic Grenades to do splash damage to take out the turrets in situations where she needs to kill them quickly.
Symmetra's Teleporter ultimate is generally safe from Ana and her poor mobility. Ana's only advantage at going off on her own is the hopes of landing a Sleep Dart on an enemy while also using a Biotic Grenade to deal damage while providing some healing for her at the same time, but it will be extremely difficult for Ana to hunt down teleporters on her own. Although, Ana could Nano Boost one of her teammates to turn them into a good Teleporter hunter for a short while, as Nano Boost increases damage reduction and damage output allowing the Nano Boosted hero to possibly track down a Teleporter more effectively.

Mei: Symmetra and Mei rarely run into each other, so Mei rarely gets the opportunity to freeze Symmetra close up with her freeze gun, although if it happens Symmetra has very poor mobility and she can't do anything to escape it.
Photon Orbs is less useful against Mei because her Ice Wall and Cryo-Freeze will both block it and prevent it from striking through anything else.
Mei usually isn't the one who runs into Symmetra's turrets, but if she does, her freeze gun can take out the turrets and she can always use a Cryo-Freeze to prevent death. Ice Walls can also prevent turret damage, especially if she can't spot where the turrets are fast enough.
You don't have to worry about Mei hunting down your teleporter, as Mei is typically not a teleporter hunter due to her slow mobility.
Mei's ultimate Blizzard happens to be useful against Symmetra due to your poor mobility to run away from it.

Symmetra: Like Winston's Tesla Cannon, Symmetra's photon projector beam is a great counter to taking out another Symmetra's Sentry Turrets, as all you would need to do is hold down your primary fire and your beam will automatically aim at each turret to quickly take them out.
Other than that there isn't much else to be said about the two in a matchup. Symmetra herself is not good at hunting down other enemy teleporters due to her poor mobility and the match largely comes down to who's teleporter helps the most to win the game.

Tracer: Symmetra's short range Photon Projector beam actually works well on Tracer because of how it automatically aims at her, even while she is blinking around quickly. Tracer only has 150 HP, which is really low and it won't take much damage to take her out. Because of this, Tracer is better off keeping somewhat of a distance from Symmetra.
Setting up Sentry Turrets in rooms and hallways can be devastating to Tracer. Because Tracer moves through hallways and passages to get around to her enemy to flank them, she is very susceptible to them. Tracer's weapon is decent at taking out sentry turrets, but she only has 150 hitpoints, so it wont take long for her to die to the turrets. Tracer can Blink past Sentry Turrets to reduce the damage done to her and she also has the option to use her ultimate Pulse Bomb to clear out a room filled with Sentry Turrets.
Symmetra's Teleporter is a prime target for Tracer, and her superior mobility makes it very easy for her to track one down to take it out.
Tracer's Pulse Bomb can be deadly to Symmetra, as there is nothing Symmetra can do to counter a stuck Pulse bomb.

Mercy: Mercy is not a direct threat to you, but she does a decent job of avoiding every attack you have. She can use her Guardian Angel ability to escape away from your up close projector beam by flying to one of her allies. She can simply follow an ally into a room populated by Sentry Turrets and heal that ally taking damage from the turrets.
Luckily there isn't much Mercy can do about your Teleporter, as she is not mobile or offensive enough to go hunt them down on her own.

D.va: Symmetra is somewhat safe from D.va. This is because D.va's Fusion Cannons only work good in close to medium range. So in order for D.va to do any serious damage to you, she would need to flank you by using her boosters to get close to you. Up close and your projector beam will bypass her Defense Matrix ability, but D.va's Fusion Cannons will still eat you alive. Since D.va moves slow while firing, you are better off just running away from her to take cover.
Sentry Turrets pose no real threat to D.va since her Fusion Cannons work really well for taking them out. Fusion Cannons fire rapidly and have a large hit area with no reloading which works effectively on Sentry Turrets. D.va also has the option to launch her Self-Destructing (ultimate) mech in a room filled with Sentry Turrets to take them all out easily.
D.va is actually a decent Teleporter hunter thanks to her boosters. If your teleporter is heavily guarded she can launch her Self-Destruct mech right at your teleporter to take it out safely.

Zenyatta: Symmetra is generally not a prime target for Zenyatta's Orb of Discord, primarily because she doesn't spend a lot of time in the frontlines with her team, but rather stays safely in the back putting up turrets and lobbing photon orbs. Zenyatta is better off putting his Orb of Discord on a bigger threat. However, Symmetra does not have anything to really counter the Discord Orb as she is also slow and is very susceptible to damage in general. But remember that losing Zenyatta's line of sight for more than 3 seconds will drop the Discord Orb from you.
Zenyatta's Orb of Harmony can be used to help offensive heroes tackle rooms filled with Sentry Turrets or Reinhardt's to negate the damage done from your photon orbs. If Zenyatta roams into a room with Sentry Turrets, there is not much he can do about it except try to aim his energy orbs at them before he dies to them. As a last resort he can always use his ultimate Transcendence to save him if he needs to.
Up close and your projector beam is deadly to Zenyatta due to his slow mobility and low HP of only 150. Although, Zenyatta's energy orbs are still rather powerful from any range and can be deadly from a highly skilled Zenyatta player.
Your Teleporter is generally safe from Zenyatta due to his poor mobility and much needed support for his team in the backlines anyway.
Symmetra's Allied Synergies Guide
News/Home | Blog | Follow | Unlock Full Guide
Attack |
Defense |
Tank |
Support |
 Genji
Genji Bastion
 D.va
D.va Ana
Ana McCree
 Hanzo
Hanzo Reinhardt
 Lucio
Lucio Pharah
 Junkrat
 Roadhog
 Mercy
Mercy Reaper
 Mei
Mei Winston
 Symmetra
 Soldier76
 Torbjorn
 Zarya
Zarya Zenyatta
 Sombra
 Widowmaker
 Tracer
Map Guides
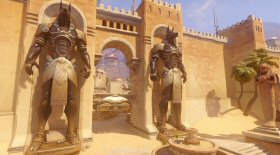 Temple of Anubis
 Hanamura
 Watchpoint Gibraltar
Overwatch Hero Introductions - Basics Guide
How the Mechanics Work in Overwatch
How Headshots Work In Overwatch
Overwatch Game Modes Overview
Overwatch Health Types & Hitpoint Basics
Overwatch Terms, Abbreviations, & Their Meanings
Easiest and Hardest Overwatch Heroes to Master
My Hotkey
Bindings For Overwatch & Why I Use Them
|
Feel free to leave any type of comment, such as how you like the guide and if it helps you at all, or to report something that is inaccurate in the guide. |
