Super Castlevania IV's Top 15 Hardest Speedrun Strats
Super Castlevania IV is a very challenging speedrun game. It takes a lot of practice time to master all the strats in the game. Here is a list of the top 15 hardest speedrun strats throughout the game. Please note that this list contains strats that may be hard due to execution, RNG (randomness), or a combination of both. Many of these strats have a high potential for death if you mess them up. Many of these strats can be skipped during races but for PB attempts I personally do them all. Most of the animation clips are taken directly from my Castlevania IV 32:06 Any% Speedrun.
15) 3-3 Eye Boost

RNG & Execution: No RNG, all execution.
Chance of death: Very small. Only if
you don't have the health for the boost, or you don't know the backup strat for
the dragon kill.
Discovered by: Unknown.
Time Saved: ??
My current success rate: 99%
My Thoughts: The stage 3 eye boost is one of the easier strats to pull off. There are slightly different ways to execute the boost and it will take some practice time to become consistent with.
14) 9-2 Dick Bones

RNG & Execution: I think there might be
some RNG.
Chance of death: Yes, Dickbones can
kill you.
My current success rate: 97%
My Thoughts: This really isn't a "strat" exactly, but I thought I needed to include this item anyways. Dickbones is the most annoying skeleton in the game by far. Someone in my Twitch chat came up with the name Dickbones, and for good reason! Dickbones can and will kill you eventually. Dickbones can do so many random things it is really hard to predict exactly what he will do to you. I have lost so many great runs to Dickbones. He can throw bones at you which can knock you into a pit and kill you.
13) 7-1 Book Jump
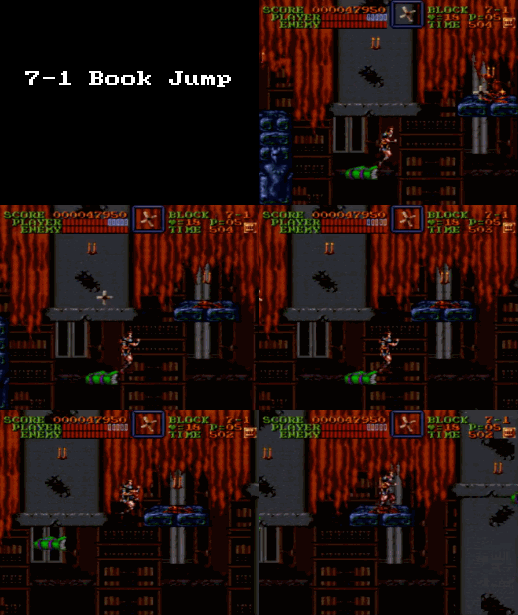
RNG & Execution: No RNG, all execution.
Chance of death: Yes.
Discovered by: Unknown.
Time Saved: ??
My current success rate: 98%
My Thoughts: The book jump (or Book Clench as I call it) can be a little scary approaching it. One must be alert and ready for the jump, or you will most likely not make it and fall to your death. I rarely miss the book jump anymore, but new players will most likely miss it from time to time.
12) A-1 Ring Grab
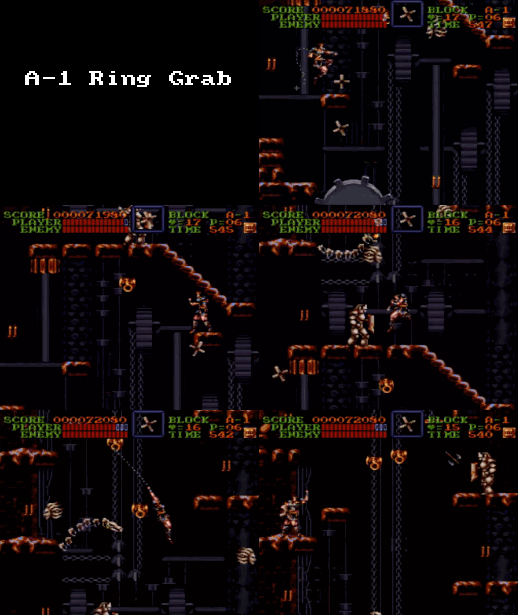
RNG & Execution: No RNG, all execution.
Chance of death: Small chance of
death.
Discovered by: Unknown.
Time Saved: ??
My current success rate: 97%
My Thoughts: This strat involves killing a few medusa heads with strategic cross throws and then taking a damage boost from an axe which allows the player to jump up and grab the ring (saving a ring cycle). This whole strat is tough to learn and has precision all through out it. One can become extremely consistent with it through enough practice.
11) B-2 Rockman Kill
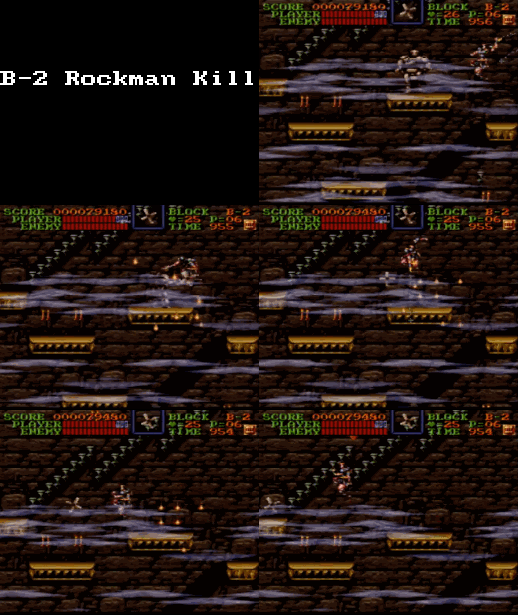
RNG & Execution: The rockman can
either move left or right, but both directions can be successfully executed.
Chance of death: Not really.
Discovered by: Unknown.
Time Saved: ??
My current success rate: 99%
My Thoughts: This strat found on stage B allows you to move past the Rockman enemy without stopping. The strat doesn't save a whole lot of time, but it is the optimal solution for passing it. New players can easily do a safe strat instead. The strat does take a bunch of practice to get consistent.
10) 8-2 Stair Jump
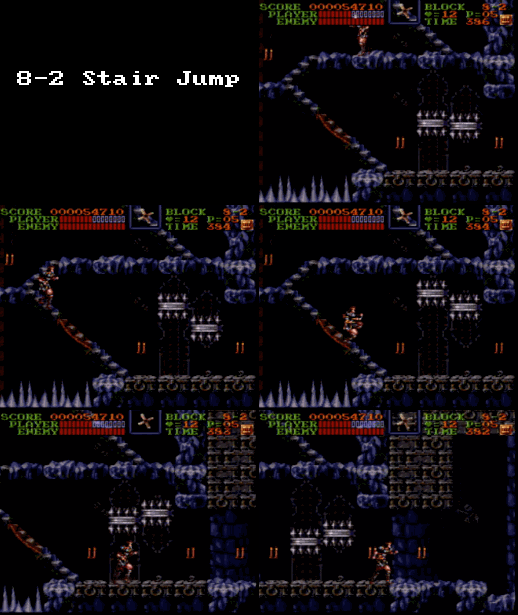
RNG & Execution: No RNG, all execution.
Chance of death: big chance of death!
Discovered by: Unknown.
Time Saved: ??
My current success rate: 98%
My Thoughts: The stair jump on stage 8 is a really scary jump. For a strat so small it is also so deadly! There are several ways to mess it up and if you don't press "up" in time to latch onto the steps you can easily fall to the spikes and die. This strat takes a lot of practice and re-practice to maintain skill with. Unfortunately, I still miss this jump from time to time.
9) 8-1 Last Eye Boost
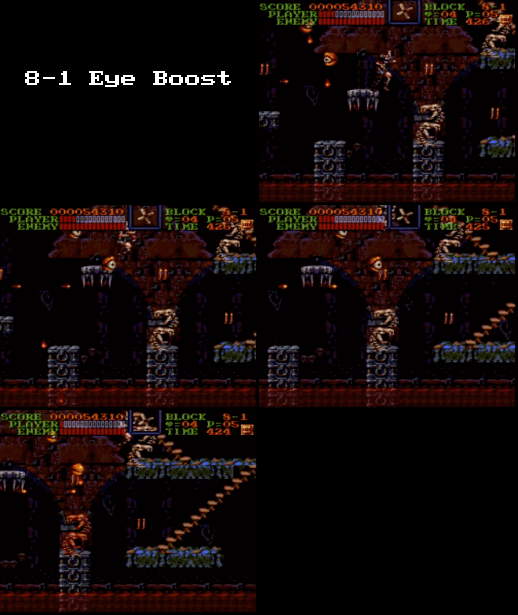
RNG & Execution: This strat does have
randomness involved but it can all be manipulated with skill.
Chance of death: Yes.
Discovered by: Unknown.
Time Saved: ??
My current success rate: 96%
My Thoughts: This is probably one of the most complex strats in the game. If you can consistently get the last eye boost in the first section of stage 8 every time, then congratulations! That is a huge accomplishment! There are many factors involved in order to get the eye boost every time. Some of the crushers on stage 8 are on a global timer and they will be at a specific position each time you enter stage 8. The player must go through the entire first section all the way to the eye while manipulating the crusher positions.
8) 3-2 Ring Gleetch
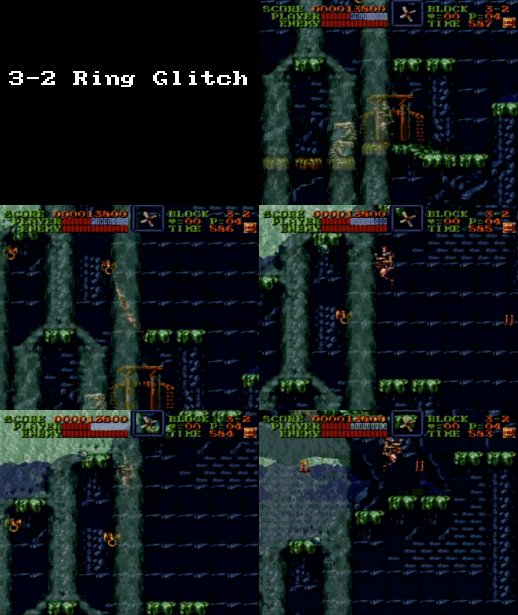
RNG & Execution: None, all execution.
Chance of death: Small chance of
death.
Discovered by: Unknown.
Time Saved: ??
My current success rate: 97%
My Thoughts: The ring glitches in this game are really cool and funky looking. They do take some time to get used to. So many things can go wrong with this ring glitch. There are many backup strats involved in order to become consistent.
7) 3-3 Ring Gleetch
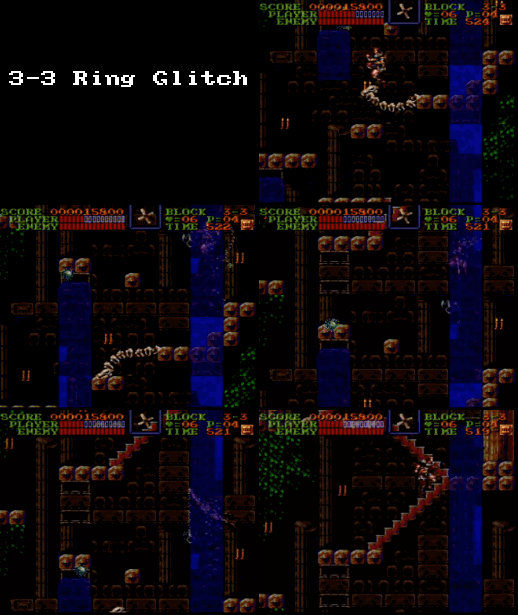
RNG & Execution: There is a chance
that a bone dragon will spawn and render this strat undoable, otherwise it's all execution.
Chance of death: Big chance of death!
Discovered by: Unknown.
Time Saved: ??
My current success rate: 90%
My Thoughts: This is by far one of the hardest strats in the game to execute. It requires a lot of precision and backup strat knowledge. I still have a lot of issues with this ring today. Looks insanely cool though :)
6) 8-1 One-Frame Jump Under Crusher
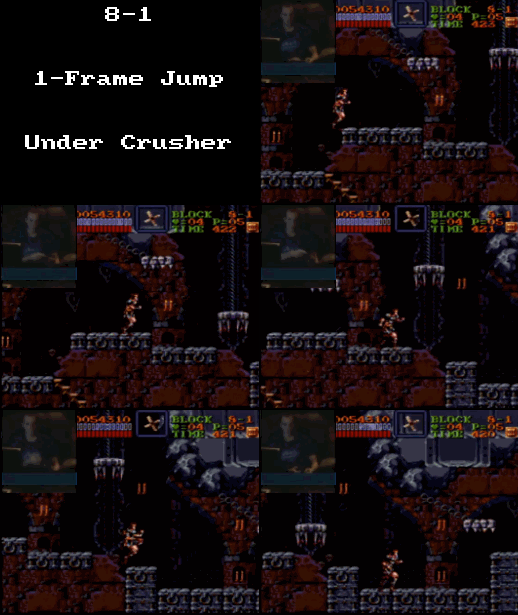
RNG: None, all execution.
Chance of death: Big chance of death!
Discovered by: TMR
Time Saved: 2-3 seconds
My current success rate: 88%
My Thoughts: A 1-frame jump involves pressing the jump button for 1 frame (1/60 of a second). When executed, Simon will jump slightly lower than a normal jump. In this case Simon will not hit his head on the spikes but rather jump right across the pit to the other side. To the average person this looks seamless and easy, but 1frame jumps are not easy to execute consistently. I still die to this jump occasionally. You can take this safe by jumping on top of the crusher but you will lose a few seconds.
5) 8-2 Vegas Bridge
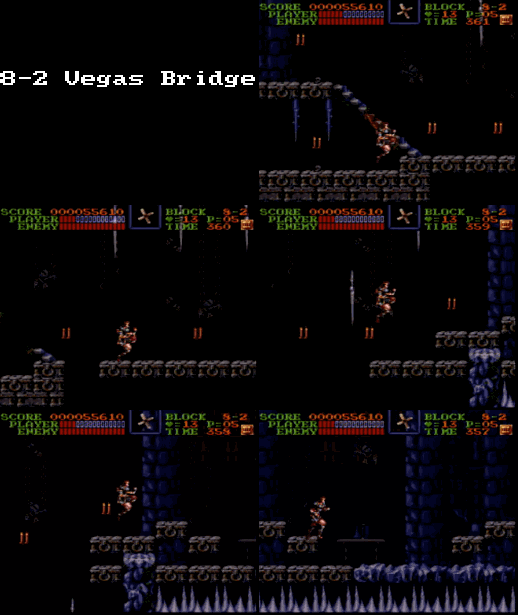
RNG & Execution: One of the most
deadliest RNG elements during a speedrun. The strat does involve proper
knowledge of execution as well.
Chance of death: Yes for sure.
Time Saved: 3.5 seconds over the
"safer" method.
My current success rate: 75%
My Thoughts: The reason this is called the "vegas bridge" is because when you take a damage boost off the steps you are essentially taking a gamble to gain 3.5 seconds in the hopes that you will land on a block instead of a pit. The disappearing blocks have RNG to them in which they may or may not be there to catch your fall. The safe method involves not doing the damage boost off the steps and waiting for the next round of blocks to appear, which increases the success rate from 75% to 95%. The vegas bridge is one of the main reasons why I do no resets after stage 8, so I do not lose my sanity!
4) 1-2 Ring Room Clip
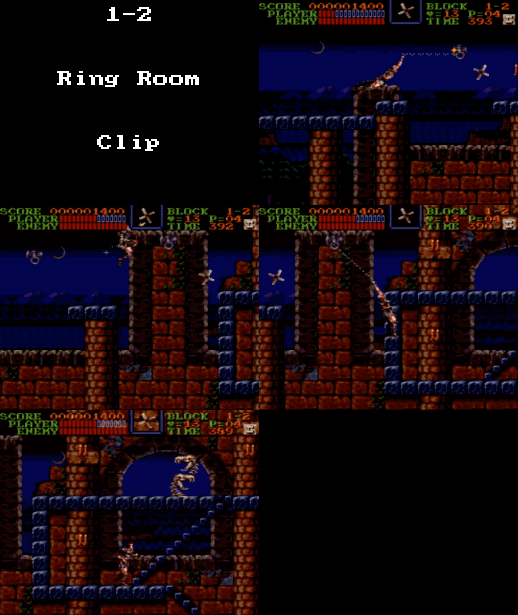
RNG: None, all execution.
Chance of death: Yes.
Discovered by: Hanage_Belmondo
Time Saved: 1.25 seconds over previous
clip, and 1.8 seconds over old traditional method.
My current success rate: 92%
My Thoughts: I love this strat! Big thanks to Hanage for finding this! I recently just started doing this and I hope to become more consistent over time with it. This new clip looks a lot more smoother than the previous clip I was doing. Very difficult to execute though! Here is a guide that Hanage put together that explains this strat more in detail on how to execute it properly.
3) 9-2 Frame Perfect Spike Jump
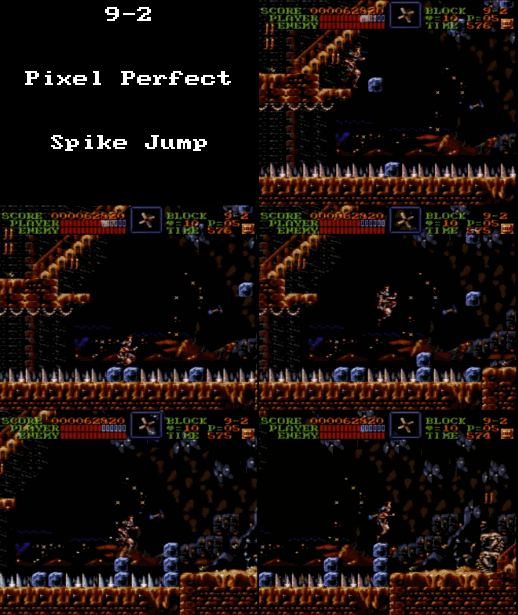
RNG: None, all execution.
Chance of death: Yes!
Time Saved: 1.5 seconds over the safe
method.
My current success rate: 77%
My Thoughts: This is by far one of the scariest strats in the game, and for good reason! This is a frame perfect jump, and if you don't jump at the specific frame you will die and the run is over. The worst part about this strat is that it's on stage 9 near the end of the game! My older safe method had a near 100% success rate, but this new spike jump is DEADLY! I did find out that by crouch walking towards the spot, it makes the strat a little easier to execute. I only recently started doing this strat in runs (and first one also). I still have yet to get this in a PB run, but it's coming!
The reason this strat didn't make it to the #2 position is because most people will most likely not even go for it at all, due to the huge risk involved. There's no need to worry about it unless you really want to squeeze out a sub 32 minute run.
This is merely executing a frame perfect jump, my current success rate is about 77%. I think it may be possible to get this much higher like 80%+ through enough practice.
2) 4-4 Zip
RNG: None, all execution (i think).
Chance of death: Yes.
Discovered by: Not sure.
Time Saved: 10 seconds over old traditional method.
My current success rate: 88%
My Thoughts: The stage 4 zip has been one of the most frustrating things to consistently get down over time. I have had to change my strategy with the 4-4 Zip many times because for some reason the strats I have used just stopped working for me and I had to switch to a new strat for pulling it off. I now have gone through about 4 or 5 main strategies for executing the zip. The zip involves getting hit by the bat at the same time your getting crushed by the ceiling, which allows the player to zip through the wall. There is a lot of precision involved and this will take a lot of practice to get better at.
1) One Cycle Chandelier on 6-1
RNG: None, all execution.
Chance of death: Yes.
Discovered by: I first did a 1 cycle
Chandelier back in 1999. I doubt anyone else did it before me.
Time Saved: 4.5 seconds over a
2-cycle, and 9 seconds over a 3-cycle. A 3-cycle is considered the safest
way to do the chandeliers.
My current success rate: 40%
My Thoughts: A cycle on the chandeliers involves a full swing from right to left. Ideally you want as few cycles as possible. A 1-cycle is done in the fastest way possible, but is also the hardest thing to consistently execute in the game. In order to execute a 1-cycle chandelier one must have a specific rhythm all the way through the chandeliers. There is a lot of precision involved and chance of death is very high. I feel like there is still more room for improvement with this strat and hopefully one day we will find newer methods to make it easier and more consistent.
SCV4 Articles:
My SCV4 Speedrun accomplishments
Super Castlevania IV's Top 15 Hardest Speedrun Strats
Difference between the Japanese and American version of SCV4
Super Castlevania IV at GDQs 2015 - My experiences!
My Speedruns & Articles:
My Overwatch Strategy Guide
World of Warcraft 1-60 Speed Run
Starcraft 2 WoL Speed Run & Guide
Super Castlevania IV Speed Runs
Castlevania II: Simon's Quest Speed Runs
Mega Man 3 Boss Guide
Wolfenstein 3d
Best Cherry MX Mechanical Keyboard Switches
My Twitch.TV Setup for Playing PC Games
My Twitch.TV Setup for Console Games
My Blacklight Garage!
