
D.va In-depth Strategy Guide
( FP's Overwatch Strategy Guide )
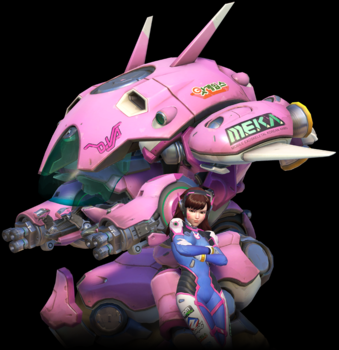 D.va
is a 19 year old former professional Starcraft player from South Korea
that now wants to protect her homeland from the omnics. D.va
pilots a big mech similar to the mechs in the game
Titanfall. Her
mech is equipped with powerful Fusion Cannons that doesn't need
reloading and boosters that give her strong mobility around the
battlefield. Her Boosters has a surprisingly low cooldown, as she
can use it often as a means of mobility to seek health packs and to
reposition herself around the map very often. Her Defense Matrix
ability is extremely powerful as it can block most incoming shots and
projectiles, including most ultimates in the game. Her ultimate
Self-Destruct emits the largest explosion in the game and although it's
easy to avoid most of the time, it is mostly used as a means to break up
enemy formations allowing her team to push forward more easily.
Once D.va's mech gets destroyed she pops out and is on her own with a
somewhat powerful blaster gun until she can call down another mech to
get into.
D.va
is a 19 year old former professional Starcraft player from South Korea
that now wants to protect her homeland from the omnics. D.va
pilots a big mech similar to the mechs in the game
Titanfall. Her
mech is equipped with powerful Fusion Cannons that doesn't need
reloading and boosters that give her strong mobility around the
battlefield. Her Boosters has a surprisingly low cooldown, as she
can use it often as a means of mobility to seek health packs and to
reposition herself around the map very often. Her Defense Matrix
ability is extremely powerful as it can block most incoming shots and
projectiles, including most ultimates in the game. Her ultimate
Self-Destruct emits the largest explosion in the game and although it's
easy to avoid most of the time, it is mostly used as a means to break up
enemy formations allowing her team to push forward more easily.
Once D.va's mech gets destroyed she pops out and is on her own with a
somewhat powerful blaster gun until she can call down another mech to
get into.
Name: Hana Song
Difficulty: Medium
Role: Tank
Age: 19
Occupation: Pro Gamer (formerly), Mech Pilot
Base of Operation: Busan, South Korea
Release Date: 11-10-2015
Mech Hitpoints: 600 (200 is armor)
Pilot Hitpoints: 150
NOTE: Since D.va's mech has a lot of armor, I highly suggest studying what attacks armor reduces the most on the Health Basics Guide.
D.va
|
 |
Main attacking weapon D.Va's mech is equipped with twin short-range rotating cannons. They lay down continuous, high-damage fire without needing to reload, but slow D.Va's movement while they're active. Ammo: Infinite (no reloading)Damage: 0.5 - 2 per pellet (11 bullets per shot) - (fall-off distance damage) Fire Rate: 7 rps Headshot?: YES Default Hotkey: LM |
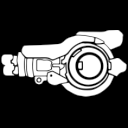
The closer you are to your target, the more powerful D.va's Fusion Cannons will get. Fusion Cannon bullets have instant travel time with no reloading, but slows her mech down considerably while she is shooting. At longer ranges, Fusion Cannons have poor accuracy with a relatively large spread. You may find that you can still dish out decent damage at medium range, especially on bigger targets like tanks.
Fusion Cannons won't take too long to get used to and you don't need to be a great aimer like with Hanzo, Genji, and McCree to shoot well with her.
Ability with cooldown D.Va's mech launches into the air, her momentum carrying her forward. She can turn and change directions or barrel through her enemies, knocking them back. Duration: 2 secondsDamage: 25 (for enemies she knock backs while boosting) Distance: 25 meters Cooldown: 5 seconds Headshot?: no Default Hotkey: Shift |

Boosters is a great mobility ability that serves many uses for D.va. It has a 5 second cooldown! Yes, a 5 second cooldown, which is crazy. Personally I think this is a bit overpowered. While boosting, it can be canceled with the fire button (or alternate fire button), which comes in handy quite a bit as sometimes you intentionally don't want to go the entire boosting duration.
Strategies for using Boosters:
- To refill up on health by boosting to health packs. I find myself using boosters for this one reason more than anything else. Being able to boost every 5 seconds means you can always boost to health packs to constantly refill your HP.
- Vertical mobility. D.va's boosters work in any direction. Just look at the direction you want to boost to and she will boost in that direction. This means you can go straight up in the air if you choose to. This allows you to get up to high spots where other heroes cannot get up to.
- To get back to the fight faster. As soon as you die, just keep boosting to get back to the fight faster.
- To knock enemies off of high ledges or even into pits (if possible). NOTE: Boosting will knock/push back enemies while doing 25 damage to each enemy knocked.
- If you are in a hallway with a lot of enemies, boost right through all of them as you will be able to knock them all down while dealing 25 damage a piece to all of them.
- To flank and harass your enemy. Being able to boost every 5 seconds means you can go sneak behind the enemy and pick off important support or defense heroes and then boost back to safety.
- To reposition yourself. Being able to boost often, means you should constantly be relocating to different spots to further confuse your enemies.
- To avoid most enemy ultimates. Boosting allows D.va to escape most of the deadly ultimates in Overwatch.
- To simply retreat out of a losing battle, simply boost back to your team to take cover or go boost to a health pack!
Channeled Ability with cooldown D.Va can activate this forward-facing targeting array to shoot incoming projectiles out of the air.
Cooldown: 1 second |

Defense Matrix is a very powerful defensive ability that blocks most incoming shots and projectiles coming your way.
Defense Matrix Mechanics
- Defense Matrix is a channeled ability, you hold down the hotkey for it and a meter will deplete while Defense Matrix is active and then recharge when it's not in use.
- Defense Matrix takes 10 seconds to reach full charge from empty.
- At full charge, Defense Matrix will last for 4 seconds.
Defense Matrix can be used at the same time with your Boosters, this allows you to fly towards really strong defenses while taking no damage. This can enable you to fly right up to Bastion Sentries, Torbjorn Turrets or Widowmakers (and many others) without taking damage and you can then take those strong defenses out at close range with your Fusion Cannons.
When a match starts as an Attacker, D.va can walk out of the gates with Defense Matrix on to protect all her allies as they flood out into the battlefield. D.va works better in this case than Reinhardt because she can move quickly while using it.
Defense Matrix is also extremely useful for blocking most ultimates in the game, but most importantly:
- Roadhog's Whole Hog
- Solder 76's Tactical Visor
- McCree's Deadeye
- Reaper's Death Blossom
- Pharah's Barrage
- Bastion's Tank Form
Defense Matrix can also be used similar to Reinhardt's shield, as you can use it to push forward while providing cover for your teammates.
Here is a list of things that Defense Matrix does NOT work on:
- All melee attacks.
- All channeled weapons, including: Mei's Endothermic Blaster (short range freeze gun), Winston's Tesla Cannon, Symmetra's Photon Projector Beam, Zarya's Particle Cannon beam.
- Lucio's Blast of Sound (alternate fire).
- Zenyatta's Orb of Discord.
- Symmetra's Sentry Turrets.
- Roadhog's Chain Hook.
|
ULTIMATE |
Ultimate Ability D.Va ejects from her mech and sets its reactor to explode, dealing massive damage to nearby opponents.
Cast Time: 3 seconds (before explosion)
|

Self-Destruct will launch D.va out of her mech and will detonate after 3 seconds, creating the largest explosion in Overwatch.
Here is a list of mechanics for this ability:
- The explosion deals up to a 1000 damage in a very large blast radius.
- The explosion does no damage to D.va and does not harm any allies as well.
- Enemies that survive any damage from the explosion will be knocked back.
- Enemies can hide behind walls or objects to be totally shielded from the explosion. Even small poles can protect you from the explosion.
- D.va can fling her Self-Destruct by initially using her Boosters quickly followed by her Self-Destruct. This will launch her mech forward while the 3 second countdown is going on. This is a very powerful technique and can give her enemies much less time to hide from it. D.va can also use this to stay out of dangerous areas while still being able to Self-Destruct in those areas.
- Using Self-Destruct will remove Zenyatta's Discord Orb from her.
- When dealing with an enemy Self-Destruct, there will be a yellow or red exclamation point depending on how far away you are from the Self-Destruct, regardless if you are behind a wall or not. Red means you are within about 40 meters of the Self-Destruct and can take damage from it. Yellow means you are further than that and will not take damage from it. Allied Self-Destructs have no exclamation mark and will be greenish in color.
Uses for Self-Destruct
It is relatively easy to avoid Self-Destruct's explosion by hiding behind walls
or objects. Self-Destruct is really used as a means to disable her enemies
for a brief period of time as they find spots to hide from the explosion, this
allows her team to push forward and contest objectives during this period of
time.
Another reason to use Self-Destruct is simply when you are very low on health and about to lose your mech, instead just Self-Destruct and you will then be able to call down a fresh new mech refreshing your HP.
Self-Destruct FLING (or launch method)
D.va's Self-Destruct fling (boost then initiate Self-Destruct) has some very
important uses, including killing Torbjorn's turrets and forcing Bastion
Sentries to reposition. Overall it tends to be more powerful as it will be
harder to predict where it will be when it explodes, making your enemies have
less reaction time to hide from it, which can result in some kills for you.
This method also tends to be safer for D.va since she can launch the exploding
mech into the enemy territory instead of boosting to the area beforehand. I highly recommend using the "fling"
method as your default way of using Self-Destruct as overall it tends to be more
effective.
Self-Destruct Paired with Other Ally Abilities
- Reinhardt - Self-Destruct works great when an allied Reinhardt uses his ultimate Earthshatter, which makes all enemies drop down and unable to move for a short period of time, this could make it so they won't have enough time to hide from the explosion.
- Zarya - Right after an allied Zarya uses her ultimate Graviton Surge (clumps up enemies together), as enemies won't have enough time to escape while being surged.
- Mei - Mei can use her ultimate Blizzard to slow and ultimately freeze her enemies in place so they wont have enough time to escape the explosion.
Offensive Attackers With Self-Destruct
A Self-Destruct is a great way to bait your enemy into your teams's offensive flankers.
D.va can launch a Self-Destruct in a way that it will force all the enemies to
flee the current area to other areas behind them where your offensive flankers
are waiting for them. Tracer, Genji and Reaper are great heroes at
cleaning up all the fleeing enemies from Self-Destruct. To a lesser
degree, Mei and McCree can also be good in this area.
Ability with cooldown While outside of her mech, D.Va can continue the fight with a mid-range automatic blaster. Ammo: 20Fire Rate: 6.66 rps Damage: 14 Headshot?: YES Default Hotkey: LM |
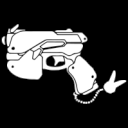
When D.va gets ejected from her mech, either from a Self-Destruct or if enemies take out all of the mech's HP, then the little D.va will pop out and she will be on her own with no abilities other than her Light Blaster Gun. Her gun emits bursts of laser projectiles that just so happens to be quite powerful. It has no fall-off distance damage so it works great for all ranges. It does more overall damage from medium to long range than her mech's Fusion Cannons. Because of this, it can be effective to remain in Human Form to continue dishing out damage from longer distances as long as you are not taking damage and you are safe from the enemy before calling down a new mech.
Steer D.va's Ejection
When your mech gets destroyed, you can hold down the direction you want D.va to
eject out at and she will jump out that direction. This means you can hold
your strafe, forward, and backward keys down while getting ejected and she will
pop out that direction. By default, if you don't press any movement keys,
D.va will eject backwards away from her mech.
Quick Mech Trick
If you lose your mech close to a spawn point, you can quickly get a new mech by
going back to the spawn room and changing to a different hero other than D.va,
then quickly switching back to D.va to get your mech back quickly. Please
note that you will lose any ultimate charge built up if you do this.
|
ULTIMATE |
Ultimate Ability #2
If her armored battle suit is destroyed, D.Va can call down a fresh mech and return to the fray. Cast Time: 2 secondsDamage: 50 (for anyone immediately around D.va while she is getting in her new mech) Default Hotkey: Q |

While in Human form, D.va will generate 1% of her Call Mech ultimate charge every second no matter what she is doing. Her blaster gun will also help generate ultimate charge as well.
When D.va calls a new Mech it will deal 50 damage to all enemies immediately around her at that time along with knocking them away from her.
Like I mentioned above, it might be wise to wait to use a new mech. As long as you have nearly full health and are able to stay back and dish out damage with your blaster without your enemies coming after you, then you are better off waiting, because your blaster gun does more damage from medium to long range than your mech's Fusion Cannons.
D.va's Strength and Weaknesses Vs Other Heroes

Widowmaker: D.va can use her Boosters to boost toward Widowmaker while using Defense Matrix (blocks incoming shots) at the same time. This allows D.va to get right up close to Widowmaker unharmed. Up close, D.va can dish out good damage with her Fusion Cannons. This can be deadly. Although Widowmaker can counter this by relocating via grappling to a new spot. D.va also needs to be careful and watch out for Widowmaker's Venom Mines she can throw out at you.
Widowmaker has an easy time sniping D.va from long distances due to D.va's relatively large target that moves slow when firing.
D.va's ultimate Self-Destruct is not too effective against Widowmaker since she can just grapple away from it and easily take cover. When D.va gets ejected from her mech she becomes a harder target to snipe for Widowmaker due to her small hitbox as human form.

Bastion: Bastion's Sentry Form only does 50% damage to armor. Since D.va is comprised of mostly armor she can withstand almost twice the damage from him than normal HP heroes can.
The usual way to deal with a Bastion Sentry is to simply use Defense Matrix to protect your allies while they kill Bastion from afar. D.va can use her Boosters and Defense Matrix at the same time to quickly get right up close to Bastion Sentry without taking damage. It can then be possible to kill Bastion with Fusion Cannons up close. But this may not be enough to take him out before he shreds you to bits. To make this work more effectively try to flank him unexpectedly. Once Bastion is dead, just boost back to safety.
You can also use Self-Destruct by literally launching your Self-Destructing mech toward a Bastion Sentry and it can then either take him out or force him to take cover from the explosion, disabling him from combat for awhile.
Defense Matrix ability blocks all incoming Bastion shots, including Bastion's Tank form, enabling your team to push forward more easily.
D.va's Light Blaster Gun in human form can be effective against a Bastion Sentry, but generally only if D.va is a pretty far distance from him. D.va in human form will melt almost instantly to a Bastion Sentry up close.

Torbjorn: D.va has some strong counters against Torbjorn and his turrets. She can use her Boosters to fly toward a turret while having Defense Matrix on to block all incoming shots (even from turrets), she can then either use her Fusion Cannons up close to take out Torbjorn or his turret, or she can simply use her ultimate Self-Destruct to totally wipe out Torbjorn's turret. D.va can Boost through a turret to deal 25 damage to it as well.
Torbjorn's Molten Core is useless against D.va's Self-Destruct. However from a distance, D.va is practically no harm to Torbjorn.

Genji: Boosters are very powerful against Genji. Her Boosters enable her to run away from Genji saving herself from Swift Strikes and Dragonblade. If Genji is trying to run away from a fight he is losing, simply boost after him to take him out.
Genji's Deflect is also less effective on D.va because she can easily let go of the trigger to stop her stream of bullets when deflect gets turned on, this ensures much less bullets will get deflected dealing less reflected damage.
Genji is better off keeping his distance from D.va while throwing Shurikens at her, up close and D.va's Fusion Cannons are very powerful against Genji.

Mercy: If you know the enemy has a Mercy, you need to constantly think about ways to go and flank her with every opportunity you get. Flanking her as D.va isn't too hard, simply boost around over to her and take her out quickly with your Fusion Cannons, then boost back to safety. Use Defense Matrix if you need to stop streams of projectiles. If you managed to take Mercy out but you still died, then it's still mission accomplished. It takes Mercy much longer to get back to the fight than it does with D.va and her Boosters.
When you use Self-Destruct, try to launch it right toward the enemy's Mercy, it will either take her out or disable her for a period of time.

Pharah: Most of the time Pharah is safe from D.va, since she is normally flying high above and a distance from D.va. D.va's Fusion cannons are weak on Pharah from medium to long range, but if D.va can manage to get closer to Pharah with her Boosters, then she has a god chance of taking her out. Pharah can counter D.va up close with her Concussive Blast, which will knock D.va away from her.
D.va's Defense Matrix is a great counter to Pharah's ultimate Barrage. D.va's Self-Destruct can be very affective against Pharah, as she is floating around in the air it can take her awhile to get down and take cover, potentially not enough time for her to take cover and the Self-Destruct can kill her quite easily then.

Ana: Ana's poor mobility makes her very susceptible to D.va's flanking abilities (Boosting with Defense Matrix, then up close Fusion Cannon damage). In close range, D.va can do a lot of damage with her Fusion Cannons and Ana's poor mobility will make it difficult to escape from D.va. Ana's best bet at escaping from D.va is a well aimed Sleep Dart. Although, if timed right, D.va's Defense Matrix can absorb Ana's Sleep Dart and Biotic Grenade. Be very careful not to get hit by a Sleep Dart when flanking Ana by using Defense Matrix at precise timings, or she will be able to escape from you much easier.
If Ana puts D.va to sleep, it might give Ana enough time to escape from you, but keep in mind as soon as D.va awakens her Boosters and Defense Matrix will be available again for use, which can give you another shot at catching back up with Ana again to flank her.
Throwing a Sleep Dart at D.va from long range can be easy for Ana due to D.va's large hitbox and slow movement when firing and D.va is a prime target for Sleep Darts because of this. The same thing applies for Biotic Grenades as well, and the prevention of healing from Biotic Grenades can really leave a dent in D.va's HP.
Ana is very susceptible to D.va's Self-Destruct due to her poor mobility to reach behind a wall to avoid it in time.
Ana's ultimate Nano Boost could help one of her allies escape from D.va's close up Fusion Cannon damage while also being able to deal with D.va much more effectively.

Zenyatta: Zenyatta's Discord Orb is especially deadly to D.va. Since D.va's mech has a large hitbox and moves slow when firing, Discord Orb amplifies all damage done to her by 30% which will most likely knock D.va out of her mech very quickly. Discord Orb can also be thrown through Defense Matrix making her an easier target for him.
D.va can counter Zenyatta's Discord Orb by using her Boosters to boost behind a wall to lose line of sight from Zenyatta. D.va can also use Defense Matrix to block incoming shots from hitting her while she has the orb on her. Also using a Self-Destruct will instantly remove the Discord Orb.
Zenyatta's basic attack weapon (Orb of Destruction) can be hard to aim at smaller targets, but with D.va it is much easier due to her large size and slow movement when firing. His charged Orb shots are very deadly to D.va and combined with Orb of Discord, he quickly makes easy work of her.
Attempting to flank Zenyatta as D.va is possible, but it will be more difficult than Mercy because he can use his ultimate Transcendence to save him and his allies from a D.va attempting to flank his team. If he doesn't have Transcendence available then D.va will have a good chance of taking him out. So I only recommend flanking Zenyatta if you know his ultimate is still charging up.

Mei: Mei has some strong counters against D.va. D.va's Defense Matrix does not work on Mei's short range frost blaster, but it does work on her long range icicle shots. From a distance D.va does very little damage with her Fusion Cannons, as they are most effective in close range, however D.va will need to keep her distance from Mei or she will most likely get frozen and ejected from her mech. Up close and D.va can escape from the freeze effect by boosting away from it.
Mei's Ice Wall is a great counter to D.va's ultimate Self-Destruct. When D.va uses Self-Destruct, Mei can simply throw an Ice Wall right in front of it between her and the exploding mech, this will not only save Mei, but her team also. This also enables her team to keep fighting and not have to find a wall to hide behind.
When Mei uses her ultimate Blizzard, you can simply avoid it by Boosting away from it. And if you have a quick enough reaction time, you can use Defense Matrix to absorb Mei's Blizzard drone before it deploys, doing this will also reset Mei's ultimate charge status back to zero. If Mei successfully employed her Blizzard, D.va can easily boost out of the area of effect to save herself from freezing.

Zarya: Zarya's explosive particle charges are very deadly to D.va from medium to long range, since D.va is such a big target and moves slow when firing. Close up and D.va can dish out more damage to Zarya with Fusion Cannons (as long as Zarya's gun is not charged up).
Defense Matrix does block Zarya's Charged Particle Shots and also her ultimate Graviton Surge (before it deploys). Defense Matrix does NOT block Zarya's short range particle beam.
Zarya's poor mobility makes running away from D.va a challenge, but she can use her Particle Barrier to stay alive longer. Particle Barriers can also save Zarya from D.va's Self-Destruct while still being able to continue attacking at the same time.
Zarya's ultimate Graviton Surge is not very effective against D.va. If trapped in the surge, D.va can use a Defense Matrix to block incoming shots and projectiles from hitting her trapped allies. D.va can also use her Boosters to escape out of it as well.
Defense Matrix can also absorb Zarya's Graviton Surge before it detonates, but one would need to be extremely quick with the trigger in order to stop it.

Roadhog: Since D.va's mech has a large hitbox, Roadhog's Scrap Gun happens to be very powerful against her. Roadhog's Chain Hook will also give D.va a hard time as it only makes it easier for Roadhog to dish out more damage to her close up. After getting chained in, D.va can attempt to boost away from Roadhog, or backup while using Defense Matrix to avoid further damage. Keep in mind Roadhog can still Chain Hook you while Boosting or using Defense Matrix.
Overall it will be tough to take out Roadhog, even from a distance since he can easily heal up his damage with his Take A Breather ability. D.va's Boosters will knock back Roadhog, but it will NOT cancel the heal effect of his Take a Breather ability.
When Roadhog uses his ultimate Whole Hog, D.va can easily block it with her Defense Matrix ability, protecting her whole team from it. D.va also has the option to use her Self-Destruct on Roadhog while he's using Whole Hog since he will be forced to keep firing until it is over, this can quite easily take him out.
Since Roadhog has poor mobility and slower movement, he will have a harder time taking cover from D.va's Self-Destruct ultimate in general.

Junkrat: Since D.va and her mech are such a big target, Junkrat's grenade spam works very well on her. As long as D.va remains in the distance from Junkrat, he becomes unstoppable with his grenade spam. However if D.va comes in close range she can do massive damage with her Fusion Cannons, but D.va needs to be very careful and watch out for any of Junkrat's traps and mines which he can throw at her up close. Junkrat can also escape from D.va with a mine jump, putting him in another position for more grenade spam.
It's important to be aware of that D.va's Defense Matrix will absorb Junkrat's frag grenades and Concussive Mines, but not his Traps.
TIP: When approaching Junkrat with Boosters, it's usually wise to also turn on Defense Matrix so it will absorb any mines he may throw out at you, this will give you a good chance to do some serious damage with your Fusion Cannons close up to him.
Junkrat can easily avoid D.va's Self-Destruct by mine jumping away from it, or simply hiding behind a wall. Junkrat's ultimate Rip-Tire can be effective on D.va as long as her Boosters are still on a cooldown. D.va's Fusion Cannons also work decently for shooting down Rip-Tires.
Keep in mind that there is a short delay right when D.va ejects from her mech, this gives Junkrat a small amount of time to throw down a Trap/Mine combo to trap her when she lands. Constant grenade spam can also kill a D.va ejecting from her mech.

Winston: It's best to keep Winston in medium range. If Winston gets too close to D.va he can deal decent damage with his Tesla Cannon or his ultimate Primal Rage. Even though D.va out DPSes Winston in close range, If he gets too close D.va is usually better off just boosting away from him, unless he is nearly low on health. If he's too far away then D.va's Fusion Cannons will be too weak, but in medium range she can hit Winston well with Fusion Cannons and there is nothing Winston can do back besides protecting his team with Barrier Shields or potentially leaping at you.
Unfortunately there is nothing that Defense Matrix will block from Winston, as all his attacks are either melee based or channeled based. Self-Destruct is not very effective against Winston, as he can simply leap away from it to safety or use a Barrier Projector to block it.
Once you get ejected form your mech, Winston is the best counter to D.va in human form, as he can simply auto aim at you with his Tesla Cannon and leap at you if you try to run from him.

McCree: McCree usually shines at close ranges with his Flashbang and fan fire ability, but D.va can actually put up a good fight against McCree up close. If timed right, D.va can use her Defense Matrix ability to absorb McCree's Flashbang and she can do a lot of damage close up with her cannons. D.va can also boost through McCree to knock him down before he gets any fan fire attacks in. But McCree can do some decent damage to D.va in medium range with his revolver, which is where he is usually better off at against D.va. Since D.va is such a big target, McCree's fan fire ability even works well at medium ranges against her.
As D.va, consider boosting closer to McCree to dish out more damage to him, especially if he is getting low on health.
McCree can use his Combat Roll to quickly get behind a wall to avoid D.va's Self-Destruct, and D.va can use her Defense Matrix ability to block McCree's ultimate Deadeye.

Reinhardt: Reinhardt has some strong counters against D.va, he can use his shield to block D.va's Self-Destruct, potentially protecting his whole team from it while they can still fight and not worry about taking cover. But it will put a dent into his shield as Self-Destruct does up to a 1000 damage and his shield has 2000 HP.
Most of Reinhardt's abilities are ground based (including Rocket Hammer, Charge, and his ultimate Earthshatter), all of these can be avoided by getting to a higher ground. With Boosters so readily available, she can easily boost to high up ledges where Reinhardt cannot get up to and she can be safe from most of Reinhardt's abilities. You just have to watch out for his Fire Strike ability which can be deadly to D.va. The only use of Defense Matrix against Reinhardt is for Fire Strikes, so keep this in mind, but it's usually just as easy to strafe to avoid his Fire Strikes.

Reaper: Even though Reaper out DPSes D.va at close range, D.va still has enough hitpoints to take a number of hits from Reaper. Since both heroes have great escape mechanisms, it usually doesn't result in a kill from either hero most of the time. D.va can use her Boosters to boost away from Reaper protecting her from not only Reaper's shotguns but from his ultimate Death Blossom as well. D.va's Defense Matrix can also block Death Blossom too. While Reaper can use Wraith Form to escape from D.va or use Shadow Step to quickly get right up close to D.va which can be very deadly to her.
D.va's ultimate (Self-Destruct) can be easily avoided with Wraith Form or Shadow Step.

Soldier 76: Soldier 76 is very deadly to D.va at medium to long range. Although his Pulse Rifle does fall-off distance damage with poor accuracy, he can still take you down fairly easy thanks to D.va's large hitbox and slow movement while firing. If you can, boost up close to Soldier 76 and take him out with your Fusion Cannons, you'll just need to watch out for his Helix Rockets, which can be harder to avoid up close.
Helix Rockets can work good on D.va, but she can block it with Defense Matrix or escape it with her Boosters. D.va can also use Defense Matrix to stop incoming shots from Soldier 76's ultimate (Tactical Visor), or even use her ultimate Self-Destruct to nullify Tactical Visor as well.
When you are in human form, stay as far as you can from Soldier 76, and you will be further protected from everything he can do to you, including his ultimate Tactical Visor, which is much more deadly to you in human form.

Lucio: Lucio can be a nuisance to D.va. His speed and heal aura makes it much harder for D.va to kill him and his whole team. Getting up close to Lucio can be difficult due to his Soundwave ability (knocks you back), which also cannot be blocked by D.va's Defense Matrix ability. If you can, still try to get close to him anyway as that is where D.va will do the most damage to him.
Lucio's ultimate Sound Barrier will not be enough to totally block off a Self-Destruct, however tanks receiving Sound Barrier may just have enough health to survive a close up Self-Destruct hit. Lucio's Sound Barrier provides his nearby allies with +500 shields, while D.va's Self-Destruct does up to 1000 damage to all nearby enemies.

Symmetra: It's generally difficult to take out Symmetra because she is usually either busy putting up Sentry Turrets and Teleporters or in the back of her team lobbing Photon Orbs. This means in order to take her out, you will need to go flank her by boosting to her and then kill her up close, which can be difficult. Up close and Defense Matrix does not work on Symmetra's Projector beam, so instead just focus on killing her with your Fusion Cannons.
If you know a room is populated with Symmetra's Sentry Turrets, launching a Self-Destruct into the room could be a good way to clear it out. D.va's Fusion Cannons also work really well for taking out Sentry Turrets since her cannons fire rapidly and have a large hit area with no reloading.
Symmetra's Teleporters can be hard to find sometimes, but D.va is actually good at hunting down her teleporters with her Boosters. Simply boost around to find the teleporter and take it out. If the teleporter is heavily guarded, then launch a Self-Destruct at it to take it out if you can.

Hanzo: Hanzo can dish out a lot of damage to D.va from nearly all ranges. In order to really deal with Hanzo, D.va will need to get closer to him via boosting and deal close up damage with her Fusion Cannons. Up close and Hanzo can use his Scatter Arrow shot at D.va along with rapid Storm Bow shots while running away from D.va's Fusion Cannons. If your quick enough, use Defense Matrix on Hanzo's Scatter Arrows if you can. Hanzo's mobility is somewhat poor (he can climb walls though), so he will have a difficult time running away from D.va.
If Hanzo uses Dragonstrike, simply strafe around it, or use Boosters if you have to. You can use Defense Matrix to block and absorb the initial arrow of Dragonstrike, but once the actual Dragons get deployed it cannot be blocked/absorbed by Defense Matrix.
Launching a Self-Destruct at Hanzo is a great way to disable him from combat for a brief period of time.

D.va: Going head to head with another D.va really comes down to who can dish out more damage with the Fusion Cannons and who can stay alive longer via boosting to health packs. Defense Matrix should really only be used when your low on hitpoints and need to retreat to health packs.
When you are in human form, stay in human form until you get down lower in HP, then call your mech. By doing this you will be able to dish out more DPS with your blaster gun than your mech's Fusion Cannons while also taking advantage of D.va's hitpoints in human form.
And of course Self-Destruct can be avoided by boosting away from it and taking cover. Keep in mind that Defense Matrix has no use against an Self-Destruct.

Tracer: Tracer needs to get close to her victims to really do any damage, since she has fall-off distance damage with poor accuracy at longer ranges, but D.va is also very deadly up close with her Fusion Cannons. This makes attacking D.va as Tracer somewhat difficult. D.va should not be a prime target for Tracer as D.va has too many hitpoints and can Boost to get more health or escape from Tracer very easily. D.va's Defense Matrix can prevent Tracer from doing some short term damage to her as well as blocking Tracer's Pulse Bomb.
D.va's ultimate (Self-Destruct) is not a big deal to Tracer as she can simply blink away from it. D.va can also survive a Pulse Bomb hit, and even if her mech dies, D.va will still live and call down another mech. Overall a tough fight for Tracer, but she may be able to pull off some harassing shots at D.va to throw her off track a bit.
News/Home | Blog | Follow | Unlock Full Guide
Attack |
Defense |
Tank |
Support |
 Genji
Genji Bastion
 D.va
D.va Ana
Ana McCree
 Hanzo
Hanzo Reinhardt
 Lucio
Lucio Pharah
 Junkrat
 Roadhog
 Mercy
Mercy Reaper
 Mei
Mei Winston
 Symmetra
 Soldier76
 Torbjorn
 Zarya
Zarya Zenyatta
 Sombra
 Widowmaker
 Tracer
Map Guides
 Temple of Anubis
 Hanamura
 Watchpoint Gibraltar
Overwatch Hero Introductions - Basics Guide
How the Mechanics Work in Overwatch
How Headshots Work In Overwatch
Overwatch Game Modes Overview
Overwatch Health Types & Hitpoint Basics
Overwatch Terms, Abbreviations, & Their Meanings
Easiest and Hardest Overwatch Heroes to Master
My Hotkey
Bindings For Overwatch & Why I Use Them
|
Feel free to leave any type of comment, such as how you like the guide and if it helps you at all, or to report something that is inaccurate in the guide. |
