
Bastion In-depth Strategy Guide
( FP's Overwatch Strategy Guide )
 Bastion
is a unique robot defensive hero that has two main configurations: a
walking mobile shooter and a stationary powerhouse with a gatling gun.
He also has a 3rd configuration (his ultimate), which turns him into a
mobile tank that shoots cannons in a large blast radius which is very
effective for just about any situation. Bastion can provide his team with a very powerful stationary DPS
defense that is great at guarding objectives,
choke points and establishing a front for his team. However,
Bastion's superior DPS is not without his drawbacks. He is
immobile when in Sentry mode, even though he can turn 360 degrees.
Enemies that hit Bastion in the rear while in Sentry mode will do double
the damage to him, so you will need to watch out for offensive flankers
that come from behind.
Bastion
is a unique robot defensive hero that has two main configurations: a
walking mobile shooter and a stationary powerhouse with a gatling gun.
He also has a 3rd configuration (his ultimate), which turns him into a
mobile tank that shoots cannons in a large blast radius which is very
effective for just about any situation. Bastion can provide his team with a very powerful stationary DPS
defense that is great at guarding objectives,
choke points and establishing a front for his team. However,
Bastion's superior DPS is not without his drawbacks. He is
immobile when in Sentry mode, even though he can turn 360 degrees.
Enemies that hit Bastion in the rear while in Sentry mode will do double
the damage to him, so you will need to watch out for offensive flankers
that come from behind.
Name:
SST Laboratories Siege Automaton E54
Difficulty:
Easy
Role: Defense
Age: 30
Occupation: Battle Automaton
Base of Operation: Unknown
Release Date: 10-27-2015
Base Hitpoints: 300 - (100 of it is armor)
Bastion
|
 |
Main attacking weapon (Recon Mode) In Recon mode, Bastion is fully mobile, outfitted with a submachine gun that fires steady bursts of bullets at medium range. Ammo: 25Rate of fire: 8 rps Damage: 6-20 per shot (fall-off distance damage) Reload Time: 2 seconds Headshot?: YES Default Hotkey: LM |
Bastion's submachine gun in Recon Mode only does an ample amount of damage to short and medium range. Accuracy will decrease the longer you hold down the fire button, so you may want to do short pulse shots (rapidly pressing the fire button) for longer range targets to increase your accuracy. While in Recon Mode, Bastion really doesn't do anything special and is overall a pretty weak target. Because of the lower DPS in Recon Mode, you should always be on the lookout for places to go into Sentry Mode so you are able to dish out good DPS to your enemy.
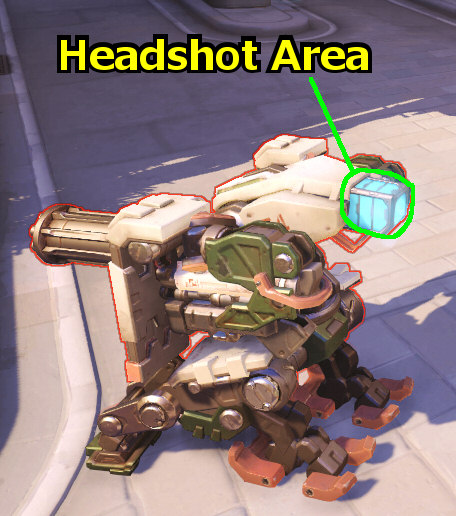
Main attacking weapon (Sentry Mode) In Sentry mode, Bastion is a stationary powerhouse and equipped with a gatling gun capable of unleashing a hail of bullets. The gun's aim can turned 360 degrees and "walk" across multiple targets, dealing devastating damage at all ranges. While in Sentry Mode, Bastion takes double the damage from behind. Ammo size: 300Rate of Fire: 30-40 rps Damage: 4-15 per shot Reload Time: 2 seconds Headshot?: NO Default Hotkey: LM |
While in Sentry Mode, Bastion is able to turn and shoot in 360 degrees. His headshot area changes to the behind instead of the front.
Because of the extreme vulnerabilities from the rear, it's generally a good idea to plant yourself in Sentry Mode up against a wall or corner so that it will be harder for enemies to flank you from behind. If you are setup in the open you will need to be constantly aware of your surroundings and watch your back from flankers, especially from offensive heroes like Tracer, Genji, and Reaper.
Sentry Mode is extremely valuable for setting up strong choke points, fronts, guarding objectives, and providing great DPS to supplement your whole team. Sentry Mode is powerful when placed on top of the Payload, serving as a moving powerful defense. Another tactic that seems to work very well with Sentry Mode is being able to get up higher. Getting up higher gives Bastion a larger field of view to fire at, more hidden from his enemies, safer and more protective. An allied Mei can use her Ice Wall ability to lift up a Bastion to get to some of these higher areas.
Later on I plan on making in-depth guides and videos showing you all the best spots for Sentry Mode and places where an allied Mei can use her Icewall ability to lift up a Bastion to higher areas he couldn't reach otherwise.
Some more tips while in Sentry Mode:
- If you run out of ammo and you are being attacked, you are better off switching to Recon Mode to continue firing, because it only takes 0.5 seconds to switch to Recon from Sentry and it will fully reload your weapon in the process (reloading in Sentry Mode takes 2 whole seconds).
- The 2 seconds spent while reloading is a good time to sway around your area to scout things out to see if there are more enemies to shoot at, or to watch out for offensive flankers.
- Always keep an eye out on your health and make sure you are healed up. Use Self-Repair to keep your health up, especially when not firing at enemies.
- It takes 6.5 whole seconds to unload a full Sentry Mode clip. It's good to keep a mental note of this so you know when you need to either reload or uplift elsewhere to reload.
Passive Ability Bastion takes 20% less damage while in Configuration: Sentry or Tank. |

This passive ability simply allows Bastion to be more "tanky" while in Sentry mode or Tank Mode (ultimate).
Ability with cooldown Bastion transforms between its two primary combat modes to adapt to battlefield conditions. Cast Time:Recon to Sentry: 1 second. Sentry to Recon: 0.5 second. Default Hotkey: Shift |

Using Reconfigure also reloads your weapon. Because of this, it's a good tactic to Reconfigure out of sentry mode when you get low on ammo to accomplish two things: moving somewhere else to plant a Sentry while also reloading your weapon.
It's important to not stay in Sentry mode in the same place for too long. If the majority of the enemy has spotted you and you are taking damage, then that is the point in which you should consider Reconfigure to Recon to reposition elsewhere. By constantly changing where you use Sentry mode at you will confuse the enemy on your whereabouts and they will have a harder time predicting where you will be at.
Reconfigure Jump
A little trick you should be aware of is that you can jump forward while
initiating a Reconfigure to Sentry Mode. This can give you a little extra
movement until a Sentry is ready. You can also jump down from a high spot
while Reconfiguring, so when you land on the ground, Sentry Mode will be ready
for you.
Ability Bastion restores its health; but he cant fire his weapons while the repair process is in effect. Cast Time: ChanneledHeal Amount: 25% of total health per second Default Hotkey: Alt Fire |

Bastion can use his Self-Repair ability in all modes (even during his ultimate). Self-Repair allows Bastion to never worry about reaching health packs since his mobility is not so great anyways to get to them quick enough. When not firing at enemies, you should constantly make sure you are fully healed up via Self-Repair.
|
ULTIMATE |
Ultimate Ability In Tank mode, Bastion extends wheeled treads and a powerful long-range cannon. The cannon's explosive shells demolish targets in a wide blast radius, but Bastion can only remain in this mode for a limited time Default Hotkey: QAmmo: infinite (no reloading) Duration: 8 seconds Cast Time: 1 second Fire Rate: 1/second Damage: 190 (direct hit) - Splash damage varies. Range: 4 meters Self Damage: up to 40 self damage. Headshot?: no |
While in tank mode, Bastion can freely move around and shoot very powerful cannon balls that fly somewhat in an ark and have a very large blast radius.
When to use Tank Form
- When initiating a push - When on the attackers team, Tank Form gets a bit more use because it can be use to make pushes towards objectives more successfully. This is best combined with a protection from another ally (as discussed below).
- When there are a lot of enemies together in a confined space - The splash damage from your cannons will end up being more useful in this situation than Bastion's Sentry Mode gatling gun.
- To save yourself from getting ambushed - Having your ULT ready while in Sentry Mode is actually a good way to protect yourself from flankers. If you see yourself getting attacked from behind while in Sentry Mode, turn your ULT on to save you and kill anyone around you quickly.
Because of the large blast radius, Bastion's Tank Form pairs well with some other hero abilities, including:
- Tank form is powerful when combined with Zarya's Graviton Surge (gravitates enemies close together), so Bastion can just shoot cannons at it.
- Mei's Blizzard or Ice Walls help to prevent enemies from running away, giving Bastion easy shots with his cannons.
While in Tank Form, Bastion will be a prime target to his enemies. These tips can be used to further protect him while in Tank Form:
- Lucio's ultimate Sound Barrier helps protect Bastion while in Tank form by providing a large amount of shields for short period of time.
- Allied Zarya's Projected Barrier.
- Getting inside Winston's Barrier Projector is a good strategy.
- Reinhardt's Barrier Field (shield) provides Bastion for cover while using his ULT. Reinhardt's ULT (Earthshatter) is very protective while in Tank form as well.
- Getting Zenyatta's Orb of Harmony while in Tank Form is a very powerful combo.
- Soldier 76 can put down a Biotic Field to keep you healed up.
- Mercy can be with you to damage boost and heal you.
Cannon Jump
While Bastion is in Tank Form he can perform a cannon ball jump (similar to a
rocket jump from quake) by looking down at the ground, jump and then fire a
cannon. Bastion will be propelled into the air about 3 times higher than a
normal jump. This can potentially allow him to get up to higher spots that
he couldn't get to otherwise. Getting to higher spots can help him get
away from deadly heroes such as Reinhardt, Reaper and McCree. This can
also position himself better to fire another cannon in mid air to hit his
enemies with.
Bastion's Strength and Weaknesses Vs Other Heroes

McCree: McCree has poor map mobility and he pretty much needs to get up close to really do any serious damage to anyone. Although if he manages to get close to Bastion, his Flashbang and Fan Fire ability can quickly take him out. Besides Combat Rolls, there isn't much else McCree can do to deal with a Bastion.
If you see McCree use his ultimate Deadeye while you are in Sentry Form, quickly find him and then focus fire on him immediately before he gets his shot off. If you have near full health while in Sentry Form it will take a good 3 seconds for McCree to line up a Deadeye shot with you (from full HP), so it's not too powerful against you.

Soldier 76: Soldier 76 is practically a sitting duck to Bastion. You pretty much don't need to worry about a Soldier 76 flanking you while in Sentry Form. The main thing to watch out for is Soldier 76's Helix Rockets, which will do a good amount of damage to you. Even then you can simply heal up the damage and you should be fine since Soldier 76 can only fire one Helix Rocket every 8 seconds. Although if you see a sprinting Soldier 76 coming up near you, that should be a prime target for you to shoot at.
Soldier 76's ultimate Tactical Visor can be deadly to Bastion and you will need to either quickly locate and focus fire at him before he can do any serious damage to you or Reconfigure to Recon to take cover behind a wall in the meantime.

Mercy: Mercy is not much of a threat to Bastion. Although she is usually out of sight most of the time, she can occasionally pop in view and once she does, you can quickly take her out while in Sentry Form. If Mercy is healing or buffing someone that is attacking you, that is usually no big deal for Bastion's insane DPS to tear through.
Mercy also has a difficult time supporting offensive heroes since most of them have superior mobility that Mercy simply cannot keep up with. So not being able to support most of the heroes that Bastion will actually have troubles with makes her a bit weaker overall against Bastion.
However, Mercy does have ways to counter Bastion. Mercy's Caduceus Blaster is actually quite effective against a Bastion Sentry, especially if she can get behind a shield (or barrier) while spamming her blaster at him.

Zarya: Zarya is not too much of a threat to Bastion. While in Sentry Form you can melt Zarya's barriers (both personal and projected) in about a half a second, normally they will last for 2 seconds before the cooldown is up for it. Even though you will give Zarya +40 strength to make her Particle Cannon stronger, it doesn't take long for a Bastion Sentry to finish her off completely before she gets many shots in. With this in mind, this is one of the few rare instances where actually killing her barriers first makes sense.
Zarya's slow mobility in general will give her a tough time taking cover from Bastion and she will have a tough time flanking you.
From a distance she can hit you with her explosive charge shots which has the potential to do a lot of damage to you, and she can sometimes achieve this while not being in your line of sight. This is the worst thing Zarya can do to you.
Zarya's ultimate (Graviton Surge) does not do much to a Bastion Sentry. If you get stuck in a Graviton Surge you can still fire your weapon (even in Sentry form), but you will still be very susceptible to area effect damage by Zarya and her teammates. Zarya will need to get at least somewhat close to you in order to pull this off though.
Zarya can protect herself with a Particle Barrier against Bastion's Tank form, and she can protect an ally with a Projected Barrier against Tank Form as well.

Pharah: Pharah does have great map mobility, but her air flying mobility makes her such an easy target to shoot out of the air for Bastion. Pharah's rockets can do some damage back at you, but since she is usually such an easy target it is generally no problem for a Bastion Sentry to take her out. Pharah's Concussive Blast does not affect a Bastion Sentry at all, as it will not knock him around.
Pharah's rockets do no fall-off distance damage, so the further she is away from you the more of a threat she becomes. If you find yourself getting attacked from her at long range, consider relocating to a spot that Pharah can't reach you from long distances.
Because of Pharah's great map mobility, there is still the possibility of her flanking you from behind. As Bastion, you need to know all the choke points around the map and how they are guarded and to be informed if one of your allies catches someone go through a chokepoint that you can't see. While playing Bastion I have noticed random Pharahs attacking me from behind occasionally, so this can happen sometimes, but not as often as seeing Reapers, Tracers, or Genjis first. With high level of play, Bastions become more stronger overall in this fight. Team communication is the key to having a better protected Bastion from all offensive heroes, and this includes Pharah.
When Pharah uses her ultimate Barrage, quickly locate her and then shoot her down before she can fire too many rockets out. Barrage is easily countered by a Bastion Sentry's insane DPS.

Winston: Overall a Bastion Sentry can deal with Winston very easily. Even though Winston is rated as a tank, he has some very interesting offensive abilities that can work okay against Bastion Sentries. Winston can use his Jump Pack ability to quickly propel himself right up close to a Bastion Sentry and then put down a barrier to block your shots, he can then finish you off with his Tesla Cannon. This usually only works if Winston catches you by surprise, because Bastion can still tear through Winston faster than he can to you.
If you see a Winston leaping at you, try your best to focus fire on him as fast as possible, you may be able to either finish him off or do some serious damage before he gets to you. Winston's Tesla Cannon is self aiming so expect him to be strafing and jumping around you which can make it harder to aim at him, but with good aim Bastion should be able to deal with Winston easily. If Winston's barrier is blocking your shots, don't worry too much because a Bastion Sentry can melt Winston's Barrier in 1.5 seconds.
If you see Winston use his ultimate Primal Rage, staying in Sentry Mode is usually a good choice because Primal Rage does weak damage and will not be able to knock back a Bastion Sentry.
Winston has some decent counters for Tank Form. Winston can avoid Tank Form by simply Leaping away from it or using Primal Rage to knock it away from his team.

Tracer: Bastion's biggest counters are the offensive heroes, especially the ones that are able to move around the map quickly and unnoticed. Tracer excels in this area very well, she can Blink around very fast to get around Bastion to flank him. Her abilities allow her to zip right to a Bastion and throw a Pulse Bomb (Tracer's ultimate), and then Recall out of there to save her. Very powerful and there isn't anything Bastion can do about it.
As Bastion just make sure you keep a good distance and try to stick with your team so they have your back against any offensive heroes, especially Tracer. If she comes close to you, quickly try to turn around at her and aim for the head, you might just be able to take her out if you land enough shots on her. As she is harassing you, keep relocating to different spots so she will have a hard time tracking you down.
Also planting yourself up against a wall so enemies cannot shoot your rear is a very powerful strategy against offensive flankers such as Tracer.

Ana: Ana has strong capabilities against Bastion. Since Ana snipes from a distance she is virtually safe from Bastion's strong DPS Sentry gun. The most potent thing Ana can do against a Bastion Sentry is to simply fire a Sleep Dart at him to disable him from combat for a short period of time, and this can have a huge impact on the game and can let her other allies (especially flankers like Tracer, Reaper and Genji) make their moves to get closer to Bastion to finish you off. After awakening from a Sleep Dart you will be back in Recon Mode (even if you were in Sentry Mode).
Another strong ability in Ana's arsenal against Bastion is her Biotic Grenade, which will prevent you from using your Self-Repair (heal ability) for a few seconds. Ana can fire a few sniper shots at you and before you turn to shoot at her she can then launch her Biotic Grenade at you and then take cover, you won't be able to heal up for a short while and Ana or her allies will have an easier chance to finish you off afterwards.
Ana's ultimate Nano Boost can make one of her allies more effective against a Bastion Sentry. A Nano Boosted enemy will be able to make easier work of a Bastion Sentry by allowing the enemy to take less damage and then be able to kill you quicker with the increased damage output.
When you use Tank Form against Ana, keep moving constantly to avoid being shot by a Sleep Dart. If you do get hit by a Sleep Dart while in Tank Form and another enemy shoots you, you will awaken while still being in Tank Form as long as the cooldown didn't end for it. Another tactic Ana can do against Tank Form is to throw a Biotic Grenade at you to ensure you will not receive healing during your ultimate, increasing the chance of your death. Ana can also use her ultimate Nano Boost on one of her allies close to you to help him survive against Tank Form along with the capabilities of taking you out easier.

Reaper: Reaper is one of Bastion's worst nightmares. Reaper's flanking abilities work great for ambushing Bastion from behind. His Wraith Form and Shadow Step abilities enable him to get behind Bastion (usually unnoticed) to flank you.
As Bastion, you and your team need to be very aware of where the enemy is at, and if any of them are working their way up to flank you, in which you need to take action by relocating elsewhere or having some of your teammates protect you. If you see a Reaper approaching you using Wraith Form, keep your crosshair on his head and get ready to dish out damage at him, you just might be able to take him out. The idea is to fire at him before he can get his shots off in time. Listen for his footsteps and watch out for him approaching you from behind.

Symmetra: Symmetra is a threat to Bastion, but unlike Tracer and Reaper, Symmetra's threat comes not from her mobility, but from her alternate weapon fire (charged photon orbs). Symmetra's Photon orbs act similar to Reinhardt's Fire Strike, in which it can strike through any enemy in its path until it hits a wall. Usually photon orbs are easy to avoid since they fire so slowly, but since a Bastion Sentry is stationary, it can be much harder to avoid. If you see a photon orb flying your direction you do have the option to lift up and relocate elsewhere constantly or keep healing, but this can keep you out of the fight often.
Setting a Sentry on top of a Payload can make it harder for Symmetra to fire her photon orbs since you will be a moving target that will be harder for her to aim at.
Another advantage that Symettra has is her Teleporter is virtually safe from Bastions, giving her one less enemy to worry about hunting down her Teleporter.
As Bastion, if you see a Symmetra on the battlefield, focus on killing her as quick as you can. If you find yourself dying to her orbs frequently then it might be a good time to switch heroes.

Genji: Genji can do some serious damage to you from long range with his shurikens, since it will be easy to aim at stationary targets. You will need to respond quickly to this and fire at him or consider uplifting and relocate elsewhere.
Genji's parkour abilities are just as good as Tracer (if not better in certain situations), as they are good enough to get behind a Bastion to flank him. He can use wall climb, Swift Strike and Deflect to get close to a Bastion Sentry. A properly executed Swift Strike can be devastating to you, as it will be hard for you to find out where he is exactly after swift striking. You will need to turn around and start firing at him. But be careful as he can turn on Deflect to ricochet your bullets right back at you. Try your best not to fire at him when he has Deflect on. At this point Genji can then turn on his ultimate (Dragonblade) to finish you off along with any others in the area.
I want to stress again how important it is to be careful around a Genji, as his Deflect ability can easily decimate a Bastion Sentry in a fraction of a second. You must be very cautious around Genji and always expect him to use a Deflect on you, always get ready to take your finger off of the trigger!
Thanks to Genji's wall climb and Swift Strikes, he is also a good counter for an elevated Bastion due to Mei's Ice Wall boost.
Be careful using your Tank Form ultimate around a Genji, because he can use Deflect on one of your cannon balls to fire it right back at you to possibly kill you in one hit.

Junkrat: The reason why Junkrat is a good counter to Bastion is because of his Frag Launcher weapon. The grenades from Junkrat's Frag Launcher can travel decent distances and bounce around walls or corners eventually ricocheting to a Bastion Sentry while Junkrat can fire them usually out of Bastion's line of sight.
Junkrat's ultimate Rip-Tire happens to be somewhat effective against Bastions. These tires can climb walls and possibly flank a Bastion Sentry from behind. As Bastion, if you see Junkrat's Rip-Tire within view, kill it immediately so it will protect you and your whole team by preventing the explosion.
Luckily Bastion doesn't usually need to worry about Junkrat's Mines and Traps since he moves slow approaching them and is in Sentry Mode most of the time anyway.

Hanzo: All of Hanzo's Storm Bow shots can be devastating to a Bastion Sentry as he can fire them from long distances and since a Bastion Sentry is stationary, it will be very easy for Hanzo to aim and fire at you dealing a lot of damage in return.
Hanzo can fire a Sonic Arrow on you which will stick to you and follow you even if you relocate elsewhere, which will make it easier for Hanzo and his team to know where you are at. Sonic Arrows will also do damage like a normal arrow as well. Hanzo's Scatter Arrow shot at the ground in front of you will deal a large amount of damage to you too.
As Bastion, dealing with Hanzo can be annoying since he is usually very far away. Use pulse shots (rapidly pressing the fire button) to increase your accuracy from longer ranges to deal more damage to him.
Hanzo's ultimate Dragonstrike is very powerful against Bastion. Dragonstrike travels across the entire map (even through walls) and does insane DPS to anything in its path. This can either kill a Bastion Sentry or force one to move around to avoid it, thus giving Hanzo's team an easier time to push forward.

Widowmaker: Like with Hanzo, sniper shots from Widowmaker can be devastating to you while in Sentry Form. Due to a Bastion Sentry's stationary nature, Widowmaker can easily aim and fire at you from very long ranges and do a lot of damage with her sniper shots. As Bastion it can be difficult to do damage to enemies at longer ranges. You will need to do pulse shots (rapidly tapping the fire button) to increase your accuracy from longer ranges against Widowmaker and her small hitbox.
You will also need to keep an eye out on her and see where she grapples to as she moves around the map. Focus on her before others as she is generally a bigger threat to you.
Sometimes when dealing with a Widowmaker the best thing you can do is to position yourself so you are out of her line of sight, by usually going back further from your team and changing the angle you face from the main choke point.
You generally don't need to worry about a Widowmaker flanking you from behind, although it can happen. Widowmaker can use her Grappling Hook to move around the map possibly getting behind you. Although I think Widowmaker is usually better off keeping a distance from you and sniping from afar.
Widowmaker's ultimate (Infra-Sight) can be slightly effective against Bastions as it will reveal your camping spot to her whole team, making you more vulnerable overall.
Widowmaker can throw Venom Mines, but Bastions rarely need to worry about that, although I have seen some good Widowmaker players lob a Venom Mine at me and literally took me out with it. So if aimed properly, Venom Mines can be deadly to Bastions, but I have rarely seen this.

Mei: Mei's Ice Wall acts as a powerful shield against a Bastion's Gatlin gun, enabling her team to push forward more easily. Other than her Ice Wall there's not a whole lot else she can do against Bastion. Although Mei's long range Icicle shots can do some decent damage to you, it's generally not enough to take out a Bastion Sentry. Mei can attempt to flank Bastion with proper uses of Ice walls and Cry-Freezes, but she will most likely be noticed too quickly by you and your teammates for her to get close enough to you. Mei is more of a support for the other offensive heroes to get to Bastion easier.
Mei's ultimate Blizzard is only somewhat effective against Bastion Sentries, since the slowing effect of Blizzard has no use against a stationary Bastion Sentry anyways. You might just get frozen for a short period of time.
Mei is a good counter to Bastion's Tank ultimate, since she can just throw up an Ice Wall to block Bastion's tank shots. Mei's Blizzard is also very effective against Tank form.

D.va: Bastion's Sentry Form only does 50% damage to armor. Since D.va is comprised of mostly armor she can withstand almost twice the damage from him than normal HP heroes can.
The usual way for D.va to deal with a Bastion Sentry is to simply use Defense Matrix to protect her allies while they kill Bastion from afar. D.va can use her Boosters and Defense Matrix at the same time to quickly get right up close to Bastion Sentry without taking damage. It can then be possible for D.va to kill Bastion with her Fusion Cannons up close. But its a close fight, and sometimes a Bastion Sentry will still win this fight. Just try to keep your crosshair on D.va's head inside the mech (for headshot damage) to try and take her out first. Having backup from your allies really comes in handy against this combo that D.va can do to you. D.va can make this work more effectively by flanking you from unexpected angles. So pay attention to her Booster sounds and be prepared to relocate if you need to.
D.va can also use her ultimate (Self-Destruct) by literally launching her Self-Destructing mech toward you while in sentry form, forcing you to uplift and take cover from the explosion.
D.va's Defense Matrix ability blocks all incoming Bastion shots, including Bastion's Tank form, enabling her team to push forward more easily.
D.va's Light Blaster Gun in human form can be effective against a Bastion Sentry, but generally only if D.va is a pretty far distance from him. D.va in human form will melt almost instantly to a Bastion Sentry up close.

Zenyatta: Zenyatta can be very deadly to a Bastion Sentry. Even though Zenyatta will drop like a fly to your gatling gun while in Sentry Form, he can catch you off guard and take you out with his deadly orbs. He can throw an Orb of Discord on you which will amplify all damage done to you by 30%. He can then use his energy orbs to do a lot of damage to you, especially his charged volley shot. Normally Zenyatta's charged volley shots can be very hard to aim, but since a Bastion Sentry is stationary it will be very easy to aim his charged volley shots at you.
Discord Orb is deadly against Bastion. The only thing Bastion can really do against it, is to find a really safe spot to use Sentry at and he would have to use Self-Repair more to heal up the extra damage done by the Orb.
Zenyatta can put his Orb of Harmony on an offensive ally to help them get around and behind you to take you out easier, or he can use his harmony orb to heal up damage that you did to his allies.
Bastion has little to worry about with Zenyatta's ultimate Transcendence, as he can still tear through enemies while they are under it.

Torbjorn: A Bastion Sentry is far more powerful than Torbjorn's turret, especially at levels 1 and 2. Although, level 3 turrets are incredibly much more powerful and is linked to Torbjorn's ultimate, so taking that out will be a tad harder. You should be able to take out a level 3 turret as long as you have enough health and do not get targeted too much by it.
Overall Torbjorn isn't much of a threat to Bastion, he can provide armor packs to his teammates and along with his turrets, he can keep a Bastion and his team from pushing forward just a bit harder.
Oftentimes Torbjorn will build a turret on top of a Payload, in these instances a Bastion waiting in Sentry Mode is a very powerful counter to this.
When Torbjorn uses his ultimate Molten Core, his turret will automatically turn to level 3 and if Torbjorn and his turret are both targeting you at the same time then it's GG for Torbjorn.

Roadhog: Most of the time Roadhog is generally too far away from Bastion to Chain Hook you into him, but it can happen and if it does there is not much you can do about it and you will most likely die to it.
Keep your distance from him as best as possible to prevent being chained into him. Luckily Roadhog's slow mobility will make it harder for him to get closer to you, and especially behind you where you are most vulnerable.
Since Roadhog is usually too far away from you, his ultimate Whole Hog is usually not very useful against a Bastion Sentry as your armor can protect yourself from the shrapnel shots while you dish out a good amount of DPS to him in return.

Reinhardt: Reinhardt's Fire Strike is one of his strongest abilities against you. Even though Fire Strikes are slower moving projectiles, that's no problem against a stationary Bastion Sentry. Since Reinhardt can use a Fire Strike every 6 seconds, this will force you to keep repairing or reposition elsewhere.
Besides Fire Strike, Reinhardt can attempt to Charge and pin a Bastion Sentry, but you can still kill Reinhardt while he is charging. Charge really only works if it's a relatively shorter distance. Mei can also lift you up in places with an Ice Wall where Reinhardt cannot reach thus making Charge useless in those situations. Reinhardt's Barrier Shield can help him and his allies get closer to you, but you can tear through his shield very fast in about 5 seconds regardless of range.
Overall, you should try to keep a distance from Reinhardt, and getting up at higher spots really does help to stay out of harms way from him.
Be careful using Tank Form around Reinhardt, because he can actually Charge and pin a Bastion using Tank Form and it will cancel out the ultimate.

Bastion: Two Bastion fighting while they are both in Sentry Form can happen, especially if you have a Bastion on top of the Payload moving towards the objective. In this case, it's important to quickly focus on killing the other Bastion immediately because they are the biggest threats to each other.

Lucio: It doesn't happen too often, but Lucio can use his fast speed boost and wall skate abilities to get around behind a Bastion to flank him. Doing so can put Lucio's team more vulnerable because he is not there healing his team and is taking a risk to flank Bastion, that's why it's rare to see this.
Lucio's ultimate Sound Barrier is a useful tool for his team to push towards a strong Bastion defense, but Lucio can go down relatively quick to Bastion's gatling gun once the shield wears off thus making this a more even fight overall.
Tank Form can also be counter by Lucio's Sound Barrier, rendering Tank Form virtually useless for the duration of his Lucio's ultimate. However Tank Form lasts 10 seconds where as Sound Barrier only lasts 6 seconds, thus giving Bastion a slight edge in this case as long as Lucio and his team doesn't kill Bastion during Sound Barrier.
Bastion's Allied Synergies Guide
News/Home | Blog | Follow | Unlock Full Guide
Attack |
Defense |
Tank |
Support |
 Genji
Genji Bastion
 D.va
D.va Ana
Ana McCree
 Hanzo
Hanzo Reinhardt
 Lucio
Lucio Pharah
 Junkrat
 Roadhog
 Mercy
Mercy Reaper
 Mei
Mei Winston
 Symmetra
 Soldier76
 Torbjorn
 Zarya
Zarya Zenyatta
 Sombra
 Widowmaker
 Tracer
Map Guides
 Temple of Anubis
 Hanamura
 Watchpoint Gibraltar
Overwatch Hero Introductions - Basics Guide
How the Mechanics Work in Overwatch
How Headshots Work In Overwatch
Overwatch Game Modes Overview
Overwatch Health Types & Hitpoint Basics
Overwatch Terms, Abbreviations, & Their Meanings
Easiest and Hardest Overwatch Heroes to Master
My Hotkey
Bindings For Overwatch & Why I Use Them
|
Feel free to leave any type of comment, such as how you like the guide and if it helps you at all, or to report something that is inaccurate in the guide. |
