
Torbjorn In-depth Strategy Guide
( FP's Overwatch Strategy Guide )
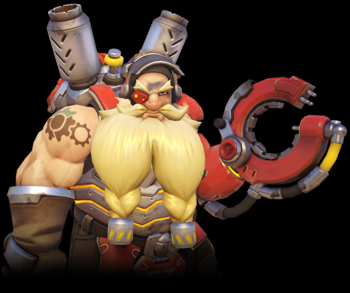 Torbjorn
is a Swedish Engineer specializing in building weapons and armor for his
allies. He bears a resemblance to dwarves and is the smallest hero
in Overwatch. Building and upgrading powerful turrets for strong
defenses is Torbjorn's main focus. His powerful turrets work great
for guarding choke points and objectives. Turrets can be put on
top of Payloads to serve as a mobile defenses. After a hero dies
on the battlefield, he can collect their Scrap which provides him with
the raw material he needs to produce armor packs for his allies.
Torbjorn's ultimate Molten Core basically enhances all
of his current abilities and automatically transforms a level 2 turret
into a level 3 turret allowing him and his turret to dish out an
incredible amount of damage for a period of time.
Torbjorn
is a Swedish Engineer specializing in building weapons and armor for his
allies. He bears a resemblance to dwarves and is the smallest hero
in Overwatch. Building and upgrading powerful turrets for strong
defenses is Torbjorn's main focus. His powerful turrets work great
for guarding choke points and objectives. Turrets can be put on
top of Payloads to serve as a mobile defenses. After a hero dies
on the battlefield, he can collect their Scrap which provides him with
the raw material he needs to produce armor packs for his allies.
Torbjorn's ultimate Molten Core basically enhances all
of his current abilities and automatically transforms a level 2 turret
into a level 3 turret allowing him and his turret to dish out an
incredible amount of damage for a period of time.
Difficulty: Medium
Name: Torbjörn Lindholm
Role: Defense
Age: 57
Occupation: Weapons Designer
Base of Operation: Gothenburg, Sweden
Release Date: 10-27-2015
Base Hitpoints: 200
Torbjorn
|
 |
Main attacking weapon Torbjörn fires rivets at long range, or ejects molten metal from his gun in a short, close-range burst.
Normal Shots: Ammo: 18 Ammo Use: 3 per shot Damage: 60 - 150 max (fall-off distance damage) Fire Rate: 1.33 rps Reload: 2 seconds Headshot?: YES Default Hotkey: RM |
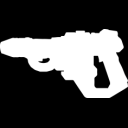
Torbjorn's normal shots fly in an ark to its destination, the travel speed is somewhat fast and only does an ample amount of damage, overall one of the weaker weapons in the game. Normal shots are good for medium to long range.
The alternate fire (charged shots) is good for short ranged enemies as it does a considerable amount of damage more than the normal shots if all shrapnel connects with a target.
Automatic Reloading with Forge Hammer
Keep in mind that your Rivet Gun will automatically reload when you switch to
your Forge Hammer, as long as you give it the full reload time of two seconds
before switching back to your Rivet Gun. This makes repairing/building
your turret a much more viable option instead of manually reloading your Rivet
Gun.
Weapon Hotkeys
The default hotkey scheme for Torbjorn is "1" for Rivet Gun and "2" for
Forge Hammer. I actually recommend changing it so you
only have one button binded to "Next Weapon". This way you will only need
one button for switching between your two weapons.
Attacking weapon / Turret Builder Torbjörn uses his multipurpose hammer to upgrade and repair turrets. In a pinch, it can also be swung as a melee weapon. Damage: 55 (melee attack)Default Hotkey: 2 (to change weapon), then LM for use. Turret Repair: +50 HP per swing Headshot?: no |
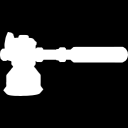
Torbjorn is the only hero in the game (besides Mercy) with two different weapons to choose from, either his Rivet gun (hotkey "1"), or Forge Hammer (hotkey "2"). The Forge Hammer is really only good for upgrading and repairing turrets, or quick melee attacks, otherwise you should switch to your Rivet Gun for your main attacking weapon.
Passive Ability
|

 Torbjörn can collect scrap from enemies
or allies that die on the battlefield.
Torbjörn can collect scrap from enemies
or allies that die on the battlefield.Scrap is only used to make armor for Torbjorn himself and his allies.
- Torbjorn can hold a total of 200 scrap.
- Torbjorn automatically replenishes his own scrap over time at a rate of 50 scrap every 25 seconds.
- Every dead hero (both enemy and ally) will drop a scrap unit that provides 15 scrap.
- Armor packs cost 50 Scrap.
- Building and Repairing turrets cost no scrap.
- Only Torbjorn can see the Scrap that he can collect, which works similar to Reaper's Soul Globes.
- Scrap pieces will disappear from the battlefield after one minute.
- Torbjorn only needs to be within about 10 meters of a Scrap piece to automatically pick it up.
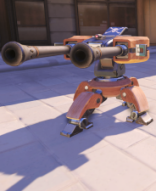
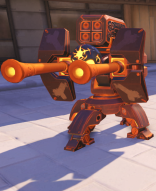
Ability with cooldown Torbjörn constructs an enemy-tracking autocannon that can be upgraded to three levels.
ALL: Ammo: infinite (no reloading) Gun Damage: 14 per shot Rocket Damage: 14 per rocket (fires in bursts of 4) Headshot?: no Hotkey to build new turret: Shift |
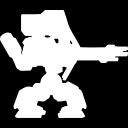
Turrets are Torbjorn's main focus and way of dealing damage to his enemies. Here is an image for each of the three turret levels:
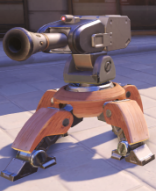
Requirements for each turret level:
- Level 1 is essentially free and is built instantly.
- Level 2 requires you to use your hammer to upgrade the turret, it will take 5 hammer swings to upgrade it to level 2. Also please note that a turret will not actually upgrade to the next level unless it is at full HP, so you may have to do a few extra hammer repair swings if it's not at full HP before upgrading.
- Level 3 requires you to activate your ultimate Molten Core. Once Molten Core is activated, a level 2 turret will automatically upgrade to a level 3 turret with fully healed HP of 800. Once Molten Core is over it will revert back to a level 2 turret and gain +150 HP (but only up to 300 HP for level 2).
Turret Mechanics
- When putting a turret down, the turret will face the same direction that Torbjorn was facing when he puts it down. This is important to know because the turret will always default to that direction when not firing at enemies and it will always take slightly longer for the turret to turn around and start firing at targets behind the turret. So always face the direction where you think the turret will be firing at more often for a faster firing response time.
- Turrets have no fall-off distance damage but they do have a max range of about 50 meters.
- Turrets act as a radar in a sense as they will automatically aim and fire at enemies within view. This can alert you where the enemies are coming from exactly.
- Turrets can attack and destroy Widowmaker's Venom Mines, Junkrat's Steel Trap, Concussive Mines and Rip-Tires.
- A Turret can be placed on top of a Payload to provide a mobile turret, which can be very powerful but also tends to be more vulnerable.
- Torbjorn can only have one turret out at a time. If you place a new turret on the map, the old one will disappear, even if it's a level 3 turret.
- Damaged turrets will look damaged. They will emit smoke and sparks when they get low on health. This is a good warning to let you know that you should repair it.
- A destroyed turret will drop a 25 scrap pickup.
Turret Strategies:
- Turrets act as powerful defenses that can guard objectives and choke points.
- When placing a turret down, try and place it so you will be able to repair it in a protected spot, such as right around a corner or hallway. It's more efficient for an enemy to attack Torbjorn himself instead of the turret when he is repairing a turret. This is because each repair restores +50 hitpoints a second. So try to take cover from the enemies when repairing turrets whenever possible. It's good to memorize which weapons do more damage than 50 DPS, so you know whether or not to shoot at turrets while they are getting repaired by Torbjorn.
Upgrade Turret One Second Faster
You can actually upgrade your turret from level 1 to 2 one second faster by
using an animation cancel on your hammer swings. To do this, first switch
to your hammer and start upgrading your turret. Hold down the attack
button and right when the hammer starts going back, quickly press "1" and then
"2". This switches to your Rivet Gun and then quickly back to your Hammer.
Keep repeating this for all 5 hammer swings for a one second faster upgrade.
This will take some practice to get down more consistently.
This same tactic also works for repairing your turret faster as well.
Later on I will include an in-depth guide on where the best spots to place turrets at for each map.
Ability with cooldown Torbjörn deploys an armor upgrade; either he or his allies can pick it up to absorb some damage. Scrap Cost: 50Bonus Armor: 75 Cooldown: None. Default Hotkey: E |

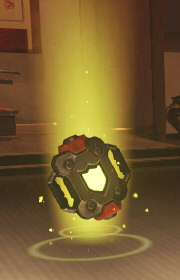 The only use of scrap that you can pick up from the battlefield is to make
armor packs for you and your allies. Always keep an eye out on
your scrap count, if you have close to your max of 200 scrap, just throw out an armor pack or two,
this way you will then be able to pick up more scrap while beefing up your
allies.
The only use of scrap that you can pick up from the battlefield is to make
armor packs for you and your allies. Always keep an eye out on
your scrap count, if you have close to your max of 200 scrap, just throw out an armor pack or two,
this way you will then be able to pick up more scrap while beefing up your
allies.
Armor Pack Mechanics:
- Torbjorn can only throw out Armor Packs in front of him (about 10 feet). This is unlike Symmetra's shields that she can instantly give to her allies from long distances.
- You will receive a message on screen when an ally picks up an Armor Pack.
- Only one Armor Pack can be picked up per hero (no stacking, and no stacking from multiple Torbjorns).
- You can throw multiple Armor Packs on the ground one right after another and they will stay there indefinitely as long as Torbjorn remains in the game or until you or an ally picks them up.
- You cannot see other enemy Armor Packs on the ground.
- You can give yourself an Armor Pack, by picking one up after you have thrown one out.
- Armor from Armor Packs cannot be healed and will vanish from your HP pool. You can only replenish armor with a new Armor Pack.
- If you switch heroes at the spawn point it will remove all Armor Packs obtained by allies along with removing all Armor Packs laying on the ground.
Use With Offensive allies Vs Defense Allies
Armor packs are useful on any hero, especially offensive attackers. The
problem though, is that defensive heroes are able to get new armor packs easier
than offensive attackers can because they typically stay around in the backlines
more near Torbjorn, while the offensive attackers generally go off on their own
to flank and harass the enemy and are usually too far away from Torbjorn to
receive new Armor Packs. These offensive heroes mostly include:
Tracer, Reaper and Genji. These offensive heroes benefit more from
Symmetra's
Photon Shield, since it doesn't need to be reapplied.
The power of multiple Torbjorns
One of the main benefits of having multiple Torbjorns on a team enables each one
to have a wider spread of picking up scrap, since each Torbjorn will be able to
pick up their own separate Scrap piece from each dead enemy or ally. This allows them to produce
more armor packs for everyone on the team. Plus setting up multiple
turrets to guard a specific area tends to be a very powerful strategy.
Unfortunately, you will be unable to repair another Torbjorn's turret though.
|
ULTIMATE |
Ultimate Ability After overheating his personal forge, Torbjörn gains a significant amount of armor and if he has a level 2 turret out it will automatically upgrade to a level 3 turret for the duration of his ultimate. He also attacks (plus builds and repairs turrets) far faster than normal. Duration: 12 secondsRepair/Build Rate: +100% Fire Rate: +50% Bonus Armor: +300 (does not refill normal health) - NOTE: Armor obtained from Molten Core CAN be healed up, but will be lost once Molten Core is over. Default Hotkey: Q |

Molten Core speeds up pretty much everything that Torbjorn does, which includes: attack rates with his Rivet Gun and repair/build rate with his Forge Hammer. Most importantly, Molten Core will automatically upgrade a level 2 turret to a level 3 turret for the duration of his ultimate.
If you do not have a turret out after activating Molten Core, you should quickly get one out and upgrade it to level 2 so it will then automatically turn to level 3. While Molten Core is on you will be able to upgrade a level 1 turret to level 2 twice as fast than normal.
Molten Core can also be used as a life saver, as it will give you +300 bonus armor temporarily for the duration of the ultimate and also increases your fire rate by +50%, which can be enough to help you to survive in harsh situations, regardless if you need to upgrade a turret or not. Because of this, I recommend saving Molten Core when you really need it, such as when your getting ambushed form an offensive hero, when you have to deal with your enemies close up, or if you need to get a level 3 turret out ASAP.
Torbjorn's Strength and Weaknesses Vs Other Heroes

McCree: McCree is very deadly up close, however Torbjorn usually keeps his distance from his enemies and doesn't need to worry about McCree that much. McCree's deadly Flashbang and fan fire combo is still deadly on Torbjorn, but Torbjorn's turret works great for keeping McCree away from him. McCree's Flashbang does work on Torbjorn's turret, and his fan fire attack can deal a lot of damage to Torbjorn's turret if he manages to get up close to it.
McCree's ultimate Deadeye is less effective on Torbjorn since he is usually in a position where he can take cover quickly. However, if Torbjorn is out in the open there is not much you can really do to avoid Deadeye. You can give yourself an armor pack which can make lining up a shot to you 0.75 seconds longer, and you can try to headshot him with your Rivet Gun.

Roadhog: Roadhog's poor mobility makes countering Torbjorn's turrets incredibly difficult for him. Roadhog has poor long range damage with his Scrap Gun which makes hitting turrets even harder for him. Torbjorn is usually out of reach of Roadhog's Chain Hook, but if Roadhog actually manages to Chain Hook Torbjorn he can simply use Molten Core to counter it if its available, otherwise Torbjorn will most likely die.
Roadhog's ultimate Whole Hog is less effective on Torbjorn since he is usually able to take cover by his turret and away from the shrapnel rounds.

Genji: Even though Genji has great mobility and can get up close to a turret, he can still have a rough time dealing with Torbjorn and his turret due to the massive amount of damage and fire power he will have to deal with.
Genji does have some methods of dealing with Torbjorn's turret. A Turret will still attack Genji if he uses deflect, and the deflected bullets can take out the turret as well. Genji can also throw shurikens at the turret from a distance to do some decent damage to it. However, Genji's Swift Strike does NOT reset the cooldown if he eliminates a turret with Swift Strike.
Genji can go all out with Swift Strikes and Shurikens, but in the end it can be a tough fight for Genji. If Genji uses his ultimate Dragonblade it can be countered with a Molten Core.

Zenyatta: Since Torbjorn is a distance from his enemies while usually taking cover while his turret absorbs damage, Zenyatta's Discord Orb is not too effective on him and Zenyatta would be better off putting the Discord Orb on a different hero. A Molten Core can be used to counter the Discord Orb by refilling your health up, but other than that there's not much else you can do except to build your turret next to a wall so you can take cover easier if you get the Discord Orb.
Zenyatta has the capability to do a lot of damage to Torbjorn's turret with his charged fire attack and can keep an ally alive longer from Torbjorn's turret via his Orb of Harmony, but it's still not enough to really deal with Torbjorn's turret.
Zenyatta's ultimate Transcendence is only somewhat effective against turrets as it can help keep his allies alive while approaching Torbjorn.

Symmetra: Symmetra poses no real threat to Torbjorn. Since Torbjorn generally doesn't wander around like offensive heroes do, you usually never need to worry about running into Symmetra's Sentry Turrets. But the negative aspect of this is that Torbjorn will usually never run into Symmetra's Teleporter as well, as you will have to rely on your allies to deal with that.
The worst thing Symmetra can do to you is to fire Photon Orbs at your turret, which can potentially go through your turret and also hit you as well, as her projectile orbs can pierce through all targets in its path. This isn't a huge threat as she can only fire one of these every 5 seconds or so, giving you enough time to repair your turret in the meantime. But this can provide an easy target for Symmetra to charge up her Teleporter ultimate.

Reaper: Reapers tend to do very well at killing defensive heroes, and in the case of Torbjorn it's no different. However, Torbjon's turret does make it a bit harder for Reaper to deal with. With Reaper's ability to position himself virtually anywhere on the map with his teleport and wraith form ability, he has an easy time avoiding the line of a turret's sight while creeping up on Torbjorn to deal insane damage up close.
If you see yourself getting attacked by a Reaper, that would be an ideal time to turn on Molten Core (if it's a available). Just hope Reaper doesn't use his ultimate Death Blossom on you, otherwise it will most likely be an easy victory for Reaper.

Tracer: Many heroes can damage Torbjorn's turret from long distances, but in a lot of instances Torbjorn is behind the turret in a safe spot repairing it, making it incredibly difficult to get around there to stop him. Tracer is one of the few heroes (besides Reaper and Genji) that has the ability to get around safely via blinking and take Torbjorn out and maybe his turret too. Tracer's Blink, Pulse Bomb, and Recall can be a deadly combo against Torbjorn and his turret. However, if Torbjorn has a level 3 turret, it will take more than a Pulse bomb to kill it.
Tracer's Pulse Bombs only do 400 damage. A level 1 turret has 150 HP, level 2 has 300 HP, and level 3 has 800 HP. So if it's a level 3 turret, Tracer would also need to deal some damage with her Pulse Rifle in order to take it out.
If Tracer sticks a Pulse Bomb on Torbjorn, he can survive it by using Molten Core (refills health to 500), but he has to use it fast enough for it to work.

D.va: D.va has some strong counters against Torbjorn and his turrets. She can use her Boosters to fly toward a turret while having Defense Matrix on to block all incoming shots (even from turrets), she can then either use her Fusion Cannons up close to take out Torbjorn or his turret, or she can simply use her ultimate Self-Destruct to totally wipe out Torbjorn's turret. D.va can Boost through a turret to deal 25 damage to it as well.
Torbjorn's Molten Core is useless against D.va's Self-Destruct. However from a distance, D.va is practically no harm to Torbjorn.

Hanzo: Torbjorn's slow mobility gives relatively easy shots for Hanzo. Torbjorn is often found repairing or building turrets usually next to a wall for him to take cover. With Sonic Arrow, Hanzo can see him before he pops around the corner to repair his turret and then head shot him quickly when he comes in contact. Hanzo's Scatter Arrow can also be used to ricochet off of walls in hopes to take Torbjorn out before he finishes building/repairing his turret.
Torbjorn's turret is immune to Hanzo's ultimate Dragonstrike, but Hanzo has a relatively easy time taking turrets out simply with charged bow shots.

Junkrat: Junkrat has the ability to fire at his turrets while taking cover. His grenades can fly over to the turret and explode dealing massive damage to his turret and possibly Torbjorn himself. Torbjorn's turret does fire at all of Junkrat's abilities, including: Steel Traps, Concussive Mines, and his ultimate Rip-Tire.
On the bright side for Torbjorn, he usually never has to worry too much about running over Junkrat's Steel Trap and Concussion Mine since he is usually in the distance managing his turret and his slow movement quickly warns him if he is about to run over them.

Winston: Winston can do a strong combo against Torbjorn and his turret with a Jump Pack leap followed by a Barrier Projector (shield) right in front of the turret, then he can deal damage to the turret with his Tesla Cannon while his shield absorbs the damage from the turret. Winston can then use his ultimate Primal Rage to clean up Torbjorn and any other enemies in the area. If you see a Winston leaping at you, that would be an ideal time to use Molten Core to protect yourself from his deadly combo.
Other than that powerful combo, Barrier Shields in general will protect Winston's team from turret damage allowing his team to push forward more easily.

Reinhardt: Reinhardt's massive shield allows his team to move forward towards the turret while his shield absorbs all the damage. Furthermore, Reinhardt can use his Fire Strike at the turret dealing a lot of damage to it, with the possibility of also hitting Torbjorn behind it thanks to the projectile's ability to hit all objects in its path.
Reinhardt's Charge actually works against Torbjorn's Turret. A Charge will slam into and stop right where the turret is placed. It will totally destroy a level one turret and deal 175 damage to a level two turret, he can then easily take out a level two turret with one additional Rocket Hammer swing.
Reinhardt can attempt to Charge at Torbjorn, but it is a very risky maneuver, due to all the damage he would take from Torbjorn's turret.
Reinhardt's ultimate Earthshatter will damage Torbjorn's turret while also stunning it for a few seconds.
TIP: If you have a Mei on your team, have her put an Ice Wall in a place where you can get high up to place your turret. Getting high up will protect you more from Reinhardt as he cannot get to high places due to his poor vertical mobility.

Ana: Both Torbjorn and Ana generally keep a distance from each other. Both of their normal attack weapons are decent at attacking each other from a distance. Ana can deal some damage to Torbjorn's turret safely from a distance while Torbjorn can do some decent damage back at her with his Rivet gun and turret damage.
Since they tend to be more of a distance from each other, Ana's Sleep Darts tends to be less effective on Torbjorn, however a good opportunity for Ana to throw a Sleep Dart at Torbjorn is when he is repairing his turret as he will be an easier target to hit during that time. With this in mind, keep strafing side by side quickly while repairing your turret to make yourself a harder target for Sleep Darts.
Molten Core can make Ana's life a bit tougher. Molten Core is one of the harder ultimates for Ana to aim Sleep Darts at, and if she actually does land a sleep dart on Molten Core and you awaken, the ultimate will continue. If Ana can't land a Sleep Dart on you during Molten Core, her best bet is to simply run away and take cover from it.
Ana's ultimate Nano Boost can make one of her allies have an easier chance at zoning in on Torbjorn and his turret to take them out more effectively, although this can be countered by using Molten Core.

Pharah: Torbjorn's rivet gun is not too effective against Pharah since his long range shots have a small travel time and also arch as it goes further, thus making it harder for him to aim at Pharah as she is flying around in the air.
However, turrets are very effective against Pharah and she will have a tough time dealing with them. Pharah may attempt to shoot her rockets in a way where she can take cover while having her rocket's splash damage deal damage to a turret. This can be annoying to deal with, as you will need to continuously repair your turret and hope that your allies deal with the sneaky Pharah.
While Pharah's Concussive Blast does nothing against a turret, it can be used to knock back Torbjorn while he is repairing his turret to disable him on repair for a few seconds. Concussive Blast is especially useful on a Molten Core Torbjorn.
Pharah's ultimate Barrage is not very effective on Torbjorn since he can easily take cover and his turret can take down Pharah while she is Barraging. You can activate Molten Core to save yourself if you cannot take cover from Barrage in time.

Bastion: A Bastion Sentry is far more powerful than Torbjorn's turret, especially at levels 1 and 2. Although, level 3 turrets are incredibly much more powerful, so taking that out will be a tad harder for a Bastion Sentry. Unfortunately, a Bastion Sentry should be able to take out a level 3 turret as long as he has enough health and does not get targeted too much by you and your allies.
Overall Bastion can give you and your team a much harder time, as he will make it harder for you to put down new turrets and he can take them out quickly by Reconfiguring into a Sentry next to one. Your long range rivet gun is actually effective against a Bastion Sentry as long as he doesn't target you while firing at him.
Oftentimes Torbjorn will build a turret on top of a Payload, in these instances a Bastion waiting in Sentry Mode is a very powerful counter to this.
When you use Molten Core, and you and your turret are both targeting a Bastion Sentry it will decimate him very quickly.

Lucio: Lucio is only a minor threat to Torbjorn. Lucio's Sonic Amplifier weapon is not very effective against Torbjorn since they are usually a distance from each other and Torbjorn will have time to dodge the sonic projectiles (while repairing his turret) and will be well out of range of Lucio's Soundwave (alternate fire) most of the time.
Lucio's ultimate Sound Barrier can be very powerful against Torbjorn and his turret since it will allow Lucio's team to be temporarily powerful enough to absorb turret damage for a number of seconds, allowing his team to push toward Torbjorn's turret to take it out. Along with Lucio's Sound Barrier, he can also use his speed aura combined with an Amp it Up to quickly get his entire team closer to Torbjorn's turret to effectively take it out. This same strategy happens to also be effective at taking out Torbjorn after using Molten Core.

Mercy: Mercy is a problem to Torbjorn because she can heal someone that is taking damage from your turret while she can usually take cover at the same time somehow. This allows her team to effectively use a means of cannon fodder to disable the turret to help the rest of her team move up to take it out. However, this will all get negated if Torbjorn uses Molten Core and his turret turns into a level 3 turret. Mercy's heal is just not fast enough to keep up with all that damage.
If Mercy gets targeted by Torbjorn's turret, it won't take long at all to take her down.

Soldier 76: Helix Rockets work really well on Torbjorn's turrets, and Soldier 76 is a decent counter to Torbjorn for this very reason. Soldier 76's Biotic Fields help to negate any damage done by turrets as well. However, since Soldier 76's mobility is not as great as heroes such as Reaper and Tracer, he will have a much harder time taking out Torbjorn himself, and a lot of times Torbjorn will be able to repair his turret faster than Soldier 76 can deal damage to it, thus Soldier 76 will usually need help from his teammates in order to take Torbjorn and his turret out.

Zarya: Zarya's alternate fire with explosive charges are somewhat effective against turrets thanks to the AOE damage, enabling it to potentially hit both the turret and Torbjorn at the same time but it isn't really enough to deal with Torbjorn's fast turret repair, unless her gun is charged up enough.
Zarya's Particle Barriers can help her and one of her allies get closer to Torbjorn's turret to make taking it out a bit easier. Torbjorn's Turrets can also attack Zarya's barriers, thus wasting the turret's fire power while Zarya's barriers absorb the damage to enhance Zarya's Particle Cannon.
Zarya's ultimate Graviton Surge (clumps up enemies in a small radius) seems to only work on Torbjorn about 50% of the time, since sometimes he places turrets away from the heart of his team. Placing turrets higher up tends to be in a safer spot from Graviton Surge. Graviton Surge has no actual effects on turrets.

Widowmaker: Widowmaker can do some decent sniping damage to Torbjorb's turrets, as one fully charged sniper shot can kill a level one turret, or two fully charged sniper shots to destroy a level two turret.
Widowmaker can have a difficult time actually killing Torbjorns that stay around walls or corners repairing his turret. And this is important, if you know the enemy has a Widowmaker, don't just build turrets right out in the open, instead make sure you will be able to continuously repair your turret while you are out of sight from your enemies, especially from a Widowmaker.
Widowmaker's Infra-Sight can help her to predict when a Torbjorn peeks within view while he repairs or build turrets. So if you hear an enemy Widowmaker use Infra-Sight be extra cautious and consider using a Molten Core to further protect yourself. NOTE: An enemy Widowmaker will say something in French when she activates Infra-Sight, while an ally Widowmaker will say in English: "No one can hide from my sight". Infra-Sight also does not work on revealing turrets.
Torbjorn rarely needs to worry about Widowmaker's Venom Mines, since its mostly used closer to her on offensive heroes. Turrets can attack and destroy Venom Mines as well.
Turrets can still do good damage from long range, so taking out Widowmakers with turrets is not too bad.

Torbjorn: Generally the Torbjorn on defense is the one that will usually win because he can build his turret first in the direction the enemy has to travel. However on Payload maps, the Torbjorn on Attack can build his turret on top of a Payload which can make that a bit more even.

Mei: Mei works as a really strong support hero against Torbjorn and his turrets. Mei can put up an Ice Wall right in front of Torbjorn's turret to totally block the line of sight of his turret, enabling her team to get closer to the turret to easily take it out. If Mei puts an Ice Wall directly on top of a turret, it will simply disable it for the duration of the Ice Wall, but once the Ice Wall is over the turret will back back shooting again. Mei's freeze blaster can also freeze a turret as well.
Other than helping her team to take out Torbjorn's turrets, there's not much else Mei can do against Torbjorn. Since Torbjorn is off in the distance building/repairing his turrets, he rarely comes into close contact to Mei's Freeze gun, although if he does he will most likely die to it since Torbjorn has poor mobility and is unable to escape from getting frozen.
Mei's ultimate Blizzard is oftentimes not effective on Torbjorn since he is usually in the distance from Mei while taking cover with his turret. Although Torbjorn has no escape mechanisms to get out of the Blizzard and will most likely get frozen if he is under it.
Torbjorn's Allied Synergies Guide
News/Home | Blog | Follow | Unlock Full Guide
Attack |
Defense |
Tank |
Support |
 Genji
Genji Bastion
 D.va
D.va Ana
Ana McCree
 Hanzo
Hanzo Reinhardt
 Lucio
Lucio Pharah
 Junkrat
 Roadhog
 Mercy
Mercy Reaper
 Mei
Mei Winston
 Symmetra
 Soldier76
 Torbjorn
 Zarya
Zarya Zenyatta
 Sombra
 Widowmaker
 Tracer
Map Guides
 Temple of Anubis
 Hanamura
 Watchpoint Gibraltar
Overwatch Hero Introductions - Basics Guide
How the Mechanics Work in Overwatch
How Headshots Work In Overwatch
Overwatch Game Modes Overview
Overwatch Health Types & Hitpoint Basics
Overwatch Terms, Abbreviations, & Their Meanings
Easiest and Hardest Overwatch Heroes to Master
My Hotkey
Bindings For Overwatch & Why I Use Them
|
Feel free to leave any type of comment, such as how you like the guide and if it helps you at all, or to report something that is inaccurate in the guide. |
