
Reaper In-depth Strategy Guide
( FP's Overwatch Strategy Guide )
 You
want to play a team FPS game but you want to have it feel like you are
playing more of a single player game? Then Reaper is the closest
choice for that. Reapers work a lot different than other heroes in
Overwatch. Instead of sticking around your team's tank or healer,
Reapers tend to go off on their own and have multiple purposes to
fulfill, which includes: scout, harass, and ambush your enemy,
usually without the help from other teammates. Reaper's offensive
abilities allow him to seamlessly move around the map behind enemy lines
and do quick surprise attacks and then reappear somewhere else to do
more surprise attacks. Reapers excel at taking out tough defenses
(Bastions & Widowmakers). As you can see, Reapers can really throw
off the enemy making them more vulnerable to the rest of your team.
You
want to play a team FPS game but you want to have it feel like you are
playing more of a single player game? Then Reaper is the closest
choice for that. Reapers work a lot different than other heroes in
Overwatch. Instead of sticking around your team's tank or healer,
Reapers tend to go off on their own and have multiple purposes to
fulfill, which includes: scout, harass, and ambush your enemy,
usually without the help from other teammates. Reaper's offensive
abilities allow him to seamlessly move around the map behind enemy lines
and do quick surprise attacks and then reappear somewhere else to do
more surprise attacks. Reapers excel at taking out tough defenses
(Bastions & Widowmakers). As you can see, Reapers can really throw
off the enemy making them more vulnerable to the rest of your team.
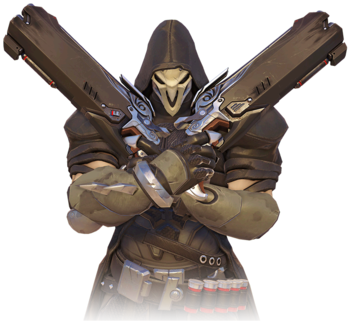
Real Name: Unknown
Difficulty: Easy
Role: Unknown
Age: Unknown
Occupation: Mercenary
Release Date: 10-27-2015
Base Hitpoints: 250
Reaper
|
 |
Passive Ability Reaper can collect Soul Globes to regain health. Globe Heals: +50 HP |

Only Reaper can see Soul Globes and they appear after an enemy dies, regardless if Reaper killed the enemy or one of his allies kills an enemy. Each globe heals 50 health. The Soul Globe only lasts on the battlefield until the dead enemy returns back to the game. This passive ability allows Reaper to keep going without having to worry about getting healed by his team. At full health you cannot pick up Soul Globes, even though they will still drop.
Main attacking weapon Reaper tears enemies apart with twin shotguns. Ammo: 8Damage: 2-7 per pellet (20 pellets per shot) - 140 max damage per shot (Fall-off distance damage). Rate of Fire: 2 per second Reload: 1.5 second Headshot?: YES Default Hotkey: LM |
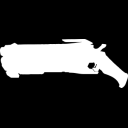
Reaper's Hellfire Shotguns deal massive damage in close range. Besides a Bastion Sentry, Reaper's Hellfire Shotguns do the most close up DPS out of any other Hero's attack weapons in the game.
Reaper's shotguns have fall-off distance damage the further it hits something. From mid to long range Reaper does much less damage as the fall-off starts from short range and drops dramatically. However, Reaper's shotguns can still be effective at mid ranges on bigger targets, such as big tanks and shields such as Reinhardt's shield.
Another tid bit, is when you reload your shotguns, Reaper will simply drop his pair of shotguns on the ground and pull out a brand new pair within his trench coat. The used shotguns on the ground will disappear after about 5 seconds. This is important because if you see these shotguns laying around in the game as another hero, this is an indicator that an enemy Reaper could be near by.
Aiming with Reaper's shotguns are not incredibly difficult, but it will take a bit of practice and game playing to get consistent with his shotguns.
Ability with cooldown Reaper becomes a shadow for a short period of time. While in this form, he takes no damage and is able to pass through enemies, but cannot fire his weapons or use other abilities. Duration: 3 secondsCooldown: 8 seconds Default Hotkey: Shift |

Wraith Form does not make Reaper invisible to enemies, but he is invulnerable for the duration of the ability. Using this ability also automatically reloads Reaper's Shotguns. So, in some situations, instead of reloading during a fight, you can use Wraith Form to reload instead, especially if you need to take cover in the process.
The main use of Wraith Form is to avoid enemy fire. When you see yourself losing a battle, just use Wraith Form to escape out of the fight (to allow yourself to go get a health pickup or to a healer). While in Wraith Form Reaper also moves slightly faster, so it can be used for basic map mobility, such as after you die, you can use Wraith Form to get back to the fight quicker. Keep in mind that Wraith Form cannot be canceled while using it, one must wait until the duration is over until you can use your other abilities again.
Reapers should try to stay around escape routes/hallways, this allows Reaper to move around the map doing his surprise attacks while using his Wraith Form to move through these escape passages on the maps. Reapers tend to be weaker in more open areas without hallways and side paths to move about.
Wraith Form counters virtually every ultimate in the game, the less obvious ones include:
- Zarya's Graviton Surge
- Mei's Blizzard
- Tracer's Pulse Bomb
- McCree's Deadeye
Another important thing to know is that using Wraith Form dispels all debuffs, most importantly Zenyatta's Discord Orb and Widowmaker's Venom Mines. Wraith Form can still be used to contest objectives, pick up health packs and Soul Globes.
Ability with cooldown After marking a destination, Reaper disappears and reappears at that location. Cast Time: 2 secondsCooldown: 10 seconds Default Hotkey: E |

Shadow Step allows Reaper to move around the map in places where Reaper couldn't go otherwise, such as high ledges, or right behind the enemy. This teleportation ability is what allows Reaper to do his surprise attacks.
When Shadow Step is used, there will be a visual and audio mark destination indicator to alert the enemy that Reaper is teleporting in. This can warn them ahead of time to prepare a headshot at Reaper once he teleports to the destination. There will also be a short stun time (about 1 second) from your original spot before teleporting to your destination. So you must be very careful where you use this at. Try to be as sneaky as possible. Try to use it in places where the enemy may not be able to see, such as all the way behind them, in rooms, hallways, or high up ledges. Keep a mental note what is around you at the time of teleporting along with what enemies are around your destination.
Shadow Step does have a max distance it can be used at, but it does have a fairly large range of use.
|
ULTIMATE |
Ultimate Ability In a blur of motion, Reaper empties both hellfire shotguns at breakneck speed, dealing massive damage to all nearby enemies. Duration: 3 secondsDamage: 200 per second (600 max damage, and 40 damage per tick) Range: 8 meter radius Headshot?: no Default Hotkey: Q |

Death Blossom is a very deadly short range damage dealer that does 360 degrees of damage all around Reaper. Deathblossom is best used when there are a lot of clumped up enemies in a short radius, as it can wipe all of them out easily as long as they do not kill you first while executing Deathblossom.
While doing Death Blossom, Reaper is still very vulnerable, so one must be very careful before using it.
Here are some tips to make Death Blossom safer and more effective to use:
- Use it when your teammates are distracting your enemy.
- Use it as a surprise attack by dropping down from a higher spot (use Shadow Step to get to these high spots), the enemy may not react fast enough to kill you.
- You can't cancel Death Blossom while using it, but you can still use your directional keys to move around while it is activated. You can even jump as well.
- You can still pick up Soul Globes while Death Blossom is activated, which could help you survive longer while using it.
Your teammates can also do one of the following to protect Reaper and to make Death Blossom more useful:
- When Zarya uses her Gravitation Surge ultimate (makes all enemies clump up together).
- When Reinhardt uses his ultimate Earthshatter (slams the ground in front of him and drops all the enemies in front of him).
- When Mei uses her ultimate Blizzard (slows and freezes all enemies in a large radius).
- When D.va uses her defense matrix ability (stops all incoming projectiles for a few seconds).
- When Winston uses his Barrier Shield for protection.
Counters to Deathblossom
There are many counters to Deathblossom, some of the hardest counters include:
- Roadhog's Chain Hook (it will cancel out Deathblossom)
- Lucio's Sound Barrier
- McCree's Flashbang (it will cancel out Deathblossom)
- Shields from either Winston or Reinhardt
- D.va's Defense Matrix
- Genji's Deflect (Genji can first Swift Strike to the Deathblossom then activate Deflect to quickly kill Reaper)
Reaper's Strength and Weaknesses Vs Other Heroes

Bastion: Bastion's worst nightmare is being flanked from behind, and who excels at flanking the best? Reapers! Reapers are a great counter to Bastions, thanks to his Shadow Step ability. Simply Shadow Step out of the Bastion's line of sight to get behind him to finish him off, then use Wraith Form to escape from the rest of the enemy fire. Remember that a Bastion Sentry takes double damage from the rear. If he turns around and starts firing at you, simply walk through him and continue firing. Most likely Bastion will be too confused on where to turn.
Thanks to Reaper's Shadow Step ability, he is also a good counter for an elevated Bastion due to Mei's Ice Wall boost.

Mercy: It's generally Reaper's job to take out Mercy. Reapers tend to have the easiest time getting the closest to Mercy. Work your way around the enemy and focus on taking Mercy out first if you can. Death Blossom comes in handy especially when Mercy is around multiple allies.

Junkrat: Junkrat does a god job of blocking off choke points with his traps and Frag Launcher. Luckily Reaper is able to Shadow Step around all that to get up close to Junkrat to take him out.
TIP: When Someone hits a Junkrat's Steel Trap, there is usually a Concussion Mine next to it waiting to be triggered to kill the one being trapped by the Steel Trap. Reaper can avoid the Mine and escape out of the Steel Trap by quickly using Wraith Form. If you got stuck in a Steep Trap and you were unsure if there was a Mine underneath of you, use Shadow Wraith anyways to potentially save yourself.
Junkrat's ultimate Rip-Tire can be easily countered by using Shadow Wraith, or even Shadow Step as a backup counter. Shooting Rip-Tires down with shotguns tends to be very difficult due to the poor damage from medium to long range.
Also since Reaper will tend to kill Junkrats close up, you have to remember to always avoid Junkrat's suicide bombs when he dies.

Widowmaker: Widowmaker is a long range sniper and can be hard to deal with sometimes. It is generally Reaper's job to hunt her down (along with Tracer and Genji). Reaper's sneaky mobility allows him to get around the map and kill Widowmaker unnoticed. You must watch out for Widowmaker's Venom mines which are usually placed at choke points covering Widowmaker to specifically stop enemies such as Reaper. If you can't avoid it, then use Shadow Step again to get around it. If you get triggered by a Venom Mine, simply use Wraith Form to dispel it from you.
One must be very careful using Shadow Step around a Widowmaker because you may find yourself getting shot in the head immediately after Shadow Stepping if a Widowmaker spots it. Try to use it at a destination spot that is not in her line of sight.

Winston: Winston mostly relies on his teammates for cover, but if he wonders off alone he may come face to face with a deadly Reaper. The best thing for Winston to do is simply retreat back to his teammates with his Jump Pack ability, or take a chance and turn on his ultimate Primal Rage, but Reaper can simply use Wraith Form to escape it.
Remember when you are inside of Winston's Barrier Projector you cannot shoot at enemies that are outside of the barrier, as the barrier works to block shots from either side (in or out of it).
Winston can counter Deathblossom by using a Barrier Projector, which could potentially protect his teammates as well. Winston can also use a Jump Pack leap to avoid further damage.

Symmetra: Symmetra is not much of a problem for Reaper. The worst thing Reaper needs to watch out for is her Sentry Turrets. Since Reapers are always moving around hallways/passages, Sentry Turrets are usually placed in these areas. Reaper's shotguns are okay at killing them quick enough, and you can always use Wraith Form to further protect yourself from dying to the turrets if you need to. You can also Shadow Step past rooms filled with turrets.
It is also Reaper's job to go and hunt down Symmetra's Teleporter ultimate due to his superior mobility.
If you manage to get close to Symmetra there is not much she can do to you and her poor mobility will make it difficult for her to escape your Death Blossom.

Ana: Ana's poor mobility and low damage output makes her very susceptible to getting flanked by Reaper's deadly close range shotguns. As Reaper, the main thing to watch out for is Ana's Sleep Darts. Unfortunately, Reaper is one of the few offensive flankers that is easier for Ana to aim Sleep Darts at, as Reaper doesn't have quick movement abilities like Tracer and Genji. If Ana misses her Sleep Dart it can be an easy kill for Reaper.
Ana's next best option to use against Reaper is Biotic Grenades, which will do some damage to Reaper while also preventing him from getting healed or preventing him from picking up Soul Globes.
Ana's poor mobility makes her very vulnerable to Reaper's Deathblossom and she will most likely die if caught in the midst of it. Once again the best thing for Ana to do against Deathblossom is to quickly take Reaper out with a Sleep Dart before he can do any damage.
Be careful flanking one of Ana's allies, as she can use her ultimate Nano Boost on that enemy to make them powerful enough to either escape from you or hunt you down with the increased damage reduction and damage output. In this case, it might be wise to run away from a Nano Boosted enemy by using Wraith Form.

Mei: Although Mei has a great short range freeze weapon, it usually isn't enough to stop a Reaper. Reapers simply dish out more DPS and have more health than Mei has. Reaper can use Wraith Form to avoid getting frozen and use Shadow Step to get around Mei's Ice Wall to take her out.
If you see yourself getting stuck in Mei's ultimate (Blizzard), simply use Wraith Form to escape it. A quick Shadow Step is another way to get out of a Blizzard as well.
Mei can counter Deathblossom by quickly using a Cryo-Freeze or an Ice Wall to block it.

Torbjorn: Reapers tend to do very well at killing defensive heroes, and in the case of Torbjorns it's no different. However, Torbjon's turret does make it a bit harder for Reaper to deal with. If you can, use Shadow Step to avoid Torbjorn's turret but still able to shoot at Torbjorn himself. If Torbjorn uses his ultimate (Molten Core) and he is repairing his turret, I find it's practically useless attacking the turret since he will be able to repair it so quickly. Instead, I find it more effective at attacking the Molten Core Torbjorn himself in this case, just try and take cover from the turret in the meantime.
Torbjorn can counter a Deathblossom by using Molten Core to heal up and gain a large amount of health to withstand it.

Pharah: Pharah is the best hero at staying from harms way of a Reaper. Her jet packs allow her to quickly get high above in the air to avoid shots from a Reaper. When she lands on the ground she can use a Concussive Blast to propel Reaper away from her.
TIP: If you can, use Shadow Step to get high up on ledges around the map where Pharah may not be looking, you may be able to get some decent shots off on her.
Pharah can easily escape from Reaper's Death Blossom by simply using her Jet Packs to fly in the air to avoid it, or by using a Concussive Blast to knock Reaper away from her (or from her allies).
Reaper can avoid Pharah's ultimate Barrage by using Shadow Wraith, if it's not available, then Shadow Step can be a backup counter for it.

McCree: Both McCree and Reaper are two of the best close range heroes in Overwatch. But who wins? McCree mostly has the upper hand here thanks to his Flashbangs. If Flashbangs are used faster than a Reaper can use Wraith Form (Wraith Form is immune to Flashbangs), then it is GG for McCree. Flashbangs also interrupt Reaper's ultimate (Death Blossom), totally canceling it out.
It is best to only face a McCree if you are flanking him from behind. Once he turns around and looks at you, I would immediately use Wraith Form to escape, unless you are for certain his Flashbang is still on a cooldown.
If you see McCree using his ultimate Deadeye (High Noon) and you don't have enough time to lose line of sight from it, then Wraith Form is the best escape from it. Shadow Step may not give you enough time to avoid it.

Lucio: All of Lucio's abilities are a threat to Reaper. Lucio can use his Crossfade speed/heal aura on his whole team to help them avoid Reaper and his close up shotguns. Lucio can use Soundwave to knock back approaching Reapers and his ultimate (Sound Barrier) protects him and his whole team from Death Blossom.
When Lucio uses Sound Barrier, it's usually best to not engage in combat for a few seconds as it's virtually pointless attacking the high shields that his allies can receive from it. This would be a good time to reposition yourself elsewhere to confuse the enemy of your whereabouts.

Hanzo: A Hanzo should be one of Reaper's prime targets. Dealing with a Hanzo is similar to dealing with a Widowmaker, Reaper can sneak around the map and take Hanzo by surprise. Hanzo has very little escape methods (besides wall climbing) so a close up Reaper is very deadly to Hanzo.
Be careful using Shadow Step around Hanzo as he can headshot kill you in one hit after teleporting in. Hanzo can also use Sonic Arrows to detect offensive flankers such as Reaper sneaking up on him.
When coming up close to a Hanzo, he can kill Reaper with a Scatter Arrow shot to the ground in front of you. You can kind of avoid this by jumping continuously when you get near him.
When Hanzo uses his ultimate Dragonstrike and you find yourself caught it the midst of it, you can use a Wraith Form to escape it safely.

D.va: Even though Reaper out DPSes D.va at close range, she still has enough hitpoints to take a number of hits from Reaper. Since both heroes have great escape mechanisms, it usually doesn't result in a kill from either hero most of the time. D.va can use her Boosters to boost away from Reaper, protecting her from not only Reaper's shotguns but from Deathblossom as well. D.va's Defense Matrix can also block Death Blossom too, potentially protecting her whole team from it. While Reaper can use Wraith Form to escape from D.va or use Shadow Step to quickly get right up close to D.va which can be very deadly to her.
D.va's ultimate (Self-Destruct) can be easily avoided with Wraith Form or Shadow Step.

Zarya: Reapers tend to avoid coming in contact with Zaryas, since she is usually with her team absorbing damage. Zarya can avoid being attacked with her Particle Barrier and it can take a number of shots to take her down.
Reapers are usually in the clear of Zarya's ultimate (Graviton Surge), since Reaper is usually not around his team most of the time. If Reaper does happen to get caught in Zarya's Graviton Surge, he can simply escape out of it with Wraith Form.
Death Blossom can be deadly to Zarya if she cannot use a Particle Barrier to protect herself from it, as her slow mobility will easily get her stuck in it.

Roadhog: Being chained in by Roadhog can be very deadly to Reaper. Wraith Form is the best way to save yourself after getting chained in. If Wraith Form is still on a cooldown there will be a good chance to die to Roadhog's Chain Hook. As Reaper you are better off keeping your distance from Roadhog and keep strafing around to avoid being chained in. You can still do decent damage from a distance on Roadhog thanks to his large hitbox.
Be careful using Death Blossom around a Roadhog because he can use his Chain Hook on you to cancel it out. Try to time your Deathblossom so you execute it when Roadhog's Chain Hook is on a cooldown to avoid it. Roadhog can also use his ultimate Whole Hog to knock a Deathblossom away from his allies.
Roadhog's Whole Hog can be counter by using Wraith Form.

Genji: Going up against a Genji is somewhat of a fair fight. Both heroes have ways to escape out of combat. Genji will still want to keep his distance from Reaper (his climb ability helps him with that). Genji's Deflect does work well against Reapers shotguns, and you will want to avoid shooting a Genji with Deflect on.
Genji's Deflect is devastating to Reaper. If you fire at Genji with his Deflect on, he will be able to instantly transfer the damage right back to you, due to the instant hitscan nature of Reaper's shotguns. This makes using Deathblossom around Genji extremely devastating to Reaper. If a Genji sees a Reaper using Deathblossom, he can Swift Strike right up to you and then activate his Deflect and it will usually kill Reaper very fast.
Genji's ultimate Dragonblade can be countered with Shadow Wraith, or Shadow Step if you can do it in time. Remember that Genji is very vulnerable while using Dragonblade, so a few shotgun shots can still take him out quickly. But be careful because Genji can still use Deflect while Dragonblade is active.

Tracer: Both Reaper and Tracer have similar roles they pursue (sneak around and flank). But when they come head to head with each other, it all comes down to who has quicker use of their abilities. Tracer will need to use Recall after only one good hit from Reaper in order to refill her life, and she will need to use Blinks very strategically to avoid taking any shots from Reaper.
The main thing Reaper needs to watch out for is when Tracer uses her ultimate (Pulse Bomb). As soon as you see Tracer lob out her Pulse Bomb at you, quickly use Shadow Wraith to counter it.
Deathblossom can kill Tracer quickly, unless she responds quicker by blinking or recalling away from it.

Reaper: Reapers rarely run into each other because they are off flanking the enemy, but if they come in contact with each other it comes down to who gets their shots off first and correctly escaping out of combat when low on health. A lot of 1on1 Reaper fights usually doesn't result in a kill, because of their escape via Wraith Form.
An enemy Deathblossom can be easily avoided by quickly using Shadow Wraith.

Soldier 76: Soldier 76 usually sticks around his team to support them with DPS and healing and doesn't usually come in contact with Reapers 1on1 a whole lot. Reapers can attempt to flank Soldier 76 from behind which can result in a kill. However, Soldier 76 can sprint away from a Reaper to avoid damage.
Soldier 76's ultimate Tactical Visor can be deadly to Reaper as long as you can't take cover from it or activate Wraith Form to save yourself from it.

Zenyatta: Zenyatta's Discord Orb is what makes going 1on1 with a Reaper somewhat difficult. Zenyatta is a prime flanking target (like Mercy), and should be high on Reaper's list of enemies to kill first. Zenyatta has very little escape abilities (besides his ultimate Transcendence), so Reaper should have the upper hand at killing Zenyatta quick enough before his Discord Orb does any amount of damage to you. Even if you do receive the Discord Orb you can remove it by simply using Wraith Form. Reaper can also use Shadow Step to quickly get behind a wall to remove the Discord Orb if he is far away from one.

Reinhardt: Reapers rarely encounter a Reinhardt 1on1, and when they do it can be quite scary for a Reaper. Reapers need to be close up to deal good damage to enemies, but with Reinhardt, you don't want to get too close to him or he will either use his strong melee attack (Rocket Hammer), or Charge at you to attempt to pin you.
Reaper needs to be extra careful around Reinhardt, keep a greater distance than usual and you will be fine. If you can, Shadow Step to a higher ground where Reinhardt is at and shoot down with your shotguns. Reinhardt's weakness is lack of vertical mobility and there is not much he can do if an enemy is above him besides attempting to throw a Fire Strike, and you will be safe from his other Rocket Hammer attacks, his Charge ability and his ultimate Earthshatter as well.
Reinhardt's shield can be a strong counter to Deathblossom, by shielding his team from the shotgun massacre.
Reaper's Allied Synergies Guide
News/Home | Blog | Follow | Unlock Full Guide
Attack |
Defense |
Tank |
Support |
 Genji
Genji Bastion
 D.va
D.va Ana
Ana McCree
 Hanzo
Hanzo Reinhardt
 Lucio
Lucio Pharah
 Junkrat
 Roadhog
 Mercy
Mercy Reaper
 Mei
Mei Winston
 Symmetra
 Soldier76
 Torbjorn
 Zarya
Zarya Zenyatta
 Sombra
 Widowmaker
 Tracer
Map Guides
 Temple of Anubis
 Hanamura
 Watchpoint Gibraltar
Overwatch Hero Introductions - Basics Guide
How the Mechanics Work in Overwatch
How Headshots Work In Overwatch
Overwatch Game Modes Overview
Overwatch Health Types & Hitpoint Basics
Overwatch Terms, Abbreviations, & Their Meanings
Easiest and Hardest Overwatch Heroes to Master
My Hotkey
Bindings For Overwatch & Why I Use Them
|
Feel free to leave any type of comment, such as how you like the guide and if it helps you at all, or to report something that is inaccurate in the guide. |
