Soldier 76 In-depth Strategy Guide
( FP's Overwatch Strategy Guide )
 Soldier
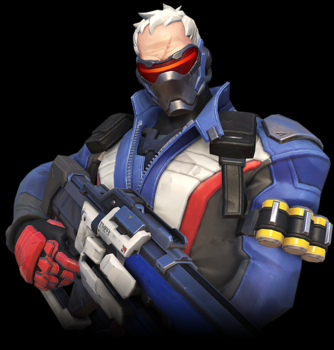
76 is your typical "Call of Duty" type character, cunningly running into
combat and dealing massive damage with his pulse rifle. I think of
Soldier 76 as a type of Offense/Defense hybrid, thanks to his healing
aura (Biotic Field) he can put down for his teammates along with his
longer range rifle and helix rockets. Soldier 76 has decent
scouting abilities thanks to his sprint ability. Although he
doesn't quite match the harass and flank abilities that of other
offensive heroes like Genji, Reaper, and Tracer. Soldier 76's
ultimate (Tactical Visor) acts similar to a high precision aimbot,
locking in on nearby targets and automatically aiming right at them,
very deadly.
Soldier
76 is your typical "Call of Duty" type character, cunningly running into
combat and dealing massive damage with his pulse rifle. I think of
Soldier 76 as a type of Offense/Defense hybrid, thanks to his healing
aura (Biotic Field) he can put down for his teammates along with his
longer range rifle and helix rockets. Soldier 76 has decent
scouting abilities thanks to his sprint ability. Although he
doesn't quite match the harass and flank abilities that of other
offensive heroes like Genji, Reaper, and Tracer. Soldier 76's
ultimate (Tactical Visor) acts similar to a high precision aimbot,
locking in on nearby targets and automatically aiming right at them,
very deadly.
Real Name: Jack Morrison
Difficulty: Easy
Role: Offense
Age: Unknown (maybe 76 years old.. J/K)
Occupation: Vigilante
Release Date: 10-27-2015
Base Hitpoints: 200
Soldier 76
|
 |
Passive Ability Whether he needs to evade a firefight or get back into one, Soldier: 76 can rush ahead in a burst of speed. His sprint ends if he takes an action other than charging forward. Default Hotkey: Shift |
It's important to remember that you need to keep holding forward in order to keep sprinting, if you let go of forward, you have to repress the sprint key again. You can press forward and a strafe key as well (but not backwards). While sprinting, Soldier 76 cannot use any other abilities including melee attacks, but jumping still works.
Uses for Sprinting:
- Soldier 76 can avoid enemy ultimates by simply sprinting away from them.
- To get back to the fight faster after dying. Soldier 76 is the 2nd fastest hero of getting back to the fight faster after dying (after Tracer).
- To scout ahead real quick to see what awaits.
- To retreat out of a losing battle.
- To reposition yourself somewhere else faster.
- Used for possible flanking situations.
- Sprinting allow you to jump further, this can allow you to jump across long gaps you normally couldn't (I will cover these in a later video).
Main attacking weapon Soldier: 76's rifle remains particularly steady while unloading fully-automatic pulse fire. Ammo: 25Fire Rate: 10 rps Damage: 5-19 (has fall-off distance damage) Reload: 1 second (0.5 during Tactical Visor ultimate) Headshot?: YES Default Hotkey: LM |
Soldier 76's Heavy Pulse Rifle mechanics:
- Shoots instantly at the target (hit-scan) and does a tremendous amount of damage overall, especially from short to medium range.
- Has fall-off distance damage at longer ranges.
- Fire spreads out with less accuracy while holding down fire. First 3 shots are right in the middle of the crosshair, spread begins on the 4th shot.
- Fire spread reduction begins almost immediately after releasing the trigger.
Pulse Shots
Accuracy does decrease the longer you hold down the fire button,
which can make distance damage less effective. This means you should
be doing pulse shots for long distances, especially on smaller targets.
Pulse shots are when you quickly tap the fire button so most of your shots will
be more precise, especially at longer ranges. There is no spread the first
3 shots and releasing the fire button resets it back to 0, but after a short
delay. So it is wise to shoot 3-4 shots, then quickly release fire and
press it again to maximize the effectiveness of pulse shots for long distance
firing. If done right, you can fire a full clip fairly fast mostly in the middle of the
crosshair. This will take some practice.
If you have played most other modern FPS shooters you should be well aware of pulse shots to manage recoils, as Soldier 76's Pulse Rifle works similar to this. Bastion's Recon gun is the only other weapon in Overwatch that benefits from pulse shots for long distance firing.
Ability with cooldown Tiny rockets spiral out of Soldier: 76's Pulse Rifle in a single burst. The rockets' explosion damages enemies in a small radius. Cast Time: 2 secondsCooldown: 8 seconds Damage: direct hit of 120 - (up to 80 splash damage, and a max of 40 self damage) Headshot?: no Default Hotkey: RM |
Helix Rockets are similar to one of Pharah's rockets except they travel slightly faster. Helix Rockets travel straight and then explode on the first object it comes in contact with. It does a lot of damage (same as one of Pharah's rockets), including some splash damage. I find Helix Rockets are useful for when you need to kill something that is either stationary such as Bastion Sentries and Torbjorn's Turrets or something that moves slow and has a lot of HP, such as tanks like Roadhog and D.va. It can be used if there is a lot of enemies clumped up such as after an allied Zarya uses her ultimate (Graviton Surge). Remember to keep using these during matches, as you can use one every 8 seconds.
Helix Rockets & Pulse Rifle combo works great for 1on1 situations as well. When close up to the enemy it's usually better to aim at the ground near the target so the Helix Rocket will have a much greater chance of damaging the target as firing straight at it could miss.
Great uses for Helix Rockets
- At D.va when she is firing her Fusion Cannons - She moves very slow when firing, which makes landing Helix Rockets on her quite easy.
- At Roadhog - Roadhog is a big target that also moves somewhat slow, so aiming Helix Rockets at him tends to be easy.
- McCree using his ultimate Deadeye - McCree moves extremely slow when using Deadeye, and you can aim Helix Rockets at him from afar quite easily.
- Widowmaker sniping from a distance - If you don't land the Helix Rocket on her, it will at least disrupt her for a bit.
- Pharah while using her ultimate Barrage - Pharah becomes immobilized while casting Barrage and aiming a Helix Rocket at her during this time is a good strategy.
- Torbjorn's Turret - His turrets are stationary (unless on top of a payload), so firing Helix Rockets at them is a good tactic. The splash damage has a good chance of hitting Torbjorn as well.
- Bastion Sentry - Bastion Sentries are stationary and is a prime target for your Helix Rockets.
Those are just some of the easier targets to hit with Helix Rockets, but really any enemy is a good candidate for it as well, especially bunched up enemies where the splash damage can hurt multiple enemies at once.
Ability with cooldown Soldier: 76 plants a biotic emitter on the ground. Its energy projection restores health to 76 and any of his squadmates within the field. Duration: 5 secondsCooldown: 15 seconds Healing: 35 per second Range: 5 meter radius Default Hotkey: E |
Biotic Fields enables Soldier 76 to qualify as a team healer, but only by a small margin as it's not nearly effective as Mercy's healing beam or Zenyatta's Harmony Orb. There is a slight learning curve on knowing where to put Biotic Fields during matches. You basically want to put them in places where your team is able to push forward and take cover at the same time, such as right around a corner (towards the objective).
Biotic Field Mechanics
- The Biotic Field is indestructible and cannot be shot at by enemies.
- In order to receive healing from Biotic Fields, both Soldier 76 and his allies must keep line of sight from the center of the Biotic Field.
- When Soldier 76 uses Biotic Field he places it slightly in front of him and to the left. This means that Soldier 76 can walk up to the edge of a platform or from a high up ledge and then use Biotic Field and it will land on the ground below him. This could come in use when there are allies below you that need healed and you want to stay up high.
- Soldier 76 and allies can still receive healing even if they are 5 meters above the Biotic Field.
Other Importance uses for Biotic Fields
- Biotic Fields work great on Control maps where the control points are at, as the Biotic Fields will generally cover the entire area of the control point.
- Biotic fields are good to use on capture points in Point Capture maps, as your team will be gravitating to those spots anyways.
- Biotic Fields are great when used on top of a Payload because the biotic field will move with the payload providing a mobile healing source. This allows his team to stay near the Payload and not venture off to find health somewhere.
Turn on Health Meters!
By default, allied health meters are not shown for Soldier 76. Since
Soldier 76 is essentially a healer, I highly
recommend turning on allied health meters by going to OPTIONS - CONTROLS -
change ALL HEROES to SOLDIER 76, then change "ALLIED HEALTH BARS" to "ON".
This will let you know whether or not to drop down a Biotic Field to heal
specific allies during a game.
|
ULTIMATE |
Ultimate Ability Soldier: 76's pinpoint targeting visor �locks� his aim on the threat closest to his crosshairs. If an enemy leaves his line of sight, Soldier: 76 can quickly switch to another target. Duration: 6 secondsDamage: 10-20 (has fall-off distance damage) Headshot?: no Default Hotkey: Q NOTE: Activating Tactical Visor reloads your ammo. |
Tactical Visor has similarities to McCree's Deadeye ultimate by automatically aiming and shooting targets. The mechanics are very different though. Soldier 76 will automatically aim to the target your crosshair is closest to and shoot at only one target at a time. You are still able to move quickly while Tactical Visor is on (as apposed to McCree's Deadeye).
Tactical Visor Mechanics:
- Activating Tactical Visor reloads your ammo. So no need to reload before using it, and you can take advantage of this by draining your current Pulse Rifle clip before activating.
- Reload time during Tactical Visor decreases by 50% (0.5 seconds from 1 second).
- Tactical Visor still does fall-off distance damage.
- Tactical Visor can do a total of 1000 damage if every shot hits something up close or 700 if all the targets were very far away.
- All shots will make contact.
- Tactical Visor does not auto aim at things that are constructed such as Torbjorn's turret, Symmetra's Teleporter and Sentry Turrets, Junkrat's Traps and Mines, and Widowmaker's Venom Mines. Although, it will auto aim to all heroes, including robot heroes.
- You can still fire Helix Rockets while using Tactical Visor and they will automatically aim directly at the target you have selected. Because of the auto aim associated with Helix rockets during Tactical Visor it can still be difficult to land hits on targets that are strafing or moving to the sides relative to your position. You should generally only fire a Helix Rocket if the enemy is stationary or is moving directly towards you, or away from you so it will have a greater chance of landing successfully.
- Shields and barriers can still block shots, so you will still need to do some aiming on your behalf.
- You can still Sprint while using Tactical Visor, but like normally you cannot shoot while sprinting.
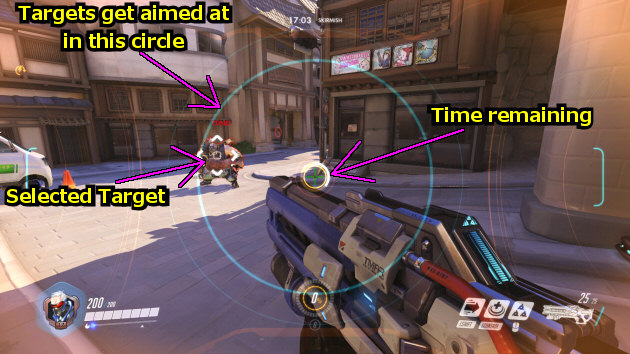
- Tactical Visor will only automatically aim at enemies that is within the blue circle at the center of the screen, as shown below:
Tips for using Tactical Visor
- While using Tactical Visor, I would focus on killing heroes that have less than 250 HP, and avoid wasting it on tanks.
- You will become a higher priority target while Tactical Visor is activated. So before using it, put down a Biotic Field so you will be able to survive the full duration of the ultimate.
- Tactical Visor's auto aim works great against fast moving targets such as Tracer and Genji. Try to aim at these heroes first if you can. Although, be careful when Genji uses Deflect and immediately aim somewhere else or you can die quickly to the deflected bullets.
- Remember that shields and barriers will block Tactical Visor's shots, so aim away from them..
- Tactical Visor works best when paired with other allied abilities that locks enemies into place and prevents them from taking cover from the Tactical Visor's aim bot, such as Zarya's Gravition Surge, Reinhardt's Earthshatter, or Mei's Blizzard.
Soldier 76's Strength and Weaknesses Vs Other Heroes
Pharah: Soldier 76's weapon is very powerful even in longer ranges (even with fall-off distance damage), and makes firing down a Pharah relatively easy for him. Pharah's rockets can do some damage too but Soldier 76 can use Biotic Fields to heal that up along with the option of getting under something to block her away from him.
Pharah's ultimate Barrage can be countered by a quick Helix Rocket then a few rifle shots from Soldier 76.
Pharah is a great target for Soldier 76's ultimate Tactical Visor, as it will auto aim at her as she's flying around in the air. The best thing for Pharah to do in this situation is to immediately drop down (stop hovering) and quickly lose line of sight with Soldier 76's aim bot.
Tracer: Tracer can be annoying to deal with, luckily Soldier 76's pulse rifle is one of the better weapons to use against Tracer (not too great though against her). If you decide to use a Helix Rocket at her, I find aiming at the ground in front of her seems to be the best way to go about it. Using Tactical Visor (ultimate) against Tracer is very effective, as you will automatically keep aiming at her even while she is blinking fast.
Tracer's Pulse Bomb and Recall combo is deadly against Soldier 76, as there is nothing he can do to counter it.
Mercy: Even though Soldier 76's flanking abilities are not as good as some of the other offensive heroes, I find Soldier 76 does fairly well against Mercy. She is a prime target for your Helix Rockets, and she is usually in medium to long range which is great for Soldier 76's pulse rifle.
When using Tactical Visor, Mercy is the first enemy you should be aiming at.
Zenyatta: Zenyatta's Discord Orb is very deadly, but I find with Soldier 76, it is less of an issue thanks to his Biotic Field (healing) ability. Just try not to get overwhelmed by to many enemies at once and you should be able to survive. Soldier 76 can also quickly Sprint behind a wall to lose the Discord Orb and his ultimate Tactical Visor can be used to focus fire on Zenyatta to quickly kill him to remove the orb.
Zenyatta moves slow, so it is easier to aim Helix Rockets at him. Use Tactical Visor shortly after Zenyatta uses his Transcendence ultimate. I find it is important to always keep in mind when Zenyatta uses his Transcendence ultimate, because it will pretty much cancel out Soldier 76's ultimate (Tactical Visor) at the same time.
Roadhog: Since Roadhog is such a big target, Soldier 76's Pulse Rifle works very well at nearly all ranges against him. The main thing you need to watch out for is getting Chained Hooked. Keep your distance from Roadhog to avoid getting hooked, if you get to close to him, consider sprinting away from him if you can.
Roadhog is a prime target for your Helix Rockets, as he is big and slow moving, which makes aiming Helix Rockets at him very easy.
Since Roadhog is a tank with high HP, avoid wasting your Tactical Visor on him and focus on taking out non tanks first. Tactical Visor does NOT get canceled if Roadhog Chain Hooks you, but you still have a high chance of death with his Scrap Gun shot with melee combo.
Bastion: Soldier 76's poor map mobility makes dealing with a Bastion somewhat difficult. You may be able to dish out some damage from longer ranges to a Bastion Sentry with your Pulse Rifle, but getting behind him can be difficult, although your Sprint ability might be able to get close to him depending on the map and the situation.
Helix Rockets are very powerful against a Bastion Sentry since aiming them will be very easy on stationary targets.
Tactical Visor can be deadly against a Bastion Sentry, but I really only recommend using it against him if his health is already somewhat lower as he has 300 HP while in Sentry mode and it can be a waste if you will be unable to take him out during Tactical Visor.
Reinhardt: Reinhardt's massive shield is a problem for Soldier 76. There isn't a whole lot Soldier 76 can do to Reinhardt, it's tough to get too close to Reinhardt due to his Charge ability along with his powerful melee hammer and ultimate (Earthshatter). If there isn't any other enemies to shoot at, then taking down Reinhardt's shield is the only option.
Zarya: You need to be extra cautious with Helix Rockets around Zaryas, because if you throw a Helix Rocket (or shoot your rifle) at a Particle Barrier it will be blocked and will greatly enhance the damage Zarya does with her Particle Cannon weapon.
Zarya's short range beam does more damage than her longer range charged explosive charges to a single target, so keep your distance from her while using your Pulse Rifle on her more so than Helix Rockets. Use Sprint to reposition yourself away from her.
Soldier 76 is usually in range to be targeted for her ultimate (Graviton Surge), so it might be a good idea to move around the map in unpredicted areas to avoid being trapped by her ultimate. If you get caught in the surge, your best bet is to throw down a Biotic Field and hope for the best.
Tactical Visor is generally not good to use on tanks, but Zarya would be the best tank target for Tactical Visor since she has poor mobility and lacks the most with blocking, healing or HP of any tank. Just watch out for her using a Particle Barrier to counter it.
McCree: DO NOT come in close range with a McCree, he can quickly and easily kill Soldier 76 up close with his Flashbang and fan fire attack. At longer ranges Soldier 76 will have the advantage. A good McCree player will use combat rolls quick enough to avoid Soldier 76's Helix Rockets. If you hear McCree use his ultimate, you can simply sprint away behind a wall to avoid it. NOTE: enemy McCrees will yell "Its high noon time" to warn you when he uses his ultimate.
Ana: Ana does weak damage overall with her Biotic Rifle, this along with her poor mobility can make it easier to target her for some easy damage.
However, the biggest advantage Ana has over Soldier 76 is the ability to shut down his Biotic Field with a Biotic Grenade. Biotic Fields are stationary healing sources and allies will be tempted to gravitate towards it for healing, Ana can simply throw a Biotic Grenade at the allies trying to get healed by it and the grenade will prevent Biotic Field's healing for a short while on those allies.
Soldier 76's Sprint ability and superior mobility during his ultimate makes him not a prime target for Ana's Sleep Darts in general.
Ana's slow mobility could get her caught in the midst of Tactical Visor if she can't find a wall to get behind in time. Ana can throw a Biotic Grenade on Tactical Visor which will make Soldier 76 more vulnerable while using it.
Soldier 76 can deal with a Nano Boosted enemy (Ana's ultimate) by simply sprinting away from it.
Hanzo: Hanzo can be deadly to a Soldier 76, as it only takes one good shot to the head with an arrow and your dead. Biotic Fields help to reduce the extra damage done by Hanzo's Sonic Arrows, just remember to use the Biotic Fields around corners where you and your teammates can take cover and fire at the enemy at the same time. If you get to close to Hanzo, keep jumping to further avoid his Scatter Arrow shots. You may need to sprint away from Hanzo's ultimate Dragonstrike.
Soldier 76 can avoid Hanzo's Dragonstrike by sprinting away from it.
Soldier 76's ultimate Tactical Visor can be deadly to Hanzo. Hanzo can try to avoid Tactical Visor's aimbot by losing line of sight with him, possibly by climbing away.
Widowmaker: The problem with Widowmaker for Soldier 76 is she is usually much further away and it can be difficult to damage her from long distances. You can attempt to lob a Helix Rocket at her, but she can strafe around to avoid it, and the pulse rifle is only mediocre at best for long ranges. You will need to do pulse shots at her from long ranges (rapidly pressing the fire button) to increase accuaracy. Flanking her with Sprint is possible, but only under rare circumstances.
Soldier 76's ultimate Tactical Visor can be very deadly to Widowmaker even from long range, as his shots will always connect to a target, and Widowmaker should be one of his prime targets during Tactical Visor.
Mei: Since Soldier 76 is usually a distance from his enemies, he doesn't have to worry too much about Mei freezing him in close range. What you have to worry about the most is Mei's Ice Wall. Ice walls can block your Pulse Rifle shots, especially while using your ultimate (Tactical Visor). As soon as Mei uses her ultimate (Blizzard), quickly find out where the center of the Blizzard is at (you will see a little floating spinning device), and sprint away from it to avoid it.
Genji: Close matchup. Biotic Fields and good pulse rifle damage will help you take on a Genji fight. You will need to watch out for Deflect and only use Helix rockets after Deflect is used. If you hear Genji turn on his ultimate (Dragonblade), I find it's usually better to just sprint away from it.
Deflect is very effective against Soldier 76, especially when you use Tactical Visor. Deflect has a chance to take you out if enough bullets get repelled back at you.
Lucio: Soldier 76 doesn't have to worry too much about Lucio's sonic projectile spam thanks to his Biotic Fields. Since both heroes tend to stay a distance form each other you don't have to worry about getting knocked back by Lucio's Soundwave ability. However, Lucio's healing and speed buff aura will make dealing with him and his team more troublesome. It will be harder to aim your Pulse rifle and Helix Rockets at Lucio when he has his speed aura on.
Just like Zenyatta, I find it's important to always keep in mind when Lucio uses his Sound Barrier ultimate, because it will pretty much cancel out Soldier 76's ultimate (Tactical Visor) at the same time. So try to use Tactical Visor shortly after Lucio uses Sound Barrier.
When Lucio uses Sound Barrier, you are better off just taking cover until their shields degenerate back to normal, which will take about 5 seconds. You can use Sprint to reposition yourself during this period of time.
Torbjorn: Helix Rockets work really well on Torbjorn's turrets, and Soldier 76 is a decent counter to Torbjorn for this very reason. Biotic Fields help to negate any damage done by turrets as well.
However, since Soldier 76's mobility is not as great as heroes such as Reaper and Tracer, he will have a much harder time taking out Torbjorn himself, and a lot of times Torbjorn will be able to repair his turret faster than Soldier 76 can deal damage to it, thus Soldier 76 will usually need help from his teammates to take Torbjorn and his turret out.
If Torbjorn uses his ultimate (Molten Core) and he is repairing his turret, I find it's practically useless attacking the turret since he will be able to repair it so quickly. Instead, I find it more effective at attacking the Molten Core Torbjorn himself in this case.
Junkrat: Knowing how to use Sprint around Junkrat is the key to dealing with him properly. If you know the enemy has a Junkrat on their team, you need to be extra cautious when sprinting around corners or other obstacles because you may find yourself sprinting right into a Junkrat Trap/Mine before it's too late. When you hear Junkrat use his ultimate (Rip-Tire), you should quickly figure out where it's coming from and sprint away from it. NOTE: Junkrat will yell "Fire in the Hole" when he uses Rip-Tire. If you know it might be too late, then throw a Helix Rocket at the tire to attempt to kill it, especially if you know it will save your teammates too.
Symmetra: If you know the enemy has a Symmetra on their team, you need to be extra cautious when running into her Sentry Turrets, which are usually placed in hallways, smaller rooms, or behind choke points. Luckily, Soldier 76's Pulse Rifle works well at taking her turrets down.
It usually isn't Soldier 76's job to hunt down Symmetra's Teleporters, but you can always sprint around the map to find and kill one if you need to, especially if you have a strong suspicion where one might be.
Tactical Visor works well on Symmetra due to her poor mobility to take cover from it and her low HP of 200.
Winston: Winston himself isn't much of a threat to Soldier 76, but his ability to protect his team with Barrier Projectors really makes it hard for Soldier 76 to dish out damage with his Pulse Rifle. It usually isn't worth it to try and kill the barrier, because (unlike Reinhardt's shield) it will automatically disappear after a short period of time. The short periods of time when the Barriers are not up is prime time for Soldier 76 to deal as much damage as possible.
Since Winston has a large hitbox, Soldier 76 will be able to do a lot of damage to Winston even from long ranges thanks to the fact that you don't need to do pulse shots to manage recoil as much.
If you see Winston use his ultimate (Primal Rage), just sprint away from it to avoid it.
D.va: It's best to keep your distance from D.va as her Fusion Cannons are more powerful close up. Remember, Soldier 76's Pulse rifle does fall-off distance damage with poor accuracy at long ranges, but with bigger targets like tanks such as D.va, firing at long range can be effective against her.
Helix Rockets can work good on D.va as long as she doesn't block it with Defense Matrix or escape it with her Boosters. D.va can also use Defense Matrix to stop incoming shots from Soldier 76's ultimate (Tactical Visor), or even use her ultimate Self-Destruct to nullify Tactical Visor as well. The better time to use Tactical Visor is after D.va ejects from her Mech.
Reaper: Soldier 76 usually sticks around his team to support them with DPS and healing and doesn't usually come in contact with Reapers 1on1 a whole lot. Reapers can attempt to flank Soldier 76 from behind which can result in a kill. However, Soldier 76 can sprint away from a Reaper to avoid his damage.
Soldier 76: Dealing with another Soldier 76 is a battle of who has the better aim with the Pulse Rifle, and who can land their Helix Rockets better.
Soldier 76's Allied Synergies Guide
News/Home | Blog | Follow | Unlock Full Guide
Overwatch Hero Introductions - Basics Guide
How the Mechanics Work in Overwatch
How Headshots Work In Overwatch
Overwatch Game Modes Overview
Overwatch Health Types & Hitpoint Basics
Overwatch Terms, Abbreviations, & Their Meanings
Easiest and Hardest Overwatch Heroes to Master
My Hotkey
Bindings For Overwatch & Why I Use Them
|
Feel free to leave any type of comment, such as how you like the guide and if it helps you at all, or to report something that is inaccurate in the guide. |







 Genji
Genji Bastion
 D.va
D.va Ana
Ana McCree
 Hanzo
Hanzo Reinhardt
 Lucio
Lucio Pharah
 Junkrat
 Roadhog
 Mercy
Mercy Reaper
 Mei
Mei Winston
 Symmetra
 Soldier76
 Torbjorn
 Zarya
Zarya Zenyatta
 Sombra
 Widowmaker
 Tracer
 Temple of Anubis
 Hanamura
 Watchpoint Gibraltar