
McCree In-depth Strategy Guide
( FP's Overwatch Strategy Guide )
 McCree
is one of the best DPS heroes in the game thanks to his powerful
revolver. He can do good damage
up close and from a medium range distance. McCree is great for
soloing enemies with his flashbang ability. If you are coming from
FPS games like Counter Strike (CS), then McCree will feel very natural
for you as his aiming is very similar in respect to the guns in games
like CS. If you are new to FPS, then there will be a learning
curve for how to aim properly with McCree. McCree's weakness is
his lack of long distance damage and map mobility skills. Because
of his lack of map mobility, McCrees' tend to stick around the tank and
deal DPS and not wonder around like other attack heroes such as Genji,
Tracer, or Reaper. Let's check out his
abilities in-depth:
McCree
is one of the best DPS heroes in the game thanks to his powerful
revolver. He can do good damage
up close and from a medium range distance. McCree is great for
soloing enemies with his flashbang ability. If you are coming from
FPS games like Counter Strike (CS), then McCree will feel very natural
for you as his aiming is very similar in respect to the guns in games
like CS. If you are new to FPS, then there will be a learning
curve for how to aim properly with McCree. McCree's weakness is
his lack of long distance damage and map mobility skills. Because
of his lack of map mobility, McCrees' tend to stick around the tank and
deal DPS and not wonder around like other attack heroes such as Genji,
Tracer, or Reaper. Let's check out his
abilities in-depth:
Name: Jesse McCree
Difficulty: Medium
Role: Offense
Age: 37
Occupation: Bounty Hunter
Release Date: 10-27-2015
Base Hitpoints: 200
McCree
|
 |
Main attacking weapon McCree fires off a round from his trusty six-shooter. Ammo: 6Normal Fire Rate: 1 shot per 0.5 second. Damage: 35 - 70 (per hit) - Damage decreases with distance. Reload time: 1.5 seconds Headshot?: YES Default Hotkey: LM / RM |
Bullets from McCree's Peacekeeper has no travel time and hits targets instantly. This is one of the reasons that makes McCree's weapon very powerful. Although due to fall-off distance damage, the further you hit a target, the less damage will be done. Proper aiming with the Peacekeeper will take a lot of practice.
Main attacking weapon McCree fires off a round from his trusty six-shooter. He can fan the Peacekeeper's hammer (alternate fire ability) to swiftly unload the entire chamber. Ammo: 6Fan Fire Rate: 6 shots over 0.85 second. Damage: 270 max (25-45 per bullet) - Damage decreases with distance. Reload time: 1.5 seconds Headshot?: no Default Hotkey: RM |
It's generally better to use the alternate fan fire ability up close and use his regular shots for longer distances. Keep in mind that when using the alternate fan fire ability, it will only unload the rest of the bullets remaining in the current chamber with an inaccurate shot spread. It can be useful to first do a combat roll to get close to the enemy and then do the Fan Fire attack so you know for sure that your gun will be loaded while also getting up close to the target.
The alternate fan fire is great when combined with Flashbangs and Combat Rolls (as explained later).
Ability with cooldown McCree dives in the direction he's moving, effortlessly reloading his Peacekeeper in the process. Cooldown: 8 secondsDefault Hotkey: Shift |

This ability has multiple purposes, but mainly it's used to confuse your enemies and to dodge out of enemy fire. This can also be used to quickly reload your revolver while in the midst of combat, while at the same time adding some confusion to your enemies.
Combat Rolls can only be used when McCree is on the ground and it can be used in any direction he is moving. This means you can do a Combat roll backwards by pressing your back button while using Combat Roll, etc.
Ability with cooldown McCree heaves a blinding grenade that explodes shortly after it leaves his hand. The blast staggers enemies in a small radius. Cooldown: 10 secondsDamage: 25 Stun Time: .7 second McCree's Recovery Time: 0.35 second (amount of time before McCree can fire again) Headshot?: no Default Hotkey: E |

Flashbangs only travel a very short distance (like about 15 feet) then explodes with a splash radius. It does a very small amount of damage (25). Most importantly it stuns all enemies in the radius for 0.7 seconds. This weapon is very deadly when used with McCree's alternate fan fire weapon (throw a flashbang, then quickly unload the revolver). If the enemy doesn't die, then do a combat roll to quickly reload and continue firing. This combo is what makes soloing enemies as McCree very efficient.
Keep in mind that shields and barriers will stop Flashbangs from effecting enemies behind them.
Flashbanging Enemies Close Up
You can throw a Flashbang to make it explode sooner and closer
to you by simply aiming at the ground in front of you. This is a very
valuable tactic, especially if an enemy is right up close to you because you can
have the Flashbang have a higher chance of not missing close up targets and it
will also detonate a bit sooner.
|
ULTIMATE |
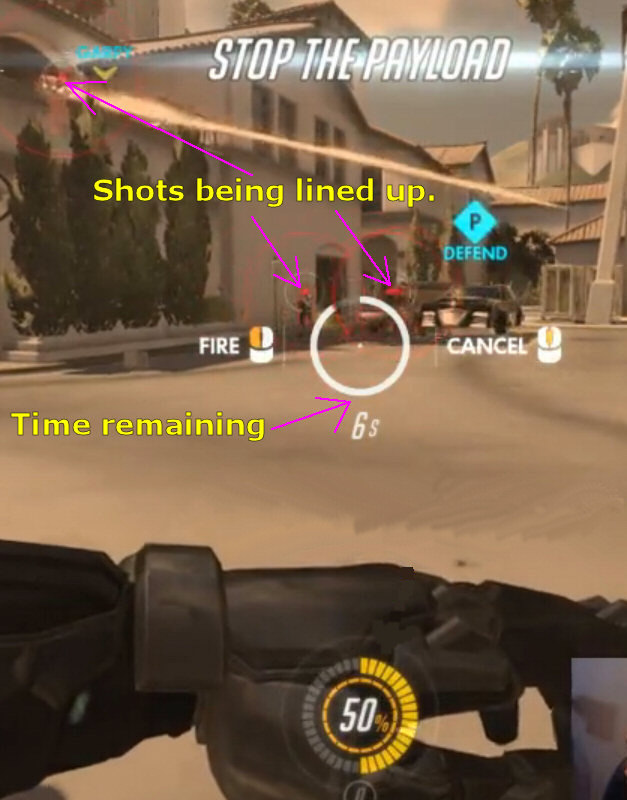
Ultimate Ability Focus. Mark. Draw. McCree takes a few precious seconds to aim; when he's ready to fire, he shoots every enemy in his line of sight. The weaker his targets are, the faster he'll line up a killshot. Charge Time: 1 second per 200 health of each enemy in sightMax Duration: 10 seconds Default Hotkey: Q Headshot?: no NOTE: Deadeye will use 50% Ultimate charge on activation, and 50% upon shooting. |

When using McCree's ultimate, he will walk very slowly around and be all lighted up for the enemy to see while McCree is zoning in for headshots. You will see circles around the enemies heads as he is revving up the shot and will be able to kill a target once the circle(s) is totally closed in on a target and turns into a red skull. The circles will zone in faster depending on how much health an enemy has, the less health the faster McCree will line up a shot. When firing the Deadeye, it will hit all targets within view but only kill targets that have a red skull on them. It can still do a lethal amount of damage to targets that were almost lined up for a killshot.
McCree's ultimate is best used mostly as a clean up ability. You should try to use it when McCree is not to vulnerable to the enemy, because you cannot use any other abilities and he will just stand there while revving up the shot(s) and can be easily killed during the process.
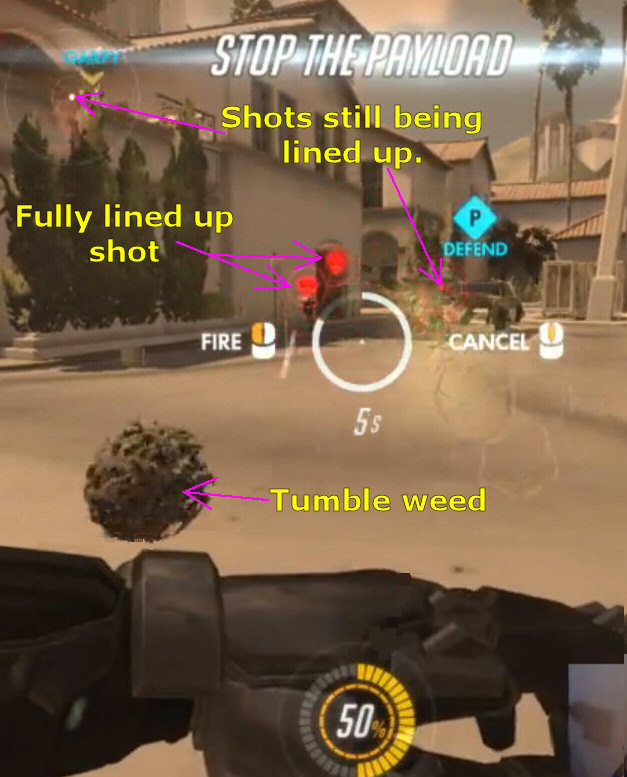
While lining up shots, you can see two different circle colors:
- Red circle is a target that is within view and is zoning in for a lined up shot.
- White circle is a target that is not within view and is NOT zoning in for a lined up shot.
Targets get lined up at 200 HP per second. So if a target has 400 HP, it will take 2 seconds for that target to get lined up.
More info on Deadeye
- You will see a tumble weed right in front of McCree while he is using Deadeye. This is only a visual effect, but this can perhaps help the enemy in locating you quicker by spotting the tumble weed first.
- Once Deadeye is activated it will quickly drain your ultimate charge to 0% in 0.25 second.
- McCree can move during Deadeye, but it is a very slow movement.
- You can cancel Deadeye during it. Canceling it will allow you to move quickly again.
A Fully lined up shot turns into a red skull. If you fire the gun, any red skulls on your screen will be dead targets upon firing.
Red skulls will be dead targets upon firing
It's a good idea to be behind a shield while using Deadeye, so getting behind Reinhardt's shield or Winston's barrier can be very useful here. Also Zarya can put a barrier on you as well.
One thing I've noticed, if you can get a lot higher up than your opponent while using Deadeye, it makes it harder for your enemy to spot you quick enough. I'll soon make a guide listing the high spots and other hidden spots on all the maps where McCree can use Deadeye more safely.
It's also important to know that Deadeye can be prevented by the enemy by having another enemy target get in front of another enemy that Deadeye is being zoned in on. So for example, a beefy tank such as Roadhog can jump in front of weaker allies that are in the line of the Deadeye sight and take the damage instead. Also enemy shields can stop Deadeye shots.
McCree's Strength and Weaknesses Vs Other Heroes

Reaper: Not many heroes can counter a Reaper 1on1, but McCree is actually a good counter to Reapers, and that's mostly thanks to McCree's Flashbangs. Flashbangs will prevent a Reaper from using Wraith Form quick enough and will also interrupt Reaper's ultimate (Death Blossom). I would still try to stay a distance from Reapers as only a few shots from their shotguns can kill a McCree in as little as 2 hits.
Flashbangs do not work on Reaper's Wraith Form. Reaper can also use Wraith Form to escape from a Deadeye.

Reinhardt: McCree performs decently at tanks, and his abilities works well against Reinhardt. A few fan fire attacks at Reinhardt's massive shield will bring it's hitpoints down tremendously fast. In fact Reinhardt's shield is one of the few instances where using the fan fire at a longer range makes sense since it is so big of a hit area. Reinhardt's shield will block Flashbangs, but McCree can actually throw his Flashbang above his shield to successfully stun Reinhardt.
You see a Reinhardt charging at you? No problem, just Combat Roll out of the way real quick to avoid it. Reinhardt will be too scared to get to close to do damage with his Rocket Hammer thanks to McCree's Flashbangs.
McCree's Ultimate Deadeye is weak against Reinhardt due to every one of Reinhardt's abilities. Since Reinhardt has a large amount of hitpoints and the fact that his shield can block it, protecting allies behind him, makes Deadeye very weak on Reinhardt. Reinhardt can also Charge at McCree when using Deadeye as long as he spots you quick enough and isn't too far away from you along with having enough health for it. A quick Fire Strike can also be used from a distance to deal some damage to McCree as he is revving up his Deadeye. Oh yeah, and Reinhardt's ultimate Earthshatter will put an end to it as well.

Pharah: Pharah is hard to flashbang since she is mostly flying around in the air, and her concussive blast ability will help keep McCree away from her. McCree can attempt to shoot her down and vice versa. McCree has a bit more DPS than Pharah overall and should come out on top with good aim. Pharah is especially vulnerable to McCree's ultimate since it will be harder for Pharah to take cover quick enough while floating around in the air. Keep in mind when Pharah uses her ultimate Barrage, it is mostly McCree's job to quickly take her out. It shouldn't be too hard since she remains still while using barrage.

Winston: Since Winston can only do damage in close range with his Tesla Cannon or his ultimate Primal Rage, he is very vulnerable close up to McCree's deadly Flashbang and fan fire combo. Winston can use his Jump Pack to help him stay away from McCree and his Flashbangs. Winston can block McCree's shots with his barrier shield, protecting his team at the same time. If Winston uses his Primal Rage Ultimate, you can still Flashbang and fan fire at him, but it's best to back up away from him by using Combat Rolls to avoid it for the most part.
McCree's Deadeye is less effective on Winston due to his large hitpoints (of 500) and his ability to block it and protect his team with his Barrier Projector. Plus with Winston's Primal Rage, he can leap right up to McCree using Deadeye and knock him out of view from firing his shots off.
Overall McCree still has the upper hand thanks to his strong medium range fire and up close Flashbang and fan fire combo against Winston.

Bastion: McCree's poor mobility makes countering a Bastion difficult. Bastion Sentries do a LOT more damage at medium to long range and can kill McCree almost instantly even at long range. Although if you manage to get close to a Bastion Sentry, your Flashbang and Fan Fire ability can quickly take him out. You can use Combat Rolls to avoid Bastion's line of sight if possible.
Deadeye is usually not as effective against a Bastion Sentry due to his high HP of 300 and it will take 1.5 seconds to line up a shot with him at full health before he focus fires you down.

Widowmaker: Since Widowmaker is usually a distance from McCree, it's usually best to avoid attacking a Widowmaker from a distance due to McCree's poor long distance damage. McCree has a much better chance of survival if your team has a Reinhardt shield up to block Widowmaker's shots. However if she comes up close, then McCree can take her down much easier. It's generally not McCree's job to go off on his own and hunt down a Widowmaker (that is a job for heroes like Reaper, Tracer, and Genji).
Before using Deadeye (ultimate), make sure there is no Widowmaker around sniping or you will be easy prey to her.

Hanzo: As long as Hanzo keeps a distance from McCree he does very well against him. Hanzo's climb ability helps him to further keep a distance from McCree. Although if Hanzo gets to close to McCree it could be a quick death for Hanzo. Be careful while using Deadeye right after Hanzo uses Dragonstrike, as this can make your teammates run away making you more vulnerable for getting shot.

Zarya: Zarya's Particle/Projected Barriers help protect her (and her allies) from McCree's flashbangs and fan fire attacks. However her shield only lasts for a very short period of time, leaving her vulnerable to McCree most of the time. Overall, Zarya's Particle/Projected Barriers, health, and damage from her particle gun will give McCree a tough time.
Keep in mind, Zarya's short range particle beam is stronger than her longer range explosive charge shots. Because of this, consider using a Combat Roll backwards away from her to get out of her short range particle beam.
Out of all the tanks, Zarya is the weakest to Deadeye. Her lack of mobility to take cover and lack of damage mitigation to protect her whole team makes using Deadeye against her easier and more potent overall.
Zarya's ultimate Graviton Surge is very deadly to McCree as he is usually right in the targetable spot for it along with not having ways to escape or counter it.

Torbjorn: McCree is very deadly up close, however Torbjorn usually keeps his distance from his enemies and doesn't need to worry about McCree that much. McCree's Flashbang and fan fire combo is still deadly on Torbjorn, but Torbjorn's turret works great for keeping McCree away from him. McCree's Flashbang does work on Torbjorn's turret, and his fan fire attack can deal a lot of damage to Torbjorn's turret if he manages to get up close to it.
Combat Rolls can keep you from taking extra damage from turrets when moving around the map.
Deadeye is less effective on Torbjorn since he is usually in a position where he can take cover quickly. However, if Torbjorn is out in the open there is not much he can really do to avoid Deadeye. He can give himself an armor pack which can make lining up a shot to him 0.75 seconds longer, and he can try to headshot McCree with his Rivet Gun.

Genji: A good McCree player can be devastating to Genji. Most new McCree players will try to throw their Flashbangs directly at Genji. The issue with this is that Genji can Deflect Flashbangs thrown right at him. But McCree can actually throw a Flashbang either into the ground in front of Genji or up in the air above Genji to avoid his Deflects and successfully get the Flashbang stun in.
Dealing with Genji can still be difficult though, as he can quickly Swift Strike up to you and then melee you for some quick damage.
When using Deadeye, Genji can use Deflect against it to easily take you out if you fire at him. You must pay attention to Genji and wait until he is not using Deflect to fire off your Deadeye shots.
When Genji is using his ultimate Dragonblade, he can still use Deflect, so still try to aim your Flashbangs above or below him to get the stun in. Use Combat Rolls to get away from Dragonblade if you can.

Mei: McCree can usually pull off his flashbang and fan fire faster than Mei can slow/freeze McCree, however she usually has enough health after that to freeze herself to regenerate her life back. When she unfreezes, you better either Combat Roll in medium range or finish her off really fast or she will freeze you (it only takes 2.25 seconds of targeting for freeze to happen). Mei's icewall helps her to block McCree's shots as well as help her run away from McCree. Mei's alternate icicle shots helps her to deal decent DPS safely at longer ranges. Mei's icewall is an excellent counter to McCree's ultimate.

D.va: Fighting a D.va as McCree is similar to fighting a Winston. She can block shots with her defense matrix ability and keep a distance thanks to her booster ability. Unlike most other heroes, close up fights with D.va can be difficult for McCree. D.va can do a lot of damage with her cannons with no reloading close up, and she can use her Defense Matrix ability to potentially block Flashbangs. Combined with her large hitpoints only makes it harder to quickly kill her in close range. It is usually best to keep a distance from her and spam shots at her. D.va's cannons do much less damage to a single hero at longer ranges. Since D.va is such as big target, McCree's fan fire ability even works well at medium ranges against her.
McCree can use his Combat Roll to quickly get behind a wall to avoid D.va's Self-Destruct, and D.va can use her Defense Matrix ability to block McCree's ultimate Deadeye.

Lucio: Lucio does a good job of keeping a distance from McCree thanks to his alternate fire (Soundwave knock back) and fast movement aura. But Lucio can still come in close encounter to a McCree occasionally making him very vulnerable to flashbangs and fan fire before it's too late for Lucio to use either Soundwave or Sound Barrier to save him.
Be careful when using Deadeye around a Lucio, as his ultimate (Sound Barrier) will make charging up shots for Deadeye MUCH slower thus making you vulnerable a lot longer. Try to use Deadeye when you think Lucio does not have his ultimate charged up yet.
When Lucio uses his ultimate Sound Barrier you are better off taking cover until it is over. You can use a Combat Roll to help you move away from the enemy during this time.

Roadhog: Both heroes deal decent damage in close to medium range, although McCree does a bit more DPS, Roadhog has much more health to compensate. If your quick enough, you can use combat rolls to avoid Roadhog's Chain Hooks.
McCree's Flashbang will cancel all of Roadhog's abilities, including: Take a Breather (his self-heal) and his Whole Hog ultimate.
Be careful while using Deadeye around a Roadhog, because if he uses his Chain Hook on you, it will cancel it. Also since Roadhog has the most health in the game, it will take the longest to rev up a shot with Deadeye if he is at near full health.

Tracer: Fighting a Tracer is generally an even matchup. The problem with Tracer is how fast she moves around, it can be incredibly difficult to hit a moving Tracer. The fight really comes down to who has the better aim and use of abilities. One important tactic I do recommend against Tracer is the best time to throw a Flashbang at her is when she is firing, that is when she is generally most vulnerable to flashbangs.
If Tracer sticks a Pulse Bomb on McCree, he will die (unless he receives a Projected Barrier from Zarya or Sound Barrier from Lucio), even a Combat Roll does NOT work to unstick a Pulse Bomb.

Mercy: The problem with Mercy is she is always hiding away from her enemies. McCree's poor mobility makes him not so good at hunting down Mercys as opposed to other heroes such as Tracer, Genji, and Reaper. However, try to aim for Mercy first before who she is healing/buffing.

Symmetra: Symmetra is usually hiding behind shields, tanks, or busy putting up traps and is harder to hit most of the time. Shooting down Symmetra's sentry turrets as McCree requires more precision than most heroes, so be cautious if you know the enemy has a Symmetra, peak around corners for traps before entering rooms/hallways. You can use a Combat Roll to either roll back out of the room or to roll past the room in attempt to avoid her turrets. Also, Symmetra can put 25 hitpoint shields (that regenerate) on all her allies, which will make shooting individual heroes a tad more difficult.
You can usually spot where a Symmetra is at by tracking back her slow moving photon orbs. Photon orbs are also relatively easy to avoid, especially by using a Combat Roll to dodge them.
Close up and Symmetra is a sitting duck to McCree's Flashbang and fan fire combo due to her lack of mobility and damage mitigation.
Unfortunately, McCree is the worst offensive hero at hunting down Symmetra's Teleporter ultimate due to his poor mobility to get around maps easily.
Deadeye happens to be very effective against Symmetra due to her poor mobility to take cover from it and only having 200 HP makes lining up a shot relatively fast.

Ana: Since Ana is a backline support sniper, she usually doesn't come into close contact with McCree a whole lot, however if she does, McCree will most likely kill her very quickly with his Flashbang & Fan Fire combo unless Ana is quicker with her Sleep Darts, but this is usually not the case since Flashbangs are much easier to hit targets than Sleep Darts.
Overall it can be hard for Ana to land a Sleep Dart on McCree, especially when McCree uses a Combat Roll. However, McCree's Deadeye makes him move very slow while revving up his shots, this is the ideal time for Ana to quickly throw a Sleep Dart at him before he gets his Deadeye shots off. Deadeye is also one of the most important targets for a Sleep Dart as it will also end the ultimate as well.
McCree is a usual target for Ana's Biotic Grenade as most of the time McCree will have healers providing healing for him and the prevention of healing from the Biotic Grenade can make it much easier for Ana's team to take him out.
A Nano Boosted enemy (Ana's ultimate) might have the extra strength needed to withstand McCree's Flashbang & Fan Fire combo along with being able to escape from McCree's Deadeye more effectively.

Soldier 76: McCree does better damage in close ranges, but Soldier 76 does more damage overall from medium to long range. Soldier 76's helix rockets fly until it hits something (unlike McCree's flashbang), thus giving Soldier 76 more of an edge at longer ranges. Use combat rolls to avoid Soldier 76's helix rockets. If you can get closer to Soldier 76 it can spell disaster for him.

Zenyatta: Zenyatta actually does fairly well when soloing enemies thanks to his Discord Orb ability (which amplifies all damage to the target who has the orb). As long as Zenyatta stays out of the range of McCree's flashbang then Zenyatta might have a chance to beat out a McCree. It's a pretty close fight.
McCree is overall very susceptible to Zenyatta's Discord Orb as there is not much he can do to counter it. McCree can use a Combat Roll to quickly get behind a wall, but not much else.
Deadeye can be very powerful against Zenyatta due to his poor mobility to hide from it in time, but he can focus fire you down quickly with his Discord Orb and energy orbs to take you out quickly, or initiate his ultimate Transcendence which can save him and then block your shots for any of his allies behind him.

Junkrat: Close match up. Junkrat will try to stay around walls/corners while lobbing grenades and hiding traps/mines for the approaching McCree. If McCree can mange to get up close to Junkrat while avoiding his traps/mines, it's GG for McCree. Since McCree's mobility is mostly slow paced, he walks around the map slow enough to see traps before he gets to them (unlike fast heroes such as Tracer or Genji), and can then shoot/kill them more safely. Also since McCrees will tend to kill Junkrats close up, you have to remember to always avoid Junkrat's suicide bombs when he dies. McCree will have the upper hand at medium range as long as Junkrat is within view.
Remember when Junkrat throws his ultimate out (Rip Tire), it can be shot down quickly with a few shots from McCree.
McCree's Allied Synergies Guide
News/Home | Blog | Follow | Unlock Full Guide
Attack |
Defense |
Tank |
Support |
 Genji
Genji Bastion
 D.va
D.va Ana
Ana McCree
 Hanzo
Hanzo Reinhardt
 Lucio
Lucio Pharah
 Junkrat
 Roadhog
 Mercy
Mercy Reaper
 Mei
Mei Winston
 Symmetra
 Soldier76
 Torbjorn
 Zarya
Zarya Zenyatta
 Sombra
 Widowmaker
 Tracer
Map Guides
 Temple of Anubis
 Hanamura
 Watchpoint Gibraltar
Overwatch Hero Introductions - Basics Guide
How the Mechanics Work in Overwatch
How Headshots Work In Overwatch
Overwatch Game Modes Overview
Overwatch Health Types & Hitpoint Basics
Overwatch Terms, Abbreviations, & Their Meanings
Easiest and Hardest Overwatch Heroes to Master
My Hotkey
Bindings For Overwatch & Why I Use Them
|
Feel free to leave any type of comment, such as how you like the guide and if it helps you at all, or to report something that is inaccurate in the guide. |
