
Mercy In-depth Strategy Guide
( FP's Overwatch Strategy Guide )
 Story
Story
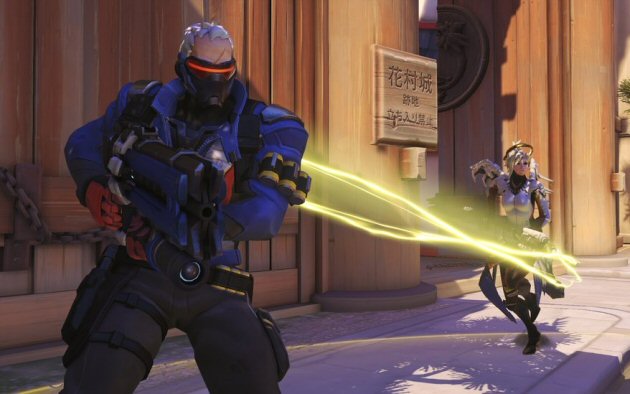
Mercy is a guardian angel for those who come under her care. She
is a peerless healer, a brilliant scientist, and a staunch advocate for
peace.
Play style
Mercy's play style involves following her allies with the flying
abilities provided by her Valkyrie suit while buffing them either with
healing or damage boosting. While buffing her allies, she needs to
take cover from enemy fire while keeping an eye out on who needs healed
or damage boosted the most. While Mercy heals and damage boosts
her allies, in return she gains ultimate charge. Mercy's ultimate
Resurrect is considered one of the most powerful ultimates in Overwatch.
Resurrect will bring back all nearby dead allies to life, which can
easily change the tide of the battle in Mercy's favor. Mercy also
slowly regains health back when she is not taking damage.
Weaknesses
Mercy's weakness is her lack of self defense as she needs to be next to
an ally to be of any use. Although Mercy has a blaster gun which
she can use for times of self defense, it's considered the weakest
weapon in Overwatch. Mercy cannot use her blaster gun at the same
time with her ally buffing abilities, which means you will rarely use
her blaster gun as you will be spending most of the time healing and
damage boosting allies. Luckily, Mercy's Guardian Angel ability
allows her to continuously fly to her allies to constantly stay useful
in battle.
Name: Angela Ziegler
Difficulty: Easy
Role: Support
Age: 34
Occupation: Field Medic, First Responder
Base of Operation: Zürich, Switzerland
Release Date: 10-27-2015
Base Hitpoints: 200
NOTE: Mercy has a self heal of 25 per second after 1 second of not taking damage.

Main weapon Mercy engages one of two beams that connect to an ally. By maintaining the beams, she can either restore that ally's health or increase the amount of damage they deal. Healing per second: 60Damage Boost: +30% Range: 15 meters Default Hotkey: 1, then: LM (heal) - RM (damage boost) |
Mercy's Caduceus Staff is what you will be using 99% of the time (as opposed to your blaster gun). Caduceus Staff is a channeled ability that can only be used on allies. You have a choice of either healing your allies (yellow beam) by 60 health per second, or damage boosting your allies by +30% additional damage output.
Mechanics of Mercy's Caduceus Staff:
- You can turn all the way around while still keeping your beam on an ally. This can allow you to scout your surroundings to see where and what your allies and enemies are up to while you are buffing an ally.
- Your beam can temporarily stretch further than the target range if your ally moves further away from you. Your beam will disconnect if you do not move closer to your ally in time (usually in a few seconds).
- The same applies when you and your ally lose line of sight from each other. If you are channeling your beam on an ally and you two lose line of sight (such as a wall between the two of you) your beam will disconnect if you do not provide a line of sight within 2 seconds.
- The healing beam will heal up shield health.
- The healing beam does heal up armor health except from Torbjorn's armor packs.
- The healing beam will stack with multiple Mercys but damage boosting beams do not stack.
- Both beams (healing and damage boosting) will gain ultimate charge for Mercy.
- Mercy will NOT gain ultimate charge from healing up allies' self-damage.
Custom Controls For Beam Toggle
By default, one must hold down the appropriate hotkey (either LM for heal
or RM for damage boost) in order to keep the channeled beam on an ally.
I suggest going into the controls menu for Mercy and change it so
the "TOGGLE BEAM CONNECTION" is set to "ON". Setting that to "ON" will
make playing Mercy easier as you will not have to hold down the buttons for
your healing and damage boosting beams.
The drawback to this is sometimes you may not want to use your beam on an ally to hide yourself from the enemy better. You can work around this by quickly switching to your blaster gun and then back to your Caduceus Staff. Another way to cancel the beam on an ally is to look away from the target your buffing/healing and then press the beam and it will turn off as long as you are not looking at another target.
Most of the time I recommend using the heal beam to keep all your allies healed up. Keep flying around to allies that need healed with your Guardian Angel ability (more on that later). Some allies will depend on healing more so than others. There is a lot of things to cover just with the Caduceus Staff, so let's get started. Here is a rough list of who needs healed more than other heroes and why.
Heroes that generally need healed by the Caduceus Staff more so than others:
- Zarya - Since she has no self heal with low mobility to seek health
packs, healing her is essential. And as a tank, she will soak up a lot
of damage that needs healed. Even though Zarya is comprised of
50% shield and 50% health, she can regenerate a lot of health back when not
taking damage and your healing beam can still heal up shield health.
- Reinhardt - As a tank, he will absorb a lot of damage that needs healed.
Although Reinhardt can Charge to a health pack, it's not very practical for him
to do so, especially when there is a Mercy on the team.
TIP: Since Reinhardt cannot attack with his
shield out, there is no need to use damage boost on him when his shield is out,
just use heal instead.
- McCree - McCree is virtually
hopeless most of the time with no self heal or quick enough mobility to seek
health packs. He becomes extremely vulnerable while using Deadeye and
will greatly benefit from Mercy's healing and damage boosting support.
- Winston - Just like Reinhardt, Winston is a tank with no self-heal.
Although he can use his Jump Pack to reach health packs quicker, he is
better off saving them for offensive purposes. Following him around is
also somewhat safe thanks to his Barrier Projectors. When Winston uses
his ultimate Primal Rage he will instantly fully heal all of his health up
plus gain an extra +500 health on top of that for the duration of the
ultimate, so switching to damage boost during this time is more ideal. Or
better yet, supporting another ally is more preferred during Winston's
Primal Rage since it does not get much use from either healing or damage
boosting. Primal Rage is not really made for dealing damage but rather
knocking enemies away.
- Pharah - Since Pharah is airborne
most of the time she is exposed to long range fire continuously.
Although her superior mobility can allow her to seek health packs faster,
it's important to keep her healed up and especially when she uses her
ultimate Barrage as she becomes very vulnerable during her ultimate.
TIP: In the air you can hold down the
jump button to keep hovering around at Pharah's altitude, which is one of
the few times where hovering really comes in handy.
- Hanzo - As a vital defensive sniper
hero with no self heal or really good mobility to seek health packs quick
enough, he benefits a lot from Mercy's healing beam.
- Junkrat - Junkrat has okay mobility
with his mine jumps which can potentially help him to reach health packs and
avoid enemy fire, but healing him will keep his grenade spam going without
delay.
- Genji - As a ninja who has no self
heal and often comes close to his enemies, he will greatly benefit from
Mercy's heals. Be careful buffing a Genji as his Swift Strikes can
bounce you around, exposing you to the enemy more.
- Torbjorn - Since Torbjorn spends a
lot of time staying in one area building/repairing his turret, he is
very vulnerable to damage. His low mobility makes it hard for him to
dodge enemy fire and to seek health packs. Torbjorn can give himself
(and allies) Armor Packs which gives him +75 armor (that cannot be healed).
Armor Packs does provide a little extra protection until damage eats away at his
native HP pool. Torbjorn's ultimate Molten
Core does NOT heal up his health pool, but it does increase his armor
temporarily. Because of his lack of means to gain health, keeping an
eye on him for healing is somewhat important.
- Widowmaker - Another defensive
sniper with no self heal. Although she can use her grappling hook to
reach health packs a bit quicker, she still benefits greatly from Mercy's
heal.
- Symmetra - Even though Symmetra
usually stays out of harms way and half of her health consists of
regenerating shield, she has poor mobility to
seek health packs, so she will benefit from Mercy's healing beam
occasionally.
- Roadhog - Roadhog has a lot of HP
(of 600) and has a self heal of 300 every 8 seconds. This means
healing him is less important than others. If he is in the front lines
tanking a lot of damage, then sticking around him to heal is more important
then. Remember, Mercy gains ultimate charge while healing allies, so
Roadhog should refrain from using his self-heal when Mercy is supporting him
and he should only use it for emergencies or if Mercy is not supporting him.
- Reaper - Reaper can collect Soul
Globes to regain health after he makes a kill, but it's still important to
provide damage boosting and heals when he comes in range of you. Don't
try to follow Reaper too often while he is flanking as his Wraith Form will
protect him anyways and will leave you hopeless.
- Bastion - Although Bastion has a
self heal (of 25% of his health per second), he cannot attack while using it. By
keeping Bastion healed he can continue firing without delay.
- Mercy - First of all, having two
Mercy's on one team is a rare thing to see, unless you are using a specific
team strategy. Mercy does have a self heal of 25 per second after not
taking damage, but it's still important to keep other Mercys healed to keep
them in the fight more often. Generally I wouldn't bother healing
another Mercy unless you see that she is below 50% on her health and really
needs it.
- Zenyatta - Zenyatta only has 50
health, the rest is 150 shield. This means that he can regenerate a
lot of his health back himself, but only when he is not taking damage, so
healing can still be important. His ultimate Transcendence will totally
save and heal him up. This means that Mercy doesn't necessarily need
to keep an eye on him too much, but Mercy can give a quick heal for him
while in the midst of battle to keep his energy orbs going strong. Just don't stick around him for too long unless you want
to damage boost him.
- Tracer - Tracer's extremely fast
mobility allows her to quickly reach health packs which will fill up a lot
of her HP, which means healing her is less important than other heroes, but
if she is within distance of you, give her a heal.
- Mei - Mei has a self heal (Cryo-Freeze)
which can heal up 150 points every 12 seconds out of her HP pool of 250.
Plus she can block shots with Ice Wall, so she is good at saving herself
without a healer most of the time. But still keep an eye out on her
and give her a heal if she needs it, especially when she is trying to freeze
enemies up close.
- D.va - Since D.va's boosters allow
her to constantly fly to health packs to refill up and her Defense Matrix
ability can block incoming shots, she isn't a prime target for healing.
Not to mention D.va's ultimate will blow up her mech anyways and she can
then call down a fresh one with full health, so healing her is not that
important. Damage boosting her Fusion Cannons is very effective
though. If you see D.va in human form, give her a heal if she needs
it.
- Soldier 76 - Soldier 76's Biotic
Field heals him and nearby allies around him. This can alleviate some
work on Mercy's part, allowing you to do more damage boosting. Biotic
Fields heal 35 per second, but only for 5 seconds and then he cannot use it
for 10 seconds. This means keeping him healed during this time can be
beneficial. Although Soldier 76's death is not too much of a deal as
opposed to other heroes since he can sprint back to the fight faster than
anyone else.
- Lucio - Lucio's Crossfade heal aura is very powerful, even on himself. And when combined with his Amp It Up, he can quickly regain all his health pretty fast. His fast movement with his skates also means he can avoid enemy fire easier and as a support he generally stays in the back lines away from too much danger. His fast speed ability also enables him to quickly get back to the fight faster after dying so healing him is probably the least important out of all the heroes in Overwatch.
Just like with the healing, damage boosting will gain ultimate charge as well. Damage boosting provides a 30% boost in damage to whoever she has her damage boosting beam on. Keep in mind Mercy cannot stack damage boosting with another Mercy.
Importance of damage boosting
A lot of times you need to make a decision whether you want to heal or damage
boost an ally. You can learn a lot of this through practice, but here are
some reasons to use damage boost over healing:
- When an ally is at full health. I know this may seem obvious, but there is no point keeping your healing beam on someone when they are fully healed, instead switch to damage boosting.
- Damage boosting when allies use their ultimates. Some heroes will benefit greatly when their ultimate is damage boosted, I will list these down below.
- When damage boosting an ally will allow him to finish his kill quicker and safely before moving onto another target. Once the kill has been made, then heal him. In this case, things are more efficient and more time is spent moving on to other targets rather than just healing constantly. Supporting a Reaper is a good example here. Keep damage boosting Reaper while he is attacking, only heal him once each little battle is over. This will come easier to know and do through practice.
- When healing is less important for specific heroes. These specific heroes are listed above and below this section.
How Damage Boost Works on Projectiles
When an ally fires a projectile, the damage boost only applies exactly when the
projectile hits the target, regardless if the damage boost beam was on the
ally when the projectile was fired or not. This means you CANNOT damage
boost the shot of a projectile then switch to healing with the hopes that when
the projectile hits it will do more damage, as it does not work this way.
Ultimates that benefit the most from damage boost:
- Soldier 76 - Tactical Visor becomes extremely powerful when damage boosted. Keep in mind though, Soldier 76 becomes very vulnerable while using Tactical Visor, so you may need to heal him to keep him alive as well.
- Genji - Dragonblade is very deadly once damage boosted, but Genji still has no change to his health, so keeping him healed during this time is equally important.
- Reaper - Death Blossom is already powerful enough even without damage boosting, but with damage boost you are sure that anyone around him will most likely die and quick. Keep an eye on Reapers health as he may need healing as well during Death Blossom.
- Pharah - Barrage is already very powerful without damage boost, but with damage boost it becomes extremely deadly. You need to watch out because Pharah becomes extremely vulnerable while using Barrage, so keep that healing beam ready. Also holding down the jump key to keep hovering is essential to stay in the air with her while she is Barraging.
- Bastion - Tank Form becomes overly powerful while damage boosting, as it will one shot just about anything (except tanks). Even though Bastion gains +150 armor during his ultimate, you still need to make sure he remains healed if he is getting attacked by too many enemies.
- Torbjorn - Damage boosting Torbjorn while he has Molten Core on can be effective, but only when he is attacking something and not repairing his turret.
- McCree - Damage Boost allows McCree to line up Deadeye shots 30% faster.
- Hanzo - Dragonstrike is already extremely deadly without damage boost, but since Dragonstrike does a damage over time effect, damage boosting it before he fires it is an easy way to add a lot of extra damage to it, which will ensure its success much better. Keep in mind the damage boosting beam must be maintained on Hanzo for the whole duration while the Dragonstrike is out in order to maintain the damage boost for it.
- Roadhog - It can be effective for Mercy to damage boost Roadhog's Whole Hog, but generally only if he is closer up to his enemies and the majority of the shrapnel rounds connect to his targets, otherwise damage boost is not so effective on Whole Hog. Whole Hog's main use is to knock back enemies, not necessarily for damage.
- Winston - Winston's Primal Rage will heal all his health up while also temporarily increasing his health pool to 1000. Because of his increased health, healing him during Primal Rage is virtually unnecessary, so damage boosting Primal Rage can be more effective. Be prepared to keep flying at him because his leap will go on a 2 second cooldown. Although if there are other allies in the area, consider supporting them instead because Primal Rage is really meant for batting enemies away and not necessarily for direct damage.
- Mei - Damage boost increases Blizzard's damage, but it does not freeze enemies any faster.
- Reinhardt - Damage boosting Reinhardt before he does an Earthshatter will do 65 damage to all enemies instead of 50 to all enemies, which is not huge.
- Zarya - Graviton Surge only does 22 damage once for each enemy trapped by the surge. Because of this, damage boost is not very useful here.
- Tracer - Damage boosting Tracer's Pulse Bomb is usually unnecessary for most enemies since a Pulse Bomb normally does 400 damage (enough to kill most heroes), however it can be useful to damage boost Tracer's Pulse Bomb when used on high HP heroes like tanks.
- Junkrat - Damage boost does not work on Junkrat's Rip-Tire.
- D.va - Damage boost has no effect on Self-Destruct.
- Lucio - Damage boost has no effect on Sound Barrier.
- Widowmaker - Damage boost has no effect on Infra-Sight.
- Symmetra - Damage boost has no effect on Teleporter.
- Mercy - Damage boost has no effect on Resurrect.
- Zenyatta - Damage boost has no effect on Transcendence.
Besides ultimates, allies that benefit the most from Damage Boosting:
- Bastion - Bastion's gatling gun becomes extremely deadly once damage boosted, everything seems to drop like flies.
- Soldier 76 - Soldier 76's Pulse Rifle is very powerful, and damage boosting only makes it better. However, his Pulse Rifle does less accuracy and damage at longer ranges. Soldier 76's ultimate is high on my chart for damage boosting, but low for healing, so damage boosting him no matter what attack he is doing is more beneficial overall.
- McCree - McCree is a great DPS dealer, why not make him 30% more dangerous? McCree is also one of the few heroes that greatly benefits from Mercy's healing, so sticking around a McCree is not a bad idea.
- Junkrat - Damage boosting Junkrat's grenade spam can make your overall defense much more powerful. Junkrat will also thank you for heals since he is on the top of my chart for heroes that benefit from Mercy's healing the most.
- Pharah - Pharah's rocket spam can be a great DPS dealer and damage boosting it can make it very deadly. Pharah is also high on my charts for healing and damage boosted ultimate, so hanging around her is a good idea.
- Zarya - Zarya's gun can charge up and get stronger via her Particle Barriers. At full charge her gun becomes very deadly and when combined with Mercy's +30% more damage is incredible. Zarya is also #1 on my list for healing so following and keeping an eye out on her is important.
- Zenyatta - Zenyatta's Orb of Destruction weapon is actually very powerful for a basic weapon and when damage boosted it becomes even more deadly. On top of being boosted by Mercy, Zenyatta can also use an Orb of Discord on the target to really take it out quickly. Aiming with Zenyatta can be difficult so consider only damage boosting a Zenyatta player if he is very experienced at using his orb shots.
- D.va - Mercy's damage boosting can be effective with D.va's Fusion Cannons, but remember Fusion Cannons are really only useful in close range which could expose Mercy to more danger. Damage boosting D.va's Light Blaster in human form is actually very effective and is a great option for Mercy to damage boost.
- Reaper - Following a Reaper can be dangerous, but damage boosting his shotguns is very powerful. Most of the time Reaper can stay healed himself so it may be more beneficial to find other heroes to support instead.
- Symmetra - Damage boosting Symmetra's photon orbs can be very powerful, especially when she is used to take out Reinhardts, since her orbs can penetrate through shields and targets.
- Hanzo - Damage boosting Hanzo's Scatter Arrow shots and even regular bow shots is deadly, especially when the player is really good with Hanzo's aiming. Hanzo also benefits from Mercy's healing, so following a Hanzo can be a good idea.
- Widowmaker - Widowmaker's sniper shots will benefit a lot from damage boosting. But Widowmaker is usually further away from the rest of her team so getting to her can take a bit longer than others.
- Roadhog - Damage boosting Roadhog's Scrap Gun is powerful, especially right after he chain hooks an enemy into him.
- Genji - Damage boosting Genji's shurikens can be deadly depending on how good the Genji player can aim with the shurikens.
- Lucio - Lucio's sonic projectile spam is a good thing to boost when there is no other options.
- Winston - Winston's Tesla Cannon is okay to damage boost, especially when Winston is attacking multiple enemies at once with the chained lighting effects of the Tesla Cannon. Following Winston's wild leaps isn't too bad for Mercy thanks to his Barriers. Winston is also high on the list to heal.
- Torbjorn - Damage boosting Torbjorn is usually not worth it since he spends a lot of time building and repairing turrets and his main attack weapon falls short to other heroes.
- Reinhardt - Most of the time there is no need to damage boost Reinhardt because he cannot attack with his shield out. Although, damage boosting his Fire Strikes can be effective only if you can do it in time, which can be difficult and will take some practice. Reinhardt can fire a Fire Strike every 6 seconds, so keep that in mind. Damage boosting his melee attacks can be effective but make sure he stays healed too as I have him ranked high for needing healed.
- Mei - Damage boosting Mei's Freeze gun does increase the DPS but doesn't affect the freeze times. Damage boosting her long range Icicle shots are not as important as other weapons in the game. Keeping her healed is not very important since she can maintain that herself. All this means Mei is one of the least Mercy friendly heroes in the game.
- Tracer - Keeping Tracer damage boosted is nearly pointless since it is so hard to keep up with her fast mobility and she is mostly used to just harass enemies anyways.
- Mercy - No point in damage boosting Mercy unless you really need to make her blaster more powerful for some reason.
- Lucio - Lucio's healing and speed aura will keep you safe and healed up from danger. Lucio's ultimate Sound Barrier is a strong life saver as well. Lucio is also a support that typically stays in the backlines usually out of too much danger.
- Soldier 76 - Soldier 76's Biotic Fields can keep all allies around him healed up. Soldier 76 also doesn't wonder too far from his team so he is a safe hero to follow.
- Reinhardt - Reinhardt's shield will protect you from incoming enemy fire. Be careful when he Charges, as he can do in it dangerous places, you may need to switch to another hero to support depending on where he charges to.
- Zenyatta - Zenyatta can put an Orb of Harmony on you, even though he is usually better off putting it on someone else. Orb of Discord can help tear through enemies that get close to him and his ultimate Transcendence can protect all his allies around him. Zenyatta is also a support that typically stays in the backlines usually out of too much danger.
- Zarya - Zarya can put a Projected Barrier on you which can help keep you alive during dangerous battles. Even Zarya's personal Particle Barriers can act as a shield for Mercy to get behind to take cover. Zarya typically doesn't go to far away from her team so she is generally safe to be around.
- Bastion - Bastion Sentries are a stationary powerhouse that is devastating to any enemies near him, so he can protect you offensively.
- McCree - McCree doesn't have anything to really protect you besides flash banging enemies up close, but he generally doesn't wonder too far away from his team so he is generally safe to be around.
- Roadhog - Roadhog is a big meat shield himself that can block damage if you stay behind him. Remember if he chain hooks an enemy into him use damage boost to do extra damage to the victim. Roadhog is a tank that usually doesn't wonder to far so he is generally safe to follow.
- Winston - Winston's Barrier Projectors are great for blocking incoming enemy fire, but they only last for a short period of time. You also have to be careful where he leaps at. Even though he can use a Barrier Projector after he leaps you still might be in a bad situation. Overall though he is okay to follow.
- Symmetra - Symmetra is generally safe most of the time to follow since she typically stays in the backlines with her team lobbing photon orbs or putting up sentry turrets.
- Torbjorn - Torbjorn usually sets his turrets up in safe places where he can generally take cover from enemy fire so following him is generally safe most of the time.
- D.va - D.va's mech is a big target as she can soak up a lot of damage that could otherwise hit you. Be careful when she uses her boosters as she may be going for health packs or trying to flank the enemy somewhere more dangerous.
- Hanzo - Hanzo is not to bad to follow since he doesn't play too offensively and stays with his team more. Hanzo's Sonic Arrow can warn Mercy of incoming flankers, allowing her to fly to another ally for safety in time.
- Widowmaker - Widowmaker can sometimes be in total different spots relative to her team so finding her or flying to her might take awhile and expose you to the enemy at the same time.
- Junkrat - As a defensive hero he can be okay to follow as most of the time he is usually safe from the enemy but sometimes you will see Junkrat players that play more offensively, in those cases you need to be extra cautious when following them.
- Pharah - Following Pharah typically involves flying to her in the air and then hovering. The problem here is that you are being exposed to snipers or other long range damage dealers that can potentially shoot you out of the sky.
- Mei - Mei is a mixed bag really. I have seen many different play styles with Mei, but generally she can be tough to follow as she has her own self heal and self freeze mechanism that can just leave you hanging with out her support for a short while.
- Genji - Following a Genji can be very beneficial but also very dangerous. Genji is a flanker and harasser, so he usually is off in unpredicted spots where things can be more deadly to Mercy. Genji's Swift Strike can also make it harder for Mercy to keep up with him.
- Tracer - Tracer's insane mobility makes it incredibly hard for Mercy to keep up with her. Tracer is also a flanker and harasser so she will be in dangerous places for Mercy to be at.
- Reaper - Reaper can be very beneficial to buff, but since he is also an offensive hero that flanks and harasses he can be dangerous to follow around. When Reaper activates his Wraith Form he will just leave you hopeless with no backup support and usually no one else to fly to.
- Mercy - There is virtually no point in following another Mercy, unless you have another damage dealing hero to follow too.
Putting all four of the charts I put together above (healing, safest to follow, damage boosting ultimates and regular weapons) I have decided to rank all the heroes into one chart to show which heroes end up having the most use when allied up with a Mercy, check it out:
NOTE: Remember this chart is just a rough estimate and is subject to change in the future. I gave the healing score a +50% bonus, since I feel like it's the most important value for Mercy.
| Hero | Total Score |
Healing | D-Boosting Weapons |
D-Boosting Ultimates |
Safest |
|---|---|---|---|---|---|
| McCree | 70 | 28 | 19 | 8 | 15 |
| Zarya | 66 | 31 | 16 | 2 | 17 |
| Bastion | 59 | 12 | 21 | 10 | 16 |
| Pharah | 58 | 24 | 17 | 11 | 6 |
| Soldier 76 | 58 | 3 | 20 | 15 | 20 |
| Reinhardt | 56 | 30 | 4 | 3 | 19 |
| Winston | 51 | 27 | 6 | 5 | 13 |
| Hanzo | 51 | 24 | 11 | 7 | 9 |
| Junkrat | 48 | 23 | 18 | 0 | 7 |
| Genji | 46 | 21 | 8 | 13 | 4 |
| Torbjorn | 45 | 20 | 5 | 9 | 11 |
| Roadhog | 43 | 14 | 9 | 6 | 14 |
| Zenyatta | 41 | 8 | 15 | 0 | 18 |
| Reaper | 41 | 14 | 13 | 12 | 2 |
| Symmetra | 40 | 16 | 12 | 0 | 12 |
| Widowmaker | 36 | 18 | 10 | 0 | 8 |
| D.va | 28 | 4 | 14 | 0 | 10 |
| Lucio | 29 | 1 | 7 | 0 | 21 |
| Mei | 18 | 6 | 3 | 4 | 5 |
| Mercy | 13 | 11 | 1 | 0 | 1 |
| Tracer | 12 | 6 | 2 | 1 | 3 |
Main attacking weapon Mercy shoots a round from her sidearm. It's best reserved for emergency personal defense. Ammo: 20Fire Rate: 5 rps Damage: 20 Reload time: 1 second Headshot?: YES Default Hotkey: 2, then: LM |

Mercy's Caduceus Blaster is actually quite powerful for what it is. Mercy's Blaster gun works similar to D.va's Human blaster gun, but Mercy's is about 15% stronger overall. Although, Mercy's blaster is not used as often since it cannot be used at the same time with your Caduceus Staff's healing and damage boosting beams. Mercy's blaster is best used in any situation where you cannot use your healing or damage boost beam on an ally. Keep in mind that you can still use Guardian Angel to fly to an ally while having your blaster out and firing at the same time as well.
Automatic Reloading
Keep in mind that your blaster will automatically reload when you switch back to
your Caduceus Staff, as long as you give it the full reload time of one second
before switching back to your blaster.
Weapon Hotkeys
The default hotkey scheme for Mercy is "1" for Caduceus Staff and "2" for
changing to her Caduceus Blaster. I actually recommend changing it so you
only have one button binded to "Next Weapon". This way you will only need
one button for switching between your two weapons.
Uses for Mercy's Caduceus Blaster:
- Anytime you do not have the capability to fly to an ally to assist them is anytime good for having your blaster out.
- If you are following an offensive hero and he/she uses an ability that leaves you without their support for a short period of time and no one else is around to fly to. Examples of this include: Mei's Cryo-Freeze, Reaper's Wraith Form, Genji's Swift Strike, Tracer blinks too far from you, and Zenyatta using Transcendence.
- When you are running back to the fight after dying you may run into offensive heroes trying to pick off heroes running back into battle. Have your blaster ready in case this happens.
- For helping your allies shoot down Junkrat's Rip-Tires.
- For shooting down Symmetra's Sentry Turrets that you have spotted that your other allies may have not noticed.
- If an enemy McCree is using his ultimate Deadeye and you are out in the open, it is better to whip out your blaster and attempt to help take him out before he can fire, the exception here is if you are damage boosting a long range damage dealer.
- If you see Junkrat's traps and mines laying on the ground take them out with your blaster before any ally runs over them.
Ability with cooldown Mercy flies towards a targeted ally, allowing her to reach them quickly and provide assistance in crucial moments. Cooldown: 1.5 secondsRange: 30 meters Default Hotkey: Shift NOTE: Keep in mind that you can cancel the ability while in mid flight by pressing the hotkey again. |
Even though Mercy is only able to heal/boost one ally at a time, Guardian Angel allows Mercy to have the mobility to get around to all nearby allies quickly and provide support for them. Only having a 1.5 second cooldown means Mercy can use this ability very often. Being able to use this often means you can constantly fly to each ally and heal them up and then quickly move to another ally to keep the heal train going. Guardian Angel allows you to keep your whole team healed very efficiently and allow you to damage boost certain allies at the right times.
For knowing the importance of who to fly at before others, just follow the lists I have above for Mercy's Caduceus Staff. Once you memorize those lists, you will have a much better understanding of when to use the Guardian Angel ability, with the right allies and at the right times. Also keep in mind you can use Guardian Angel on dead allies as well, this can give you another place to quickly fly at if you need to.
Mercy's escape mechanism
Guardian Angel is also used as an escape mechanism to get away from enemies.
If you see that you are getting too close to the enemy or in a dangerous
situation, simply use Guardian Angel to quickly fly to an ally that is in a
safer spot than your current position. A good example of this is right after an
enemy Roadhog Chain Hooks you into him. Simply fly back to your team to
save yourself.
Guardian Angel Custom Control Settings
By default, Mercy will prefer the target that she has her beam on to fly to once
she activates Guardian Angel. I highly recommend turning this off in
Mercy's custom control settings. The setting is labeled as "Guardian Angel
Prefers Beam Target". By default it is "ON". I recommend turning
this "OFF". Turning this off will give you more precise control of flying
to the ally that you actually have your crosshair pointed to, which simply
allows you to have greater control with Guardian Angel.
Passive Ability Propelled by her Valkyrie suit, Mercy slows the speed of her descent from great heights. Default Hotkey: Hold down the jump button in the air. |

Angelic Descent allows Mercy to slowly fall to the ground. This comes in handy when following heroes that can fly, such as Pharah or D.va with her Boosters. To use it simply hold down the jump button when you are in the air.
You can also use this ability for mobility purposes to get to ledges that are higher up. For example, first fly to a Pharah in the sky or any ally that is high up on a ledge such as a Widowmaker sniping on a high perch. Once up there, you can then jump and hover to other high platforms or ledges. This can provide a shortcut to quickly reach other heroes that are in different rooms or hallways.
|
ULTIMATE |
Ultimate Ability Mercy radiates restorative power, bringing nearby dead allies back into the fight with full health. Cast Time: noneRange: 15 meters Default Hotkey: Q |

Mercy's Resurrect is considered one of the most powerful ultimates in Overwatch. Resurrect can easily turn the tide around from a losing battle.
Mechanics of Resurrect:
- Upon activation of Resurrect, Guardian Angel will reset its cooldown immediately.
- While performing a resurrection, Mercy becomes temporarily invulnerable along with the allies being revived.
- Mercy does not stop when casting Resurrect as she can continue moving in the direction she was going.
- During the animation of Resurrect, allies will appear yellowish as they fade back in. During this time these allies are invulnerable to damage and unable to move or react until they fade totally in.
- Resurrected allies will be able to maneuver after 2.25 seconds.
- All allies Resurrected will return to full health.
- If you are hovering in the air and then activate Resurrect you will be able to continue hovering.
- Resurrect only works within 10 seconds of an allies death.
- Resurrect currently has a range of 15 meters.
- Mercy can Resurrect allies even if they are behind walls (or out of her line of sight).
- Before using Resurrect, you will see an indicator on your screen that shows how many allies will be resurrected before activating it:
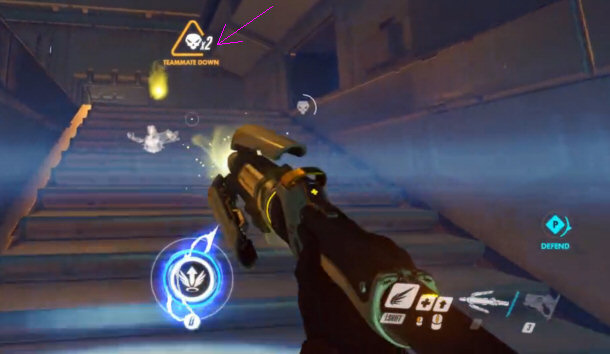
Strategies for using Resurrect
- After an ally dies on the battlefield, try to take a mental note on where that ally died, so when you use Resurrect, you will know where your allies will get resurrected at.
- Always keep an eye on the Kill Feed to let you know exactly what hero died to let you know what hero will get resurrected.
- Sometimes you may want to refrain from using Resurrect, especially when your allies died at a heavily guarded area and will most likely die again after getting resurrected. This knowledge will become more natural the more you use Resurrect.
- Resurrect is a good counter to Zarya's Graviton Surge, since all resurrected allies will be brought back to life in the same spot allowing them to quickly regain control of the map again as long as they are not overly bombarded with more AOE damage.
Knowing when to use Resurrect or not
Obviously it's more efficient to resurrect more than one ally at once, but a lot
of times you will have the option to Resurrect only one ally and it might sound
tempting to do so. There are several factors that come into play when
knowing when to use resurrect or not and they are hero specific for the most
part. One of the biggest factors is how long it will take for the dead
hero to get back to the fight. Some heroes have the capability to get back
to the fight faster after dying much quicker than other heroes and you should be
aware of this info. Please check out the list below for the fastest heroes
at getting back to the fight faster.
Heroes that are more important to be Resurrected than others
- Reinhardt - Reinhardt can use a Charge to get back to the fight a tad faster after dying, but getting his shield back out on the battlefield is very important and he deserves to be high on the list of allies to Resurrect first.
- Zarya - She is a slow moving hero and a tank that will greatly benefit from being Resurrected.
- Roadhog - Roadhog is a very slow moving hero and as a tank he is a great candidate to be resurrected.
- Zenyatta - Zenyatta is a slow moving hero and will take a while to get back to the fight faster after dying. His Discord and Harmony Orbs are very useful and overall he is high on the Resurrect list.
- McCree - McCree is somewhat slow at getting back to the fight faster after dying and will greatly benefit from getting resurrected.
- Bastion - Bastion is a slow moving hero, but he generally needs a good backup from tanks and backup to be of use on the battlefield. Make sure if you Resurrect him that there will be others nearby to protect him.
- Mei - On some maps Mei can use her Ice Walls to take shortcuts to get back to the fight faster, but overall she benefits from getting back to the fight faster from resurrect more so than most other heroes.
- Winston - Winston can use his Jump Pack leaps to get back to the fight faster after dying.
- Pharah - Pharah can use her Jump Jets and Concussive Blasts to propel herself back to the fight faster.
- Junkrat - Junkrat can use Mine jumps to get back to the fight a tad faster, but only by a small margin. His traps will remain out in the battlefield even after he dies too.
- Hanzo - Since Hanzo can climb walls and start firing away at enemies from long distances, I would put him right in the middle of heroes that will benefit the most from resurrection.
- Mercy - Mercy is a slow moving hero, unless she has someone to fly to and will usually take longer to get back to the fight faster than other heroes.
- Torbjorn - Even though Torbjorn is a slow moving hero, his turret can still fight for him even after dying. If you see that Torbjorn's turret is still out and healthfully firing away at things then resurrecting him is not as important than if his turret is not out on the battlefield.
- Widowmaker - She can use her Grappling hook to quickly get back in the action and start firing away from long distances, as such she is lower on the list of heroes to be resurrected before others.
- Genji - Genji's superior mobility with wall climbing, double jumping in the air, and Swift Striking will enable him to get back to the fight a bit faster. He can also start firing at enemies from afar with his shurikens.
- Reaper - Reaper can Teleport back to the fight faster with his Shadow Step ability.
- D.va - D.va's boosters enable her to quickly get back to the fight faster after dying and she is low on the list of heroes to resurrect because of this.
- Symmetra - First off, both heroes have capabilities of getting heroes back to the fight faster after dying. But Symmetra's Teleporter can still compliment Mercy's Resurrect to provide a "backup" source for getting allies back to the fight faster after death. With that said, resurrecting Symmetra is low on the list since she can use her teleporter to get back to the fight faster and she can have Sentry Turrets out still doing her dirty work even while she is dead. If her Teleporter is not out, then resurrecting her would be more important then.
- Tracer - Tracer can Blink back to the fight very fast after dying, as such she should be lower on the list of heroes to get resurrected. In fact she is overall the fastest hero at getting back to the fight faster after dying, besides someone using Symmetra's Teleporter (or Resurrect).
- Soldier 76 - Soldier 76 can Sprint back to the fight faster after dying. He is the second fastest hero of getting back to the fight faster after dying (after Tracer). He can also start firing at enemies from long range with his Pulse Rifle and Helix Rockets.
- Lucio - Lucio's speed aura combined with his Amp It Up ability enables him and other nearby allies to quickly get back to the fight faster after dying. Lucio is the 3rd fastest hero of getting back to the fight faster after dying. Lucio is also a healer, but since Mercy is a healer as well, Lucio's healing will mean less for the match. This makes Lucio the least important one to be Resurrected.
So if you see that you have the option to Resurrect 1 or 2 heroes, and both of those heroes are very low on the list, then I would consider waiting until either more heroes need resurrected or one of those heroes high on the list also happens to die that would greatly benefit from getting resurrected.
Mercy's Strength and Weaknesses Vs Other Heroes

Junkrat: Junkrat's grenade spam can be a problem for Mercy. Even taking cover behind walls can still expose you to Junkrat's bouncing grenade spam. If you are getting spammed by Junkrat you should reposition yourself safer or go to another ally. Pharah is a safe ally to support against Junkrat as he will have a really tough time aiming grenades at targets in the air.
Since Mercy follows behind her teammates, she will rarely ever run into Junkrat's traps or mines, and will be able to heal up damage from allies that falls prey to his traps as well.
For Junkrat's Rip-Tire ultimate, you can use your Guardian Angel (flying ability) on an ally to propel yourself away from the incoming tire. Otherwise you will have to whip out your pistol real quick to try and shoot it down or use damage boost on an ally that is already shooting at it.
There is currently a big debate during beta with Junkrat's grenade spam and Mercy healing all the damage from the spam. The issue is that Mercy gains ultimate charge while healing her allies. This means that Junkrat's spam is essentially enabling her to reach her ultimate Resurrect faster and more often when healing up Junkrat grenade spam. This is in current debate and could change in a future patch. This is currently why I have her listed as a counter to Junkrat.
After Mercy uses Resurrect, Junkrat has the capability to put down a trap and mine on one of the resurrecting heroes to deal massive damage to one of them.

Zarya: Although Zarya can easily kill Mercy in combat with her explosive charge AOE shots, Mercy is deadly mostly due to Resurrect. Resurrect is a hard counter to Zarya's ultimate Graviton Surge. As long as Mercy doesn't get trapped in the surge or is able to survive it (such as with a Projected Barrier), she can then resurrect all the dead heroes that died from the surge. This can make Graviton Surge very ineffective against Mercy. Mercy can also escape out of a Graviton Surge by using her Guardian Angel ability to fly to an ally that is further away from the surge.

Mei: Since Mercy rarely ever comes into close range with her enemies, she tends to give Mei a harder time since Mercy will rarely come into contact with Mei's freeze gun. If Mei does manage to get close to Mercy and start freezing her, Mercy can use her Guardian Angel ability to fly to another ally to escape out of it. Mei's Icicle shots can be effective but it is generally hard to aim at Mercy since she is constantly flying around to support her allies while taking cover behind walls or objects.
If Mercy pops out in the open, Mei can use an Ice Wall to isolate you from the rest of your team, which can make you a much easier target to shoot down.
Since Mercy usually stays in the backlines and away from Mei, she tends to be safer from Mei's ultimate Blizzard. If you do happen to get stuck in Mei's Blizzard, try to quickly fly to an ally that is out of Blizzard's range.

Tracer: Tracer's blink ability allows her to get almost anywhere on a map very quickly, this allows her to quite easily flank Mercy from virtually any direction.
As Mercy, in order to counter Tracer, simply keep moving. Keep jumping around supporting different allies, this will confuse Tracer on your whereabouts. If Tracer comes close to you, quickly fly to another ally to escape from her. If you are too late, Tracer might throw a Pulse Bomb (her ultimate) on you and there is nothing you can do to save yourself from that, unless an allied Zarya quickly throws you a Projected Barrier in time.

Reaper: Like Tracer, Reapers also tend to have an easy time getting close to Mercy. Up close and Reaper is very deadly with his shotguns. It's generally Reaper's job to take out Mercy, so you need to watch out for him. While supporting allies, look around you and see if Reaper is teleporting somewhere near you and respond accordingly by telling your allies about it.
If you see a Reaper approaching you, quickly fly away from him if you can by flying to another ally further away. Staying up close to Reaper for more than a few seconds will most likely kill you, especially when he uses his ultimate Death Blossom on you.

Ana: Mercy strong healing can be countered by Ana's Biotic Grenades. When thrown onto an ally, Biotic Grenades will prevent all healing done to that ally for a short period of time. This can be devastating, especially when trying to heal your main tank. Biotic Grenades will also prevent Mercy's auto health regeneration as well. However, keep in mind that when allies are struck with a Biotic Grenade, Mercy is still able to damage boost these heroes.
Mercy is relatively safe from Ana's Sleep Darts. Mercy has a relatively small hitbox and she will usually be too far away from Ana (since she is a long range sniper), plus Mercy's Guardian Angel ability makes her move faster, which will only make you a harder target to aim at.
One thing to watch out for is Ana's ultimate Nano Boost. A Nano Boosted enemy, especially on a flanker such as Tracer, Reaper, Genji or D.va will make it much easier for that enemy to flank Mercy.

Widowmaker: Mercy is relatively easy prey for Widowmaker. Even though it's easy for Mercy to take cover most of the time, the nature of jumping from ally to ally in order to support your team will eventually expose you to snipers such as Widowmaker. This becomes especially an issue when you support allies such as Pharah where you have to fly and then float in order to support her, easily exposing you to Widowmaker.
Widowmaker's ultimate Infra-Sight works really well against Mercy. Infra-Sight allows Widowmaker and her allies to see enemies behind walls. Since Mercy hides around walls or corners most of the time, Widowmaker and her team can predict when she comes within view much easier with Infra-Sight. So if you hear an enemy Widowmaker use Infra-Sight, be very careful when peeking around walls and corners.
Widowmaker's Venom Mines are virtually useless against Mercy since she is usually in the back lines with her team most of the time.

Roadhog: Mercy's flying ability makes her very susceptible to Roadhog's Chain Hook. Flying from ally to ally, or hovering slowly in the air, especially when supporting a Pharah can really make you susceptible to getting chain hooked in by a Roadhog. Once chained in, you cannot do much to escape it except try to use your flying ability to quickly go back to a nearby ally, but by then you will most likely perish to Roadhog's Scrap Gun.
Roadhog's ultimate Whole Hog can be used on Mercy to bat her away from healing her allies, but it's not too bad since you can simply use Guardian Angel to catch back up to your allies.
Before using Resurrect, make sure you are behind something that blocks Roadhog's line of sight, otherwise a Chain Hook on you will cancel your resurrection.

Soldier 76: Even though Soldier 76's flanking abilities are not as good as some of the other offensive heroes, I find Soldier 76 does fairly well against Mercy. She is a prime target for Soldier 76's Helix Rockets, and she is usually in medium to long range which is perfect for Soldier 76's pulse rifle.
Soldier 76's ultimate Tactical Visor is deadly against Mercy and she will be a prime target for it.
The best way to deal with Soldier 76 is to simply take cover and keep him out of your line of sight, hide behind walls and be careful when moving to different allies.

Genji: Genji's parkour abilities allows him to seamlessly move around the map and give Mercy a surprise attack from any unexpected angle. Like with other offensive heroes the best you can do is to keep moving and fly away from Genji if he gets close to you, especially when he pops his ultimate Dragonblade which will easily tear you apart.

Winston: Winston happens to be decent at flanking enemies with his Leap/Barrier combo and it works especially well against Mercy. After Winston leaps towards a Mercy he will then most likely put down a Barrier then start attacking with his short range Tesla Cannon. Since Winston can only attack in close range all you have top do is quickly fly to a further ally to avoid him.
It becomes especially difficult to counter Winston when he uses his ultimate Primal Rage. When Winston has Primal Rage on he can use his leap ability every 2 seconds which makes avoiding him very difficult to do, even when trying to fly to nearby allies, he can simply leap right after you. Just try to stay away from Winston as best as you can.

D.va: Even though D.va is a tank, she has the capability to flank Mercy thanks to her Boosters and Defense Matrix abilities. While D.va uses her Boosters she will knock down anyone in her path and she can use it along with Defense Matrix to block incoming shots while she is boosting. These abilities enables her to get close to Mercy to potentially take you out. Up close and D.va is very deadly with her Fusion Cannons.
As Mercy, keep your distance from D.va as best as you can. Fly to nearby allies to get away from her and try to keep her out of your line of sight so she can't hit you with her Fusion Cannons.
Be careful when D.va launches her Self-Destruct (ultimate) mech at you. If you see it coming you need to quickly take cover behind a wall. Remember you can try to fly to an ally quickly to help you get behind a wall faster to avoid the explosion.

Bastion: Although Mercy is usually out of Bastion's sight most of the time, you can occasionally pop into his view, especially when flying around to different allies to support them. The few instances where you do pop into his view, a Bastion Sentry can quickly take you out with his very high DPS.
Healing or buffing an ally attempting to attack a Bastion Sentry is no big deal for Bastion's insane DPS to tear through.
Mercy also has a difficult time supporting the offensive heroes that can counter a Bastion Sentry, since most of them have superior mobility that Mercy simply cannot keep up with. So not being able to support most of the heroes that Bastion will actually have troubles with makes her a bit weaker overall against Bastion.
However, Mercy does have ways to counter Bastion. Mercy's Caduceus Blaster is actually quite effective against a Bastion Sentry, especially if you can get behind a shield (or barrier) while spamming your blaster at him.

Hanzo: Hanzo is deadly against Mercy because he is able to shoot long distances along with being able to see behind walls with his Sonic Arrows. Being able to see behind walls gives Hanzo a big advantage against Mercy. You need to be extra careful around Hanzo and try not to go out in the open for too long or he can easily shoot you down with his bow. Hanzo can attempt to ricochet his Scatter Arrows behind walls and corners to potentially take you out as well.
Hanzo's ultimate Dragonstrike can be easily avoided by simply flying to an ally away from the stream of the Dragonstrike shot.

Lucio: Lucio and Mercy rarely interact with each other during matches due to their support roles in the backlines. Both heroes have similar roles to support and heal allies, however Mercy does a better job at healing single heroes with her Caduceus Staff than Lucio's heal aura. This could allow Mercy to have a tankier hero to fight up against Lucio's team. However unlike Mercy, Lucio is able to heal all his teammates while at the same time fire his weapon. Both Lucio and Mercy has their ups and downs as support and overall this isn't a real 1on1 matchup to consider as they both rely on their team to directly support them back.
As far as self defense goes for 1on1 battles, Lucio does a much better job at soloing enemies than Mercy thanks to his self heal and Sound Barrier ultimate. Mercy pretty much relies on at least one ally to protect her.

Mercy: Mercy Vs Mercy largely depends on which hero they are buffing and supporting and overall how well each Mercy does at supporting their whole team on keeping them healed and choosing priority heroes to heal and damage boost first. And of course which Mercy pulls off their Resurrect better at the right timings and placements of the reviving heroes.

Pharah: Pharah can often be found up in the air shooting rockets down in your area. The problem with this is that she has the capability to scout you out better than other heroes and the splash damage from her rockets can mean that she can hit multiple targets at once which will make keeping up with your healing a little bit harder.
To counter Pharah simply try to take cover as best as you can and if Pharah uses her ultimate Barrage you need to take cover ASAP by flying to another ally that is in a safe spot from her.

Torbjorn: Dealing with Torbjorn's turrets can be a bit tricky depending on what level the turret is. If his turret is a level 1 or 2 you should be okay with healing an ally that is tanking the damage from it, allowing you and your team to get close to it effectively. However if you are dealing with a level 3 turret with a Molten Core Torbjorn then you need to be extra careful because the turret will be able to do a lot more DPS than you can heal per second. This, along with Torbjorn's increased damage and armor output can give you a hard time.
If Mercy gets targeted by Torbjorn's turret, it won't take long at all to take her down, so do your best to make sure another ally is taking damage from the turret instead.

Reinhardt: Luckily it's generally not Reinhardt's job to kill Mercy, but in close range he can be very dangerous to anyone. Up close and Reinhardt can knock you down with his ultimate Earthshatter or do powerful melee strikes at you.
Reinhardt's biggest weakness is his lack of vertical mobility so supporting allies that are higher up on ledges is a very effective tactic against him. As long as you take cover you should be able to avoid his Fire Strikes, which he can fire at even if you are up on a ledge.
After using Resurrect, Reinhardt can somewhat counter it by charging one of the resurrecting allies or he can use an Earthshatter to knock them down, giving your enemy an easy opportunity to take them out again.

McCree: McCree has the weakest mobility out of all the offensive heroes. Because of this, you generally don't need to worry about him flanking you. However McCree's Peacekeeper is still effective at short to medium range and he still has the capability to do damage to you from any range.
Also it's important to stay far away from him as you can because up close he can quickly take you out with his flashbang and fan fire combo. If you see him approaching you, simply fly away to another ally to get away from him.
When McCree uses his ultimate Deadeye, quickly take cover as fast as possible by flying to an ally that will block your line of sight between you and McCree.

Symmetra: Symmetra is not much of a direct threat to Mercy. You just need to dodge her slow moving Photon Orbs which can penetrate through all targets including shields and enemies. If she happens to get close to you, fly away from her short range Photon Projector beam.
Always be careful when walking into rooms or hallways as you can run into Symmetra's Sentry Turrets. Just make sue you follow an ally as you walk into rooms and hallways so your ally can take the damage from her turrets so you can easily heal the damage up.
Unfortunately there isn't much Mercy can do about Symmetra's ultimate Teleporter, as Mercy is not mobile or offensive enough to go hunt them down. If you do happen to see her Teleporter, just whip out your pistol and shoot it down.

Zenyatta: If Zenyatta puts his Orb of Discord on you, then you need to be extra cautious of which ally to support. Do your best to stay far away from your enemy and stay hidden behind walls or shields as best as possible to waste his Discord Orb or you can quickly die with the additional damage done to you. Staying behind walls or shields will also further protect you from Zenyatta's energy orbs as well.
Mercy can use her Guardian Angel ability to quickly fly to an ally that is closer to a wall for her to get behind to remove the Discord Orb.
Mercy's Allied Synergies Guide
News/Home | Blog | Follow | Unlock Full Guide
Attack |
Defense |
Tank |
Support |
 Genji
Genji Bastion
 D.va
D.va Ana
Ana McCree
 Hanzo
Hanzo Reinhardt
 Lucio
Lucio Pharah
 Junkrat
 Roadhog
 Mercy
Mercy Reaper
 Mei
Mei Winston
 Symmetra
 Soldier76
 Torbjorn
 Zarya
Zarya Zenyatta
 Sombra
 Widowmaker
 Tracer
Map Guides
 Temple of Anubis
 Hanamura
 Watchpoint Gibraltar
Overwatch Hero Introductions - Basics Guide
How the Mechanics Work in Overwatch
How Headshots Work In Overwatch
Overwatch Game Modes Overview
Overwatch Health Types & Hitpoint Basics
Overwatch Terms, Abbreviations, & Their Meanings
Easiest and Hardest Overwatch Heroes to Master
My Hotkey
Bindings For Overwatch & Why I Use Them
|
Feel free to leave any type of comment, such as how you like the guide and if it helps you at all, or to report something that is inaccurate in the guide. |
